Edge Chromium Default Search Provider

With more and more organizations and users adopting the Microsoft new Edge Chromium based browser. One of the most common requests are setting the default search provider. The most common request I get is setting it to Google but there are other providers out there and even specific ones for some systems and sites.

Finding the search provider string

First we need to find the search provider string that is supposed to be entered. The easiest way I’ve found, is actually using the browser to first visit the site and using the built in auto discover let Edge find the correct search terms and extracting them.

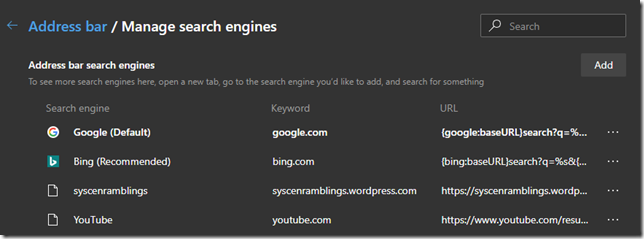
Let’s start by putting in “edge://settings/searchEngines” in the address field and you will end up on the correct page. In here all the search providers are already listed for you.

image

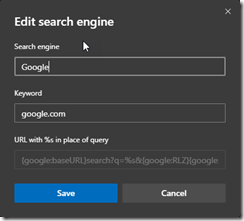
Hittig the … and then Edit, at the end will give you some options for that specific provider. You can set the name and the keyword. You will also have a locked field for URL. The URL part is what you need to use in a GPO or MDM later.

image

Setting the policies needed

Now all that remains is setting the policies needed. For this to work you will need to have the admx templates for Microsoft Edge. The templates can be found here Edge MSI and ADMX download

Next you need to edit the settings found under either User Configuration / Policies / Administrative Templates / Microsoft Edge / Default search provider or Computer Configuration / Policies / Administrative Templates / Microsoft Edge / Default search provider. Note that one location is enough as long as it linked to the correct type.

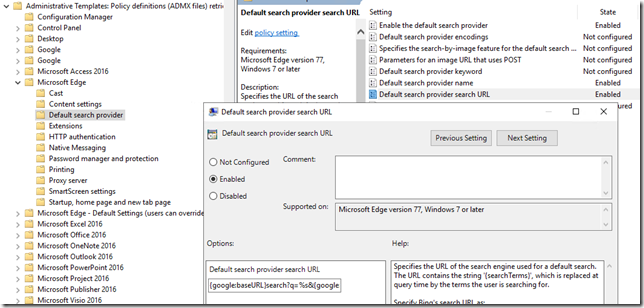
Configure the Default search provider URL and past the URL copied from the previous section.

image

Make sure to also configure Enable the default search provider. As an optional you can specify how the search provider name will be displayed by setting the Default search provider name. All settings are visible in the screenshot above.

Summary

This way you can configure any search provider you want, and even take it a step further and configure a predefined list using other GPO/MDM options. The new Edge policies really make this a enterprise class browser.

/Peter
Enable TPM inventory

So a couple of weeks ago I wrote a post on how to verify that your computers are running UEFI and SecureBoot (read here). After that there was a post on the importance of staying supported with up to date hardware (read that here). As a follow up to both of them there is another part that should be monitored as we move deeper into to Windows as a Service. This becomes especially true when we look at todays security landscape and the need to enable all of the new security features.

Some of these new features requires TPM and furthermore some require TPM 2.0. Now this can be inventoried using tools like Microsoft Endpoint Manager. The issue here is that by default ConfigMgr only inventory information about if TPM is present, enabled and owned. It does not keep track of TPM spec version.

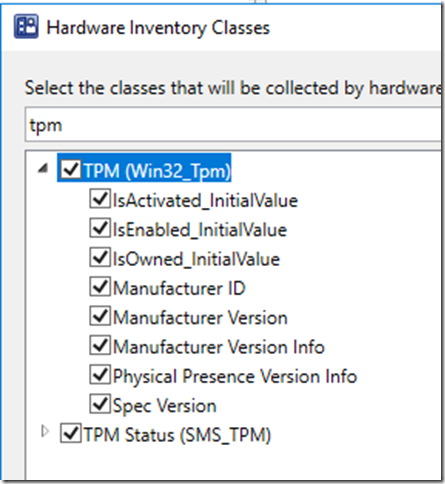
So this will be a quick fix! Open up your client settings that targets your workstations and laptops and make sure to enable the TPM spec version. Check out the hardware inventory page and the classes part. If you do a quick search for TPM you will find that spec version is not check. So go ahead and check that. Watch the inventory data flow in and make decisions based on it!

TPM

Happy deployments!

/Peter

Supported Hardware

For some reason the last couple of engagements there has been discussions on what its means to run supported hardware for your devices and why that is imported. For me this has always been a no brainer, I refuse to be last person to solve everything. This applied to everything I do, if there is an issue I don’t want to be that last stop, the one everyone expects to magically fix everything. This is especially true for devices so I always make sure the devices that we run are supported.

Now in the old days of Windows 7 this was not a big issue. The same device that was supported 5 years ago was usually still supported later on as well and since the same OS was run all was the same. With Windows 10 its a different story. And before you start screaming about “<insert brand name> should fix this” or “I will switch to <insert other brand name>” you need to consider why this is happening and what the consequences of a change actually are.

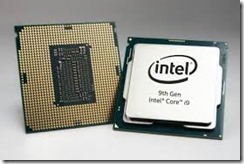
So if we look at why, well its pretty simple and as a lot of other things it basically boils down to money. Intel/AMD wants to make more money, they way they do that is to sell more CPUs. To sell more CPUs to enterprise customers (who don’t just change CPUs) they need to speed up how often they release new versions of the CPUs. This together with the fact that newer CPUs are more secure and faster by design means the Microsoft also have to step up and release new versions of the OS more often (exactly how often is a different discussion). But this all means that the vendors have to supply new models with the new CPUs more often and since they don’t want to support a million different models (cost money to support) they move the support cycles.

intelCPU

The other side of this is that even if you where to change to different vendor, odds are they are doing the same thing and you would still have all of your old models laying around and you would still have to deal with them. With all of what that entails both regarding support and firmware updates.

So if we establish that we cannot solve the issue by moving to another vendor the solution is then to have a lifecycle process to make sure old hardware is replace in a timely fashion. This will beside the point of making sure you are supported also make it easier to stay compliant with patching, firmware updates and so as you will get better control on the actual devices running in the your organization.

So there are three links that you should keep track of (since I am assuming you are running one of the big vendors). The list is without any preference and available to help you find the information.

For Lenovo
https://support.lenovo.com/se/en/solutions/ht509394

For HP
https://support.hp.com/bg-en/document/c05195282

For Dell
https://www.dell.com/support/article/us/en/04/sln297954/dell-computers-tested-for-windows-10-november-2019-update-and-previous-versions-of-windows-10?lang=en


Happy deployments!

/Peter

#MEMCM and the stuck hotfix

While doing a new install at a customer the last couple of weeks we ran into a strange issue. To make matters worse this is an offline site so all the normal posts and tricks don’t apply.

Now the issue here is that when we run the serviceconnectiontool it will create a telemetry file and download needed hotfixes and upgrades. Now this all works as intended, the challenges is that once the dowloaded files have been imported over and the tool run on the primary again the hotfix is stuck as “available to download”. Now in most scenarios a simple restart of SMS_EXECUTIVE or kick the download process a bit. However, in a offline scenario re-downloading the patch doesn’t really help.

After a bit of looking and trouble shooting it turns out that I’m not the first (and probably not the last) to encounter this. Now Prajwal Desai has made a post on how to fix that on an online system, read the full post here https://www.prajwaldesai.com/sccm-1906-hotfix-download-issues/. What he either doesn’t know or have encountered yet is that the same principles apply to offline systems as well, meaning you should run the serviceconnectiontool as described in the official documentation. When done you still execute the storeprocedure spAddPackageToDownload with the guid as described. Restart the SMS_EXECUTIVE service and wait for extraction of the cab file to happen. The the hotfix will be available to install as expected.

MEMCM1906HF

A shoutout to Parjwal for documenting the fix!

Happy deployments!

/Peter

Staying secure with UEFI and SecureBoot

One of the bigger issues I still see with a lot of customers is devices that has still not been converted to run UEFI and SecureBoot. This will prevent you from enabling a bunch of security features in Windows 10. This includes but is not limited to new features such as Credential Guard (to protect your identities).

If you already have ConfigMgr CB today the new SMS_Firmware class is enabled by default in hardware inventory. By using this information we can get insight into the environment and see how many machines should be converted. Now you can either create collections for this or if you just need to know and want to use the data for a presentation or something like that a simple SQL query can be used.

Running the following SQL query would give you status for SecureBoot and UEFI.

select Secureboot00, UEFI00 from Firmware_DATA

The downside here is that you won’t see what devices. The next issue would be that certain bios versions won’t have full support for UEFI and SecureBoot. Furthermore there are certain vendors and models that requires specific BIOS versions to support new features like Credential Guard. This can however be fix by running a slightly more complex SQL query

select
Case
When SecureBoot00 = 0 Then ‘FALSE’
When SecureBoot00 = 1 Then ‘TRUE’
End AS SecureBootEnabled,
Case
When UEFI00 = 0 then ‘FALSE’
When UEFI00 = 1 Then ‘TRUE’
End AS UEFIEnabled,
dbo.vSMS_R_System.Name0 as PCName, v_GS_WORKSTATION_STATUS.LastHWScan as LastScan
,PC_BIOS_DATA.ReleaseDate00 as BIOSReleaseDate, PC_BIOS_DATA.BIOSVersion00 as BiosVersion
from dbo.Firmware_DATA
Inner Join dbo.vSMS_R_System on dbo.Firmware_DATA.MachineID = dbo.vSMS_R_System.ItemKey
Left join v_GS_WORKSTATION_STATUS on dbo.vSMS_R_System.ItemKey = v_GS_WORKSTATION_STATUS.ResourceID
Left join PC_BIOS_DATA on dbo.vSMS_R_System.ItemKey = PC_BIOS_DATA.MachineID
order by PCName

The output from this gives you a nice list with the status of SecureBoot, UEFI, PCName, bios release date and bios version. Something like below which can then be exported to excel or PowerBI.

SecureBootUefi

Happy deployments!

/Peter

Nice to Know – Defender Sandbox

So another step in the right direction for Windows Defender, it can now run in sandboxed mode. For now you have to turn it on but in the future that will be default.

If you want to read more about the release of this check out the cloudblog from MS here https://cloudblogs.microsoft.com/microsoftsecure/2018/10/26/windows-defender-antivirus-can-now-run-in-a-sandbox/?fbclid=IwAR1BX92wvaqmse7bgucQtPbi_Si6XY1cMfIec9JW1XttX-4wqttIU39mokM

So lets assume you also run ConfigMgr, now this is where its gets intreseting. We can then use a CI to track if it has been turned on!

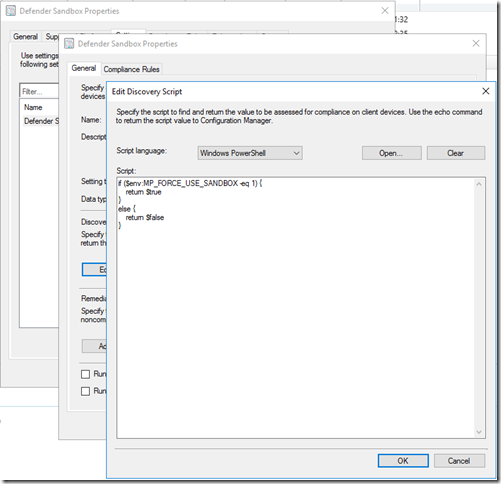
This is done using a very simple detection script.

image

Here is the small code snippet used to track compliance.

if ($env:MP_FORCE_USE_SANDBOX -eq 1) {
  return $true
}
else {
  return $false
}

Now two things remain, set the data type to boolean and as compliance set to “True”.

All set to measure this. Of course a simple script or package can now be used to force the setting of this, just remeber that its only supported on Windows 10 1703 and later and will require a reboot before taking effect.

Happy deploymnet!

/Peter

Windows Server 2019 Server Manager

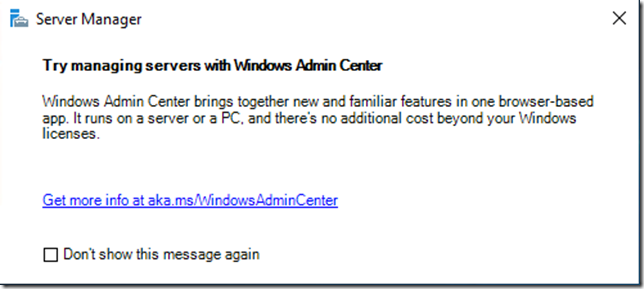
We all like the new admin center, right? But logging on to a new shiny Windows Server 2019 and getting a popup saying “hey you know about Windows Admin Center” thats not my idea of nice server management. Pops ups should be killed with fire! So when I first saw the box below well that got me thinking, how do we get rid of it before I even log on?

image

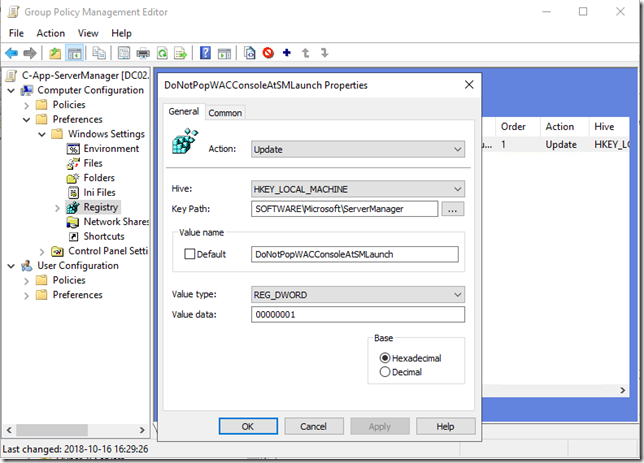
Answer to this is simple, this is controlled by a registry value and as such subject to the power of group policy preferences. Create a new GPO and create a new registry item following these settings

Hive: HKEY_LOCAL_MACHINE
Key Path: SOFTWARE\Microsoft\ServerManager
Value name: DoNotPopWACConsoleAtSMLaunch
Value type: REG_DWORD
Value data: 00000001

image

Now hit ok and then link the policy to you server OU/OUs. Done, no more annoying popup!

/Peter

Windows 10 – Lifecycle change AGAIN!

Update 2018-09-07: Michael Niehaus was kind enough to supply some additional information on this subject. So to clarify this post and the information from MS. The currently available versions of Windows 10 Enterprise and Education will have 30 months of support and future releases starting with 1809 and 1903 will have 30 and 18 months of support.

Niehaus has also stated that Microsoft is still commited to deliver innovation and new features for every single Windows 10 release.

Orignial Post:

So its happend again, the lifecycle supportstatment surrounding Windows 10 has been changed. Some say for the better, but it remains to be seen. The change only applies to Enterprise and Education SKUs and only to the september relase of every year. So if you are on 1703 nothing has changed but if you are on 1607 or 1709 there has been some changes.

The new change is that Enterprise and Education now get 30months of support. There is also a small note to be made about a statment of the lifecycle facts page stating

“…you’ll need to install the latest feature update to help keep your device secure and have it remain supported by Microsoft.”

Which would mean that unless you apply the latest CU every month you are not really supported. How this will be “enforced” remains to be seen.

For more detailed information and source of the change review the lifecycle fact page from Microsoft here https://support.microsoft.com/en-us/help/13853/windows-lifecycle-fact-sheet

One last thing to note, up until now Microsoft have only been testing upgrading the previous version to the lastest version of Windows 10, example when 1709 was released the only path that was tested was 1703->1709. With the new support statement you might have an urge to skip versions. However unless Microsoft changes their test protcoll and actually tests jumps like 1607->1709 it might still be worth going with every version, altho not as quickly as before.

Support dates as of 2018-09-06

image

/Peter

The Death Of MBAM

Update: 2018-10-06
Microsoft has given out information that MBAM is not been removed but instead put into sustained engieering. Meaning it will continue to work and continue to recive bug fixes but no new features will be added. This also means that support for future Windows 10 release as well as new SQL release should be added.

This should hold true until Microsoft has a feature by feature compareable service elsewhere (Azure most likley).


Microsoft Bitlocker Administration and Monitoring (MBAM) has now recieved its finaly date. This means that if you have already implemented MBAM you have a couple of years to migrate away from it, but if you haven’t implemented it and was about to do so. Please refrain from it.

Mainstream support will end July 7th 2019, meaning up until that date new “features” will be brought out to support newer SQL versions and the like.

Extended support will end on July 7th 2024, meaning after this date there will be no security patches and no support at all available.

image

Hopefully Microsoft gives a solution to rotating keys and self-service through Active Directory or Azure Active directory soon to fill the gap between MBAM and a standarnd Bitlocker implementation.

/Peter

Improving the Windows 10 Upgrade Sequence

When you upgrade to Windows 10 or between diffrent Windows 10 versions there are genearlly several things you wish to do. This can include removing “bad” applications or install drivers. Among some common things that needs to be taken care of is diffrent pre-requisites and language packs. This posts covers some things you can improve in your Windows 10 upgrade sequence.

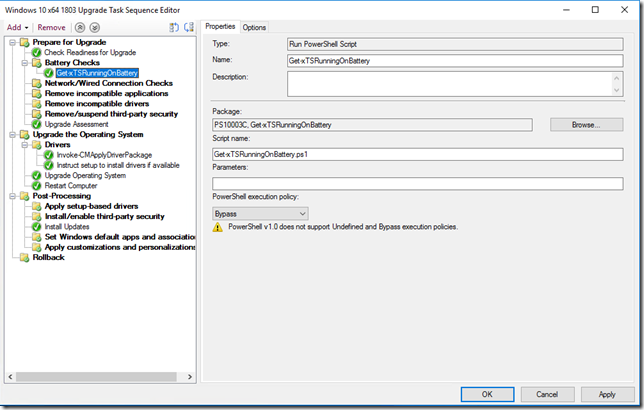
The small things first. As more and more users are working from a laptop a common problem is that someone intiates the sequence when the users has 10% battery left. Now the predicatable outcome is broken upgrade and rollback. To prevent this we can enable a small check to verify if the machine is running on battery power and if so exit the sequence quickly all while we leave a log trace for admins to track.

First we require a small powershell script, download that from here https://github.com/LofgrenP/Scripts/blob/master/Get-xTSRunningOnBattery/Get-xTSRunningOnBattery.ps1

Create a package with source files but no program. Then add a Run PowerShell Step in the begning of your sequence. Use the new package that has been created and set the script name to Get-xTSRunningOnBattery.ps1. Set the execution policy to ByPass.
image

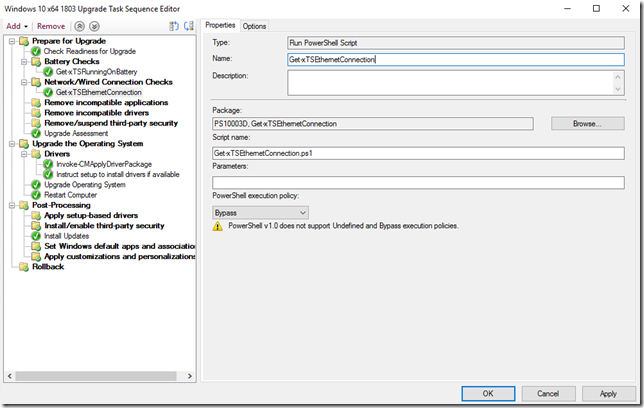
That will take care of machines running on battery. Next common issue is that machines not connected to the wired network won’t reconnect to the network after a restart. To assist with this we can make sure that the upgrade does not run if its not a wired connection.

Download the script needed from here https://github.com/LofgrenP/Scripts/blob/master/Get-xTSEthernetConnection/Get-xTSEthernetConnection.ps1

Create a package with source files and no program then add another Run PowerShell Step in the beginning of your sequence. Use the new package that has been created and set the script name to Get-xTSEthernetConnection.ps1. Set the execution policy to ByPass.
image

With that taken care of lets move on to sorting the language packs. To sort this there are two things we need to sort out. First up is making sure to reinstall all language packs that are already installed. Now Nickolaj Andersen over at SCConfigMgr has an awesome post on how to do that, read that here http://www.scconfigmgr.com/2017/11/06/automatically-retain-installed-language-packs-during-windows-10-servicing/

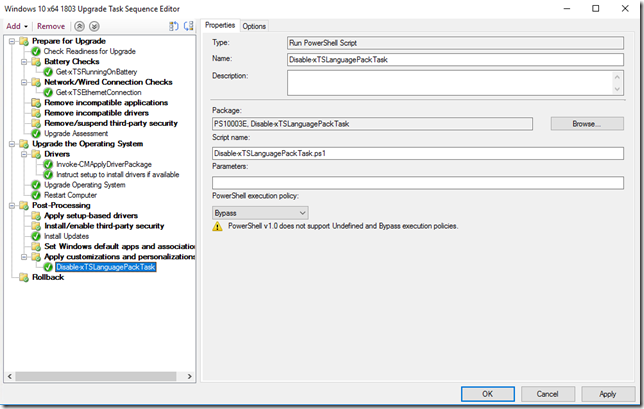
The final piece to the pussel is making sure that the Language Pack scheduled task does not run. This can be achived in many ways but I prefer to just disable the task after the upgrade is done. For that reasone you can download a small script here https://github.com/LofgrenP/Scripts/blob/master/Disable-xTSLanguagePackTask/Disable-xTSLanguagePackTask.ps1

Now we create another package with source files but without any program and add a final Run PowerShell Step to our upgrade sequence. This time at the very end of the sequence. Make sure to use your new package, set the script name to Disable-xTSLanguagePackTask.ps1 and set the execution policy to ByPass.
image

Now you should be all set to upgrace your machines.

Happy deployments!

/Peter