Windows Server

Windows Server 2019 Server Manager

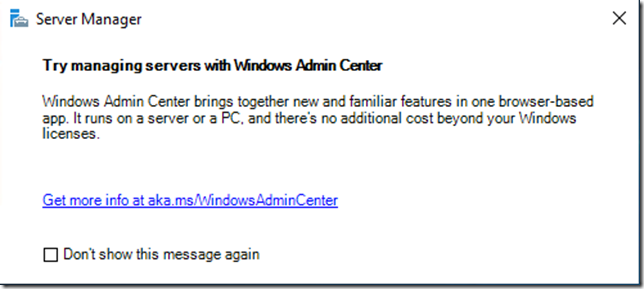
We all like the new admin center, right? But logging on to a new shiny Windows Server 2019 and getting a popup saying “hey you know about Windows Admin Center” thats not my idea of nice server management. Pops ups should be killed with fire! So when I first saw the box below well that got me thinking, how do we get rid of it before I even log on?

image

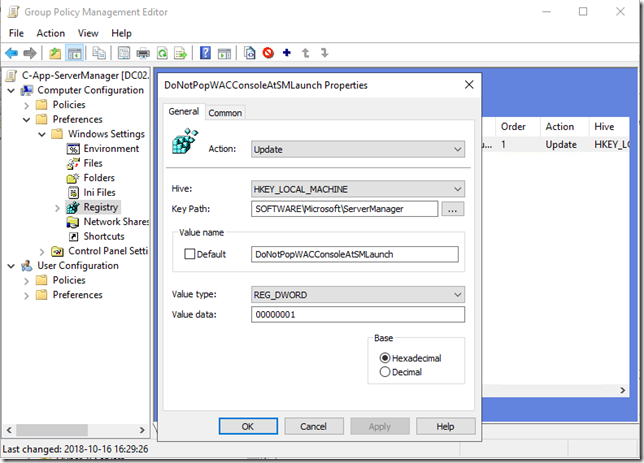
Answer to this is simple, this is controlled by a registry value and as such subject to the power of group policy preferences. Create a new GPO and create a new registry item following these settings

Hive: HKEY_LOCAL_MACHINE
Key Path: SOFTWARE\Microsoft\ServerManager
Value name: DoNotPopWACConsoleAtSMLaunch
Value type: REG_DWORD
Value data: 00000001

image

Now hit ok and then link the policy to you server OU/OUs. Done, no more annoying popup!

/Peter

SQL Server Inventory using ConfigMgr

The hardware inventor feature of ConfigMgr helps us discover and track several items. One recurring item is SQL Server and by default there is no nice way of tracking this. Basically the only option out of the box is using the application inventory to find where SQL server is installed. However this usualy results in a large list with mixed servers and clients and you still have no idea if its running SQLExpress, Standard or Enterprise edtion.

So what can we do to fix this besides buy a third party solution. Well the good thing is that SQL stores all the information into WMI, this means we can track editions, installations and versions with a bit of trickery with the hardware inventory engine.

There are number of steps included here at it is important to follow all of them for a successful result.

Step 1 – Update Configuration.mof

The first part of this is updateing configuration.mof. This file will control classes that inventoried and then index into the database.

The file can be a bit tricky to find if you have never done this before. You need to go to this location <Your ConfigMgr Install folder>\Inboxes\clifiles.src\hinv

In here is the configuration.mof file, now first make a backup copy of the file in case you want to revert the changes later and don’t want edit the file again.

At the very end of the file there is a section for adding custom extensions.

//========================

// Added extensions start

//========================

//========================

// Added extensions end

//========================

In between these block we need to add the following

//———————————————

// SQL 2017 Properties

//———————————————

[Union, ViewSources{“select IsReadOnly,PropertyIndex,PropertyName,PropertyNumValue,PropertyStrValue,PropertyValueType,

ServiceName,SqlServiceType from sqlServiceAdvancedProperty”},ViewSpaces{“\\\\.\\root\\microsoft\\sqlserver\\computermanagement14”}, dynamic,

Provider(“MS_VIEW_INSTANCE_PROVIDER”)]

class cm_sql17

{

[PropertySources{“IsReadOnly”}        ] boolean IsReadOnly;

[PropertySources{“PropertyIndex”},key ] uint32 PropertyIndex;

[PropertySources{“PropertyName”},key  ] string PropertyName;

[PropertySources{“PropertyNumValue”}  ] uint32 PropertyNumValue;

[PropertySources{“PropertyStrValue”}  ] string PropertyStrValue;

[PropertySources{“PropertyValueType”} ] uint32 PropertyValueType;

[PropertySources{“ServiceName”},key   ] string ServiceName;

[PropertySources{“SqlServiceType”},key] uint32 SqlServiceType;

};

//———————————————

// SQL 2016 Properties

//———————————————

[Union, ViewSources{“select IsReadOnly,PropertyIndex,PropertyName,PropertyNumValue,PropertyStrValue,PropertyValueType,

ServiceName,SqlServiceType from sqlServiceAdvancedProperty”},ViewSpaces{“\\\\.\\root\\microsoft\\sqlserver\\computermanagement13”}, dynamic,

Provider(“MS_VIEW_INSTANCE_PROVIDER”)]

class cm_sql16

{

[PropertySources{“IsReadOnly”}        ] boolean IsReadOnly;

[PropertySources{“PropertyIndex”},key ] uint32 PropertyIndex;

[PropertySources{“PropertyName”},key  ] string PropertyName;

[PropertySources{“PropertyNumValue”}  ] uint32 PropertyNumValue;

[PropertySources{“PropertyStrValue”}  ] string PropertyStrValue;

[PropertySources{“PropertyValueType”} ] uint32 PropertyValueType;

[PropertySources{“ServiceName”},key   ] string ServiceName;

[PropertySources{“SqlServiceType”},key] uint32 SqlServiceType;

};

//———————————————

// SQL 2014 Properties

//———————————————

[Union, ViewSources{“select IsReadOnly,PropertyIndex,PropertyName,PropertyNumValue,PropertyStrValue,PropertyValueType,

ServiceName,SqlServiceType from sqlServiceAdvancedProperty”},ViewSpaces{“\\\\.\\root\\microsoft\\sqlserver\\computermanagement12”}, dynamic,

Provider(“MS_VIEW_INSTANCE_PROVIDER”)]

class cm_sql14

{

[PropertySources{“IsReadOnly”}        ] boolean IsReadOnly;

[PropertySources{“PropertyIndex”},key ] uint32 PropertyIndex;

[PropertySources{“PropertyName”},key  ] string PropertyName;

[PropertySources{“PropertyNumValue”}  ] uint32 PropertyNumValue;

[PropertySources{“PropertyStrValue”}  ] string PropertyStrValue;

[PropertySources{“PropertyValueType”} ] uint32 PropertyValueType;

[PropertySources{“ServiceName”},key   ] string ServiceName;

[PropertySources{“SqlServiceType”},key] uint32 SqlServiceType;

};

//———————————————

// SQL 2012 Properties

//———————————————

[Union, ViewSources{“select IsReadOnly,PropertyIndex,PropertyName,PropertyNumValue,PropertyStrValue,PropertyValueType,

ServiceName,SqlServiceType from sqlServiceAdvancedProperty”},ViewSpaces{“\\\\.\\root\\microsoft\\sqlserver\\computermanagement11”}, dynamic,

Provider(“MS_VIEW_INSTANCE_PROVIDER”)]

class cm_sql12

{

[PropertySources{“IsReadOnly”}        ] boolean IsReadOnly;

[PropertySources{“PropertyIndex”},key ] uint32 PropertyIndex;

[PropertySources{“PropertyName”},key  ] string PropertyName;

[PropertySources{“PropertyNumValue”}  ] uint32 PropertyNumValue;

[PropertySources{“PropertyStrValue”}  ] string PropertyStrValue;

[PropertySources{“PropertyValueType”} ] uint32 PropertyValueType;

[PropertySources{“ServiceName”},key   ] string ServiceName;

[PropertySources{“SqlServiceType”},key] uint32 SqlServiceType;

};

//———————————————

// SQL 2008 Properties

//———————————————

[Union, ViewSources{“select IsReadOnly,PropertyIndex,PropertyName,PropertyNumValue,PropertyStrValue,PropertyValueType,

ServiceName,SqlServiceType from sqlServiceAdvancedProperty”},ViewSpaces{“\\\\.\\root\\microsoft\\sqlserver\\computermanagement10”}, dynamic,

Provider(“MS_VIEW_INSTANCE_PROVIDER”)]

class cm_sql08

{

[PropertySources{“IsReadOnly”}        ] boolean IsReadOnly;

[PropertySources{“PropertyIndex”},key ] uint32 PropertyIndex;

[PropertySources{“PropertyName”},key  ] string PropertyName;

[PropertySources{“PropertyNumValue”}  ] uint32 PropertyNumValue;

[PropertySources{“PropertyStrValue”}  ] string PropertyStrValue;

[PropertySources{“PropertyValueType”} ] uint32 PropertyValueType;

[PropertySources{“ServiceName”},key   ] string ServiceName;

[PropertySources{“SqlServiceType”},key] uint32 SqlServiceType;

};

//———————————————

// SQL 2000/2005 Properties

//———————————————

[Union, ViewSources{“select IsReadOnly,PropertyIndex,PropertyName,PropertyNumValue,PropertyStrValue,PropertyValueType,

ServiceName,SqlServiceType from sqlServiceAdvancedProperty”},ViewSpaces{“\\\\.\\root\\microsoft\\sqlserver\\computermanagement”}, dynamic,Provider(“MS_VIEW_INSTANCE_PROVIDER”)]

class cm_sql2kand05

{

[PropertySources{“IsReadOnly”}        ] boolean IsReadOnly;

[PropertySources{“PropertyIndex”},key ] uint32 PropertyIndex;

[PropertySources{“PropertyName”},key  ] string PropertyName;

[PropertySources{“PropertyNumValue”}  ] uint32 PropertyNumValue;

[PropertySources{“PropertyStrValue”}  ] string PropertyStrValue;

[PropertySources{“PropertyValueType”} ] uint32 PropertyValueType;

[PropertySources{“ServiceName”},key   ] string ServiceName;

[PropertySources{“SqlServiceType”},key] uint32 SqlServiceType;

};

Save the configuration.mof file

Done! On to step two.

Step 2 – Import hardware inventory information

The next step is done in the console and you need some nice permissions to do this. You will need to edit the default client settings object.

First thing is first. So we need to create a custom mof file to import. To do this, copy the following and save it as SQLProperties.mof (pick a nice location, like the desktop).

//=================SQL 2017 Information

[dynamic, provider(“MS_VIEW_INSTANCE_PROVIDER”),

SMS_Report(TRUE),

SMS_Group_Name(“SQL17 Property”),

SMS_Class_ID(“CUSTOM|SQL17_Property|1.0”)]

class cm_sql17 : SMS_Class_Template

{

[SMS_Report(TRUE)    ]  boolean IsReadOnly;

[SMS_Report(TRUE),key]  uint32 PropertyIndex;

[SMS_Report(TRUE),key]  string PropertyName;

[SMS_Report(TRUE)    ]  uint32 PropertyNumValue;

[SMS_Report(TRUE)    ]  string PropertyStrValue;

[SMS_Report(TRUE)    ]  uint32 PropertyValueType;

[SMS_Report(TRUE),key]  string ServiceName;

[SMS_Report(TRUE),key]  uint32 SqlServiceType;

};

//=================SQL 2016 Information

[dynamic, provider(“MS_VIEW_INSTANCE_PROVIDER”),

SMS_Report(TRUE),

SMS_Group_Name(“SQL16 Property”),

SMS_Class_ID(“CUSTOM|SQL16_Property|1.0”)]

class cm_sql16 : SMS_Class_Template

{

[SMS_Report(TRUE)    ]  boolean IsReadOnly;

[SMS_Report(TRUE),key]  uint32 PropertyIndex;

[SMS_Report(TRUE),key]  string PropertyName;

[SMS_Report(TRUE)    ]  uint32 PropertyNumValue;

[SMS_Report(TRUE)    ]  string PropertyStrValue;

[SMS_Report(TRUE)    ]  uint32 PropertyValueType;

[SMS_Report(TRUE),key]  string ServiceName;

[SMS_Report(TRUE),key]  uint32 SqlServiceType;

};

//=================SQL 2014 Information

[dynamic, provider(“MS_VIEW_INSTANCE_PROVIDER”),

SMS_Report(TRUE),

SMS_Group_Name(“SQL14 Property”),

SMS_Class_ID(“CUSTOM|SQL14_Property|1.0”)]

class cm_sql14 : SMS_Class_Template

{

[SMS_Report(TRUE)    ]  boolean IsReadOnly;

[SMS_Report(TRUE),key]  uint32 PropertyIndex;

[SMS_Report(TRUE),key]  string PropertyName;

[SMS_Report(TRUE)    ]  uint32 PropertyNumValue;

[SMS_Report(TRUE)    ]  string PropertyStrValue;

[SMS_Report(TRUE)    ]  uint32 PropertyValueType;

[SMS_Report(TRUE),key]  string ServiceName;

[SMS_Report(TRUE),key]  uint32 SqlServiceType;

};

//=================SQL 2012 Information

[dynamic, provider(“MS_VIEW_INSTANCE_PROVIDER”),

SMS_Report(TRUE),

SMS_Group_Name(“SQL12 Property”),

SMS_Class_ID(“CUSTOM|SQL12_Property|1.0”)]

class cm_sql12 : SMS_Class_Template

{

[SMS_Report(TRUE)    ]  boolean IsReadOnly;

[SMS_Report(TRUE),key]  uint32 PropertyIndex;

[SMS_Report(TRUE),key]  string PropertyName;

[SMS_Report(TRUE)    ]  uint32 PropertyNumValue;

[SMS_Report(TRUE)    ]  string PropertyStrValue;

[SMS_Report(TRUE)    ]  uint32 PropertyValueType;

[SMS_Report(TRUE),key]  string ServiceName;

[SMS_Report(TRUE),key]  uint32 SqlServiceType;

};

//=================SQL 2008 Information

[dynamic, provider(“MS_VIEW_INSTANCE_PROVIDER”),

SMS_Report(TRUE),

SMS_Group_Name(“SQL Property”),

SMS_Class_ID(“CUSTOM|SQL_Property|2.0”)]

class cm_sql08 : SMS_Class_Template

{

[SMS_Report(TRUE)    ]  boolean IsReadOnly;

[SMS_Report(TRUE),key]  uint32 PropertyIndex;

[SMS_Report(TRUE),key]  string PropertyName;

[SMS_Report(TRUE)    ]  uint32 PropertyNumValue;

[SMS_Report(TRUE)    ]  string PropertyStrValue;

[SMS_Report(TRUE)    ]  uint32 PropertyValueType;

[SMS_Report(TRUE),key]  string ServiceName;

[SMS_Report(TRUE),key]  uint32 SqlServiceType;

};

//==================SQL Information 2000 and 2005

[dynamic, provider(“MS_VIEW_INSTANCE_PROVIDER”),

SMS_Report(TRUE),

SMS_Group_Name(“SQL Property Legacy”),

SMS_Class_ID(“CUSTOM|SQL_Property_Legacy|2.0”)]

class cm_sql2kand05 : SMS_Class_Template

{

[SMS_Report(TRUE)    ]  boolean IsReadOnly;

[SMS_Report(TRUE),key]  uint32 PropertyIndex;

[SMS_Report(TRUE),key]  string PropertyName;

[SMS_Report(TRUE)    ]  uint32 PropertyNumValue;

[SMS_Report(TRUE)    ]  string PropertyStrValue;

[SMS_Report(TRUE)    ]  uint32 PropertyValueType;

[SMS_Report(TRUE),key]  string ServiceName;

[SMS_Report(TRUE),key]  uint32 SqlServiceType;

};

Next, head on over to the Administration workspace in the ConfigMgr console and find the Client Settings in the menu to the left. Open up the Default Client Settings and check the Hardware Inventory tab.

There is a nice little button named Set Classes, hit that and then hit import. Browse to the SQLProperties.mof file and hit Open.

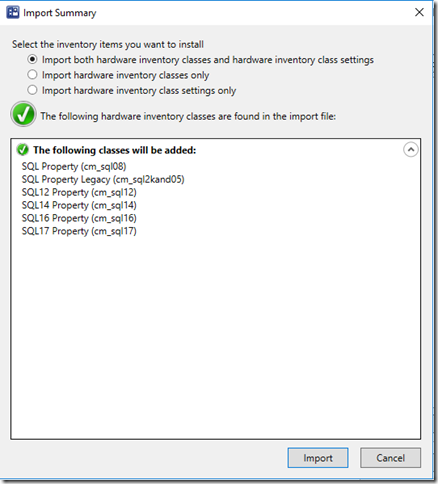
You will be greated by this screen where you need to make sure the Import both hardware inventory classes and hardware inventory class settings is selected

sqlinv02

If you are like me and don’t want this inventory to hit each and every device you have deselect the following classes in your default settings. If you are only using the default client settings object, please skip to the next step.

sqlinv01

If you are using custom client settings, please add the above classes to be included in hardware inventory under the same tabe as we did the import.

This means SQL information will now be imorted into the database! We can now create collections based on this, please do leave enough time for hardware inventory to run on each client before you find data in the database.

Step 3 – The Report

For me the last piece of the pussel is to create a custom report to easily show me the information needed. I will not cover the details of how to create a custom reports as the options are plenty. However I will share the query used to get a nice detailed view with the server and edition info.

Note that this is a simple report and can be extended in a lot of ways and if you are already using PowerBI you can extract the same data that way.

Query used:

— SQL 2017
select
sys1.Netbios_name0 as [Computer Name]
,max(Case sql6.PropertyName0 when ‘VERSION’ then
(case
when sql6.PropertySTRValue0 like ‘9.0%’ then ‘SQL 2005’
when sql6.PropertySTRValue0 like ‘10.5%’ then ‘SQL 2008 R2′
when sql6.PropertySTRValue0 like ’10.%’ then ‘SQL 2008′
when sql6.PropertySTRValue0 like ’11.%’ then ‘SQL 2012′
when sql6.PropertySTRValue0 like ’12.%’ then ‘SQL 2014′
when sql6.PropertySTRValue0 like ’13.%’ then ‘SQL 2016′
when sql6.PropertySTRValue0 like ’14.%’ then ‘SQL 2017’
else ‘SQL Other’ End)
end) as [SQL]
,max(Case sql6.PropertyName0 when ‘SKUName’ then
sql6.PropertySTRValue0 end) as [SQL Type]
,max(Case sql6.PropertyName0 when ‘SPLEVEL’ then
sql6.PropertyNUMValue0 end) as [SQL Service Pack]
,max(Case sql6.PropertyName0 when ‘VERSION’ then
sql6.PropertySTRValue0 end) as [SQL Version]
,max(Case sql6.PropertyName0 when ‘FILEVERSION’ then
sql6.PropertySTRValue0 end) as [SQL CU Version]
from v_r_system sys1
left join v_gs_custom_SQL17_Property0 sql6 on sys1.ResourceID=sql6.ResourceID
where
sql6.PropertyName0 in (‘SKUNAME’,’SPLevel’,’version’,’fileversion’)
group by sys1.Netbios_name0
union

— SQL 2016
select
sys1.Netbios_name0 as [Computer Name]
,max(Case sql5.PropertyName0 when ‘VERSION’ then
(case
when sql5.PropertySTRValue0 like ‘9.0%’ then ‘SQL 2005’
when sql5.PropertySTRValue0 like ‘10.5%’ then ‘SQL 2008 R2′
when sql5.PropertySTRValue0 like ’10.%’ then ‘SQL 2008′
when sql5.PropertySTRValue0 like ’11.%’ then ‘SQL 2012′
when sql5.PropertySTRValue0 like ’12.%’ then ‘SQL 2014′
when sql5.PropertySTRValue0 like ’13.%’ then ‘SQL 2016′
when sql5.PropertySTRValue0 like ’14.%’ then ‘SQL 2017’
else ‘SQL Other’ End)
end) as [SQL]
,max(Case sql5.PropertyName0 when ‘SKUName’ then
sql5.PropertySTRValue0 end) as [SQL Type]
,max(Case sql5.PropertyName0 when ‘SPLEVEL’ then
sql5.PropertyNUMValue0 end) as [SQL Service Pack]
,max(Case sql5.PropertyName0 when ‘VERSION’ then
sql5.PropertySTRValue0 end) as [SQL Version]
,max(Case sql5.PropertyName0 when ‘FILEVERSION’ then
sql5.PropertySTRValue0 end) as [SQL CU Version]
from v_r_system sys1
left join v_gs_custom_SQL16_Property0 sql5 on sys1.ResourceID=sql5.ResourceID
where
sql5.PropertyName0 in (‘SKUNAME’,’SPLevel’,’version’,’fileversion’)
group by sys1.Netbios_name0
union

— SQL 2014
select
sys1.Netbios_name0 as [Computer Name]
,max(Case sql4.PropertyName0 when ‘VERSION’ then
(case
when sql4.PropertySTRValue0 like ‘9.0%’ then ‘SQL 2005’
when sql4.PropertySTRValue0 like ‘10.5%’ then ‘SQL 2008 R2′
when sql4.PropertySTRValue0 like ’10.%’ then ‘SQL 2008′
when sql4.PropertySTRValue0 like ’11.%’ then ‘SQL 2012′
when sql4.PropertySTRValue0 like ’12.%’ then ‘SQL 2014′
when sql4.PropertySTRValue0 like ’13.%’ then ‘SQL 2016′
when sql4.PropertySTRValue0 like ’14.%’ then ‘SQL 2017’
else ‘SQL Other’ End)
end) as [SQL]
,max(Case sql4.PropertyName0 when ‘SKUName’ then
sql4.PropertySTRValue0 end) as [SQL Type]
,max(Case sql4.PropertyName0 when ‘SPLEVEL’ then
sql4.PropertyNUMValue0 end) as [SQL Service Pack]
,max(Case sql4.PropertyName0 when ‘VERSION’ then
sql4.PropertySTRValue0 end) as [SQL Version]
,max(Case sql4.PropertyName0 when ‘FILEVERSION’ then
sql4.PropertySTRValue0 end) as [SQL CU Version]
from v_r_system sys1
left join v_gs_custom_SQL14_Property0 sql4 on sys1.ResourceID=sql4.ResourceID
where
sql4.PropertyName0 in (‘SKUNAME’,’SPLevel’,’version’,’fileversion’)
group by sys1.Netbios_name0
union

— SQL 2012
select
sys1.Netbios_name0 as [Computer Name]
,max(Case sql3.PropertyName0 when ‘VERSION’ then
(case
when sql3.PropertySTRValue0 like ‘9.0%’ then ‘SQL 2005’
when sql3.PropertySTRValue0 like ‘10.5%’ then ‘SQL 2008 R2′
when sql3.PropertySTRValue0 like ’10.%’ then ‘SQL 2008′
when sql3.PropertySTRValue0 like ’11.%’ then ‘SQL 2012′
when sql3.PropertySTRValue0 like ’12.%’ then ‘SQL 2014′
when sql3.PropertySTRValue0 like ’13.%’ then ‘SQL 2016′
when sql3.PropertySTRValue0 like ’14.%’ then ‘SQL 2017’
else ‘SQL Other’ End)
end) as [SQL]
,max(Case sql3.PropertyName0 when ‘SKUName’ then
sql3.PropertySTRValue0 end) as [SQL Type]
,max(Case sql3.PropertyName0 when ‘SPLEVEL’ then
sql3.PropertyNUMValue0 end) as [SQL Service Pack]
,max(Case sql3.PropertyName0 when ‘VERSION’ then
sql3.PropertySTRValue0 end) as [SQL Version]
,max(Case sql3.PropertyName0 when ‘FILEVERSION’ then
sql3.PropertySTRValue0 end) as [SQL CU Version]
from v_r_system sys1
left join v_gs_custom_SQL14_Property0 sql3 on sys1.ResourceID=sql3.ResourceID
where
sql3.PropertyName0 in (‘SKUNAME’,’SPLevel’,’version’,’fileversion’)
group by sys1.Netbios_name0
union

— SQL 2008
Select
sys1.Netbios_name0 as [Computer Name]
,max(Case sql2.PropertyName0 when ‘VERSION’ then
(case
when sql2.PropertySTRValue0 like ‘9.0%’ then ‘SQL 2005’
when sql2.PropertySTRValue0 like ‘10.5%’ then ‘SQL 2008 R2′
when sql2.PropertySTRValue0 like ’10.%’ then ‘SQL 2008′
when sql2.PropertySTRValue0 like ’11.%’ then ‘SQL 2012′
when sql2.PropertySTRValue0 like ’12.%’ then ‘SQL 2014′
when sql2.PropertySTRValue0 like ’13.%’ then ‘SQL 2016′
when sql2.PropertySTRValue0 like ’14.%’ then ‘SQL 2017’
else ‘SQL Other’ End)
end) as [SQL]
,max(Case sql2.PropertyName0 when ‘SKUName’ then
sql2.PropertySTRValue0 end) as [SQL Type]
,max(Case sql2.PropertyName0 when ‘SPLEVEL’ then
sql2.PropertyNUMValue0 end) as [SQL Service Pack]
,max(Case sql2.PropertyName0 when ‘VERSION’ then
sql2.PropertySTRValue0 end) as [SQL Version]
,max(Case sql2.PropertyName0 when ‘FILEVERSION’ then
sql2.PropertySTRValue0 end) as [SQL CU Version]
from v_r_system sys1
left join v_gs_custom_sql_property_2_00 sql2 on sys1.resourceid=sql2.ResourceID
where
sql2.PropertyName0 in (‘SKUNAME’,’SPLevel’,’version’,’fileversion’)
group by sys1.Netbios_name0
union

— SQL 2005
Select
sys1.Netbios_name0 as [Computer Name]
,max(Case sql1.PropertyName0 when ‘VERSION’ then
(case
when sql1.PropertySTRValue0 like ‘9.%’ then ‘SQL 2005’
when sql1.PropertySTRValue0 like ‘10.5%’ then ‘SQL 2008 R2′
when sql1.PropertySTRValue0 like ’10.%’ then ‘SQL 2008′
when sql1.PropertySTRValue0 like ’11.%’ then ‘SQL 2012′
when sql1.PropertySTRValue0 like ’12.%’ then ‘SQL 2014′
when sql1.PropertySTRValue0 like ’13.%’ then ‘SQL 2016′
when sql1.PropertySTRValue0 like ’14.%’ then ‘SQL 2017’
else ‘SQL Other’ End)
end) as [SQL]
,max(Case sql1.PropertyName0 when ‘SKUName’ then
sql1.PropertySTRValue0 end) as [SQL Type]
,max(Case sql1.PropertyName0 when ‘SPLEVEL’ then
sql1.PropertyNUMValue0 end) as [SQL Service Pack]
,max(Case sql1.PropertyName0 when ‘VERSION’ then
sql1.PropertySTRValue0 end) as [SQL Version]
,max(Case sql1.PropertyName0 when ‘FILEVERSION’ then
sql1.PropertySTRValue0 end) as [SQL CU Version]
from v_r_system sys1
left join v_gs_custom_sql_property_legacy_2_00 sql1 on sys1.ResourceID=sql1.ResourceID
where sql1.PropertyName0 in (‘SKUNAME’,’SPLevel’,’version’,’fileversion’)
group by sys1.Netbios_name0

This might not be the prettiest query every created or the smartest way (there are alot smarter people out there) so don’t go flaming it’s not optimized. It does the job : )

/Peter

PowerShell remoting – source vs destination

Powershell remoting, the ability to remotley manage and influence devices is a key part of PowerShell. By default PowerShell remoting is enabled on servers and one of the lazy “security” features you can use is to only allow connections from specified networks.

In a domain network this is very easy to do, all you need is a small group policy that sets the networks. There is one thing you need to note, that is not really documented.

The Group Policy

The group policy is a regular computer policy setting found under “Computer\Policies\Administrative Templates\Windows Components\Windows Remote Management (WinRM)\WinRM Service” and the actual poliy item is named “Allow remote server management through WinRM”

When you enable this policy you can enter networks the server will consider trusted.  So lets say you have your server on the network 192.168.1.0, that would mean you set the filder to 192.168.1.1-.192.168.1.254.

The issue

What you need to consider is the following. Say you have servers on two seperate networks and one is considered management network, lets say it uses 172.16.1.0/24. This means you now specify the management network as approved. But the servers you are accessing is on your primary server network 192.168.1.0/24. You have to specifiy both source and destination networks for this to work as this also controls the actual listners and if you only specify the 172.16.1.0/24 network the listners on the servers on network 192.168.1.0/24 will not be enabled.

The solution

For the scenario above make sure to specify both networks in your GPO. So the filter will be set to 192.168.1.1-192.168.1.254,172.16.1.1-172.16.1.254

winrm

/Peter

Strange Case of the failed Remote Desktop Gateway

I have been having a kind of a strange issue for a longe while and finally got around to troubleshooting and figuring out why so here is a breakdown of the strange case of the failed remote desktop gateway connection.

The setup is as follow, using diffrent machines Windows 10, 8.1 and 7 to connect to diffrent remote desktop gateway solutions and for some reason the connection failed with wrong username and password to a couple of the RDGWs.

So after som digging and alot of help from my good friend over at isloation.se we found the issue and how to check if you are also running into this issue.

The check

On the RDGW check under incomming connections/monitoring and if the connections display as RPC-HTTP. This is the clue that something is not all right.

rdgw1

The cause

So over the years the has been alot of fixes and version of the RDP client for each version of Windows. In the later release support was introduced for RDP over HTTP with UDP as a performance booster. However due to bugs and other things happening there have been posts and information about setting a registry value to make RDP work again. The value is called RDGClientTransport. It is a DWORD and you set it to 1 to get everyting working again.

However what this does is force the RDP client to fall back to RPC-HTTP connections instead of HTTP/UDP. This in turn can cause connection issues if you have modern solutions.

The solution

Depsite several blogs and forum posts saying this the value should be 1 you really should change the default value of 0.

So here is the full path to set the value.

HKEY_CURRENT_USER\Software\Microsoft\Terminal Server Client\RDPClientTransport

As you probably noted it is a current user setting and since I am very lazy. Most of my configuration is done through either Configuration Manager or GPO so in this case it was a GPO setting the value to 1 for all my users. Hence the problem was only on my devices and not my coworkers devices.

rdgw2

/Peter

Techdays 2017 Pre-Conf Slides

Me and Jörgen Nilsson (@ccmexec) did a pre-conf together at Techdays in sweden. And after much slacking here are now the slide deck from that pre-conf.

Here is the link to download the slidedeck!
https://1drv.ms/b/s!ArAh2CEqOjRkk-8ZDAVJ1vRqi8Glxg

Techday2017

/Peter

ADFS Single Sign on with Edge

I usually don’t blog about ADFS but since I recently had to solve this issue for a customer I thought someone else might find it usefull as well.

When you use Edge or Chrome as your primary browser and using a machine that should have SSO with Office 365 and Sharepoint you still get a login page. This happens because by default ADFS have a set of trusted browser strings and others will be prestend with a form authentication.

To fix this on your ADFS server you need to use a couple of simple powershell commands.

Let’s start with just getting what browser strings are trusted currently.

Get-ADFSProperties | Select -ExpandProperty WIASupportedUserAgents

DefaultSettings

As you can see there browser agent for Edge and Chrome are missing. To fix this we run the following powershell command.

Set-AdfsProperties –WIASupportedUserAgents @("MSAuthHost/1.0/In-Domain","MSIE 6.0","MSIE 7.0","MSIE 8.0","MSIE 9.0","MSIE 10.0","Trident/7.0", "MSIPC","Windows Rights Management Client","Mozilla/5.0","Edge/12")

Then restart the ADFS service

Restart-Service ADFSSrv

That is, you can verify the settings by getting the ADFS properties again

FixedSettings

All done and Single Sign On will should now work using Edge or Chrome as well!


/Peter

System Center ConfigMgr 1702

Here we go again. New version of ConfigMgr! This time around it brings a bunch of new cool features and improvements. It also brings along the end of the 2008 era for site servers and SQL servers.

This is all good news but it requires some planning and managinig before an upgrade can be done if you are still running Windows Server 2008 or SQL server 2008.

For a complete list of what’s new and removed check out the official documentation here.

https://docs.microsoft.com/en-us/sccm/core/plan-design/changes/whats-new-in-version-1702


Happy deploying!

/Peter

Keeping Track of PowerShell versions

In today enterprises many are faced with the challenge of managing both Windows 7, 8, 8.1 and 10. This means that most have a multitude of PowerShell versions out there which in turn does not ease the management tasks faced.

If you are running ConfigMgr 2012 or later you have access to one of my favorite features called Compliance Settings. Use this feature you can easily keep track of your environments different settings and measure compliance. One of the things I like to measure is the current running PowerShell version. I do this for two reasons. Number one, I want to now that my systems are running the version set out as a baseline. Number two is that if they are not running the correct version I get an easy way of finding them all and hence an easy way of correcting it.

So the tasks including creating a Configuration Item, linking it to a Configuration Baseline, deploying said baseline to a collection of workstations and creating a collection of devices that are not running the correct version.

Step 1 – Creating the Configuration Item

In your ConfigMgr console find the Assets and Compliance workspace and then under Compliance Settings you will find Configuration Items.

Create a new one and give it a name, I will be using “PowerShell Version”. Make sure that Settings for device managed with ConfigMgr Client is set to “Windows Desktops and Servers (custom)”.

In the next pane select the appropriate Operating Systems that this can be run on. Hint, Windows XP does not support PowerShell.

On the settings pane, hit New and in the configuration set a Name, again “PowerShell version” works just fine. Set the Setting type to “Script” and the datatype to Integer. Hit the “Add Script” button for Discovery script and paste in the following script and then hit OK.

[int]$Version = $PSVersionTable.PSVersion.Major
return $Version

On the Compliance Rules pane hit New and give the Rule a name. I’m calling it BaselineVersion. Hit the browse button and select your Current CI and the Version setting we just created. The rule type should be set to Value and in the comply part set the value returned must “Equal” and then set your desired baseline version. 4 will give you an OK on Windows 8.1 and Windows 10 and 5 will only give you an OK on Windows 10 (this assumes you have not previously upgraded your WMF versions). Hit OK and then Next.

Review your setting on the summary pane and hit next when ready to create the Configuration Item

Step 2 – Creating a Configuration Baseline

Head over to the Configuration Baselines workspace and create a new baseline. Please note this can both be included in previously created baselines but I prefer a separate for this so I can later use the non compliance feature. Give the Baseline a name, “PowerShell”. Hit Add, Select Configuration Item and select your previously created CI.

Step 3 – Deploying the Baseline

This should feel very normal to most of you since it’s the same procedure as deploying any application or client setting. Right click your baseline and select deploy. The wizard will not look like the usual deployment wizards but all you have to do is select a collection to deploy to. I recommend avoiding deploying it to the built-in collections and instead do two deployments if you want to monitor both servers and clients. Before you hit OK change the Schedule to suite your response times. Default is 7 days which in a small environment can be forever but in a large environment it just around the corner.

Step 4 – Creating the non compliant collection

The last step is to create that all needed collection which you can deploy the new Windows Management Framework too. select your newly created baseline, look for a tab named Deployments a the bottom of the console. In this view you can see the collection the baseline has been deployed to.

Now right click the collection, select “Create New Collection” and then select “Non-Compliant”. Follow the new Collection wizard and not that the rule for membership is premade.

noncompliance

Last notes

Now all that remains is waiting for the devices to report back status and then end up in the Non-Compliant collection so you can remedy them.

For your Windows 7 machines please note that if you have not previously upgraded Windows Management Framework you will need to install both WMF4 and WMF5. WMF4 is a prerequisite for WMF5 and both require a reboot to complete. This might be a good time for a small custom task sequence.


/Peter

ConfigMgr–Disk Space Compliance

One of the least utilized features in ConfigMgr is compliance items and baselines. For some reason most of my customers tend to forget that a small part of monitoring on the client side will go a long way towards reducing the amount of tickets to your helpdesk.

One of things you might wish to measure is free space left of on the OS drive. This is easily done with a small compliance item. This post will show you how and you can then expand this to do self cleaning and other features as well if you so wish.

Start with creating a Compliance Item by going to the Asset and Compliance Node, Compliance Settings and Configuration Items. Right click, Create Configuration Item and give it a suitable name. Click Next when ready.

Create

Select the Operating systems that this can run on. Make sure to deselect the older OSes which do not support PowerShell and click next when done.

OS

In the settings pane click new to create a new setting to monitor. Give it a name I use FreeSpace and then set Setting type to Script and Data type to Integer.

Setting

Click Add Script and add the script to get the frees pace percentage of the C drive. Click OK and next to get to the Compliance Rules pane.

Script

The Script

$FreeSpace = (Get-Volume -DriveLetter C).SizeRemaining/(Get-Volume -DriveLetter C).size
[int]$Size = [math]::Round($FreeSpace,2)*100
return $Size

Click New to add a new rule, give the Rule a name and select the setting you just created. For rule type set it to Value and set the following values:
The value returned by the script: Greater than or equal to
The following values: <percent you wish to monitor> (I use 20)
Noncompliance severity for reports: Warning

freespace_compliancerule

Now the Configuration Item is done, just click next twice to save everything and create the CI.

For this to actually work a Baseline needs to be created. So head over to the Asset and Compliance workspace and the Compliance settings node and find Compliance Baselines. Right click and create a new baseline.

Give the baseline a name, click Add and select Configuration Item.

Baseline

You get a list of all your CIs and just select the one you just created and click Add and OK.

CIs

Now you have a baseline you can deploy to a collection.

This can of course be expanded with things like non compliant collections, reports, remediation scripts and so on. You can also add other checks and verifications to the same baseline and monitor things like BitLocker encryption status.

WS2016 Beyond Unsupported

Update 2016-10-01: Currently MAK keys won’t work with activation. Expect Microsoft to release a new Eval media to correct this.

Update 2016-10-09: I previously had mentioned you can upgrade index 1 and 3 using the methods described below but Core editions cannot be modified this way and I have update the post to reflect that.

Windows Server 2016 Eval media has been released and while we wait for VL media there is a small cheat you can use if you want to play around with the licensing modes. Please do note that this is not in any way a supported way to do it and far from recommended.

Method 1 – An already running server with WS 2016 installed

This is the easier way and can be done on any running Windows Server 2016 except for domain controllers.

First you need to get the KMS keys from Microsoft TechNet KMS key appendix A found here https://technet.microsoft.com/en-us/library/jj612867(v=ws.11).aspx. There are different keys for both Standard and Datacenter so make sure pick the correct one.

Next start an elevated command prompt and run one of the following commands depending on if you upgrading to Standard or Datacenter

For Standard:
Dism /online /Set-Edition:ServerStandard /Productkey:<key for Standard from appendix A> /AcceptEULA /Norestart

SrvStd

For Datacenter:
Dism /online /Set-Edition:ServerDatacenter /Productkey:<key for Datacenter from appendix A> /AcceptEULA /Norestart

SrvDC

Wait while it completes and then reboot the server and your done. When the server is done rebooting you will have either a Standard edition or Datacenter Edition server.

Method 2 – Changing the media and enable in-place upgrade

This is a bit more complex and requires some installation steps before it works. The first thing needed is the newest Dism tools 10.0.14939 found in the ADK for Windows 10 1607. That can be found here https://developer.microsoft.com/sv-se/windows/hardware/windows-assessment-deployment-kit

Download the setup for ADK and run the installation. The only component needed for this is the Deployment Tools. Wait for the installation to finish and then reboot the machine to make sure all dlls are registered.

adk

Download the Eval media from the TechNet Evaluation Center https://www.microsoft.com/en-us/evalcenter/evaluate-windows-server-2016

Copy the contents of the ISO to a folder on your management machine in this example I will use C:\ISO but you can use any folder, just make sure to correct all paths in each command.

Iso

Create a folder for mounting the wim file (C:\Mount) and start an elevated command prompt.

Change the directory to your newly installed dism tools usually here C:\Program Files (x86)\Windows Kits\10\Assessment and Deployment Kit\Deployment Tools\amd64\DISM then run the following commands and press enter after each (there will be some wait in between each)

dism.exe /Mount-Wim /WimFile:C:\ISO\Sources\Install.wim /index:2 /MountDir:C:\Mount

dism.exe /Image:C:\Mount /Set-Edition:ServerStandard /ProductKey:WC2BQ-8NRM3-FDDYY-2BFGV-KHKQY /AcceptEula /Norestart

dism.exe /UnMount-image /MountDir:C:\Mount /Commit

dism.exe /Mount-Wim /WimFile:C:\ISO\Sources\Install.wim /index:4 /MountDir:C:\Mount

dism.exe /Image:C:\Mount /Set-Edition:ServerDatacenter /ProductKey:CB7KF-BWN84-R7R2Y-793K2-8XDDG /AcceptEula /Norestart

dism.exe /UnMount-image /MountDir:C:\Mount /Commit

If you look closely you will notice I change the index number and the product key to update all 4 scenarios, Server Standard Core, Server Standard GUI, Datacenter Core and Datacenter GUI

Now the last step is the one you have to solve yourself and that is to create a bootable ISO from these files.


As a last note: DO NOT under any circumstances use this in production. I highly doubt this is a supported or even recommended way from Microsoft but can help you in your testing with licenses.

Happy deploying!

/Peter