MDT

Refresh scenario and LAPS

When doing reinstall of machines a common issue is that the LAPS password does not get updated due to the fact that the machine thinks the password is current. So to prevent the nice folks from Microsoft wrote a small script to reset the timer and force and update. The original blog post and script can be found here https://blogs.msdn.microsoft.com/laps/2015/05/06/laps-and-machine-reinstalls/

Now my issue with this is there is no log file created and no way for helpdesk to verify it actually happend (besides logging on which I don’t like).

So to solve this I have made an updated version of the script that centralizes logging basone if the script is run as part of MDT, Configuration Manager or Standalone.

image

Script can found on github here https://github.com/LofgrenP/Scripts/tree/master/Clear-xTSPasswordTimeStamp

Windows 10 1709 Reference Image

Update – 2018-03-06 – Read at the bottom

When creating a Windows 10 reference image a common issue is that the store updates will autoupdate while you are busy installing software updates and applications. This then causes sysprep to fail in giant ball of fire.

To solve this there are basically two options and for some option one doesn’t seem to work which is why I always opt for option two.

Option 1, follow the guidance for disabling auto store updates. This consists of adding a DWORD registry item to HKEY_LOCAL_MACHINE\SOFTWARE\Policies\Microsoft\WindowsStore named AutoDownload with a value of 2. More info on how to do this check out the blog over at deploymentresearch.com

Option 2, is to use a WSUS and then disable internet access for the duration of the build. This can easily be achieved using PowerShell and a sprinkle of magic.

Here is how! Lets start with creating a small PowerShell Script.

param (
[Parameter(Mandatory=$False,Position=0)]
[Switch]$Disable
)

If (!$Disable) {
Write-Output “Adding internet block”
New-NetFirewallRule -DisplayName “Block Outgoing 80, 443” -Enabled True -Direction Outbound -Profile Any -Action Block -Protocol TCP -RemotePort 80,443
}

if ($Disable) {
Write-Output “Removing internet block”
Get-NetFirewallRule -DisplayName “Block Outgoing 80, 443” | Remove-NetFirewallRule

}

Save that into as Invoke-InternetAccess.ps1 and place the file into the MDT deployment share script folder.

Now time to set the sequence.
Add two “Run PowerShell script” steps as shown below.

Ref1709

For the first one just set the script name to Invoke-InternetAccess.ps1
For the second one set the script name to Invoke-InternetAccess.ps1 and parameters to –Disable

All done! Now you can run your sequence and not worry about any store updates during your build.

Update – 2018-03-06
There has been some discussion around this and there is an alternative to the way below which will work if you use MDT. The solution is a simple as it is elegant and requires very little configuration.

All you would need is to set HideShell=YES in your customsettings.ini. This will not load a full explorer and hence store will not start and there will be no store updates downloaded.


Happy deploying

/Peter

Techdays 2017

I have the great honor of presenting at TechDays sweden this year. I will be doing a pre conf together with Jörgen Nilsson about Client management. We will show of tips and trix, give some insight on how to surive the Windows As A Service change and talk about the future of client management.

Make sure to reserve your seat now and we will see you there. For more information check out the preconf site for TechDays here http://tdswe.se/events/windows-10-client-management-now-and-in-the-future-level-300/

Hope to see you there!

/Peter

Windows 10 Notes From The Field – Q&A

Last week @jarwidmark and myself held a live session about windows 10 deployment notes from the field and we had ALOT of good questions.

Here are the questions and answers from the session

Q: How well does the performance of an NVMe drive compare to an M2 SSD?
A: There are both M2 NVMe and M2 SSD drives available at the current time. However, the NVMe drives are a different type of drives even if they are connected using the slot type. NVMe will always be faster but depending on what you need to do it might not be economical.

Q: Can Secure Boot be disabled and enabled after Windows 10 installation?
A: Yes, Secure Boot can be disabled/enabled after Windows installation. Note that turning UEFI on/off is not the same thing!

Q: Is peercache similar to a product such as 1E Nomad?
A: Yes, peerchache is very similar to those types of products. What you need to remember is that peercache has now been around for all of 2 months while products similar third party products have been out for a couple of years. There is a good write up about this topic made by 2Pint Software found here https://2pintsoftware.com/peer-cache-in-configmgr-current-branch-first-impressions/

Q: What’s the best way to upgrade from Windows 7 to Windows 10 1607 in place?
A: As of right now the best way is using the Replace scenario so backup the current computer and redeploy it as a new computer while restoring the settings and documents. This will enable you to turn on UEFI+SecureBoot and any other new features you desire.

If you do a normal in-place upgrade there is currently no way of switching from Legacy BIOS to UEFI and thus you will not be able to use all the new cool features of Windows 10.

Q: how do you prevent Windows 10 from automatically uninstalling software it deems “not compatible” when doing Windows update? Example: Cisco VPN client app, when updating versions (i.e. 1507->1511)
A: Don’t use Windows Update, use sequencing instead. Either with MDT or SCCM. That way you can control before, during and after. Giving you the tools you need to get the job done. In this case making sure the software is reinstalled or upgrade as part of the in-place upgrade.

A good starting point can be found here http://deploymentresearch.com/Research/Post/533/Improving-the-ConfigMgr-Inplace-Upgrade-Task-Sequence

Q: For the in-place upgrade Task Sequence, is it possible to add Cumulative Update to the image rather than adding the CU to the TS? Running a Cumulative Update during the TS adds a lot of time to the deployment.
A: Yes, you can add both CUs and Security fixes to a install.wim file. That is fully supported. However, as it will use offline servicing to do so the patches won’t be installed until the machine is booted up and during the initial boot they will install. This will take the same amount of time as adding them as applications during the TS.

Q: Which OSs are supported by MDT 8443?
A: Windows 7 and forward. Note that MDT 8443 requires ADK1607 and that ADK has issues with Windows 7 and driver injection when running on SSD drives.

Q: Is the best way to customize default pinned apps in the Win 10 task bar still via a run-once logon script?
A: No, use the start and taskbar layout xml file instead. More info on that can be found here https://technet.microsoft.com/en-us/itpro/windows/manage/windows-10-start-layout-options-and-policies

Note that taskbar pinning using xml requires Windows 10 1607.

Q: Have you seen any new hardware components with no Win7 drivers?
A: Yes, not all new models support Windows 7. This is due to instruction sets in some of the Skylake CPUs by Intel. Most vendors have a number of models/configurations that do support Windows 7 still. Expect this to diminish now that Kaby Lake is out and going forward with new CPUs.

Q: With Win 7/8.1 we would use Copyprofile, configure items in the captured image, and that worked great. Since Copyprofile is a no-go with Win10 it seems, what is the best approach going forward? WICD? Don’t configure in captured image, but apply during deployment TS?
A: Microsoft is moving towards less IT configuration and more personal configuration by end-users. This makes it less worthwhile doing customizations but when you need to do them you have a couple of options. Do the in the deployment TS or use GPOs. Since in-place upgrade is going to be the way between versions and you can’t customize the install.wim file moving them elsewhere will be needed.

Q: Is it better to remove Appx packages from win 10 via a powershell script during OS deployment, or via applocker (so that they never get installed for the users) anyone have experience/comparison to both
A: Removing Appx packages can only be done with PowerShell. Applocker will not remove them only block them from being used. If you want to scale down on the apps make sure to remove AppX packages and the AppX provisioned packages.

Q: Why don’t use ConfigMgr for reference images?
A: Until very recently that was not an option due to the fact that ConfigMgr will install the client as part of deployment and we want to avoid that. We still prefer MDT due to the fact its smaller, needs to infrastructure to work, its much faster and you also get a profile that can be customized to some extent.

Q: In your experience, has anyone needed hardware upgrades to go from win7 to win10? Or are real-world HW requirements the same?
A: This is a split question. If a model is supported no they won’t need an upgrade x64 requirements for Windows 7 and 10 are the same. Windows 10 will even be kinder to your hardware giving you more bang for your buck.

The thing to lock out for is of course that old models might not be vendor supported for Windows 10 and a lot of older models does not support full UEFI. Thus, for those models you won’t be able to turn on features like, Device guard and Credential guard.

Q: Would MDT Version: 6.2.5019.0 work with Win 1607, if I was to start testing deployment?
A: No, you will need a newer ADK and that is not supported with the old versions of MDT. The newer version of MDT also contains a massive amount of bugfixes so make sure to upgrade MDT instead.

Q: Does CM1610 with MDT 8443 support ADK 1511? I ask because we have to use 802.1x port authentication in our boot images and that is broken in ADK 1607.
A: Kind of, 1606 does support ADK1511 and I have not seen statements that 1610 requires ADK1607 to work. Its more a question on which OS you want to deploy. Check the link for support statement on ADK and ConfigMgr from the Microsoft Team.
https://blogs.technet.microsoft.com/enterprisemobility/2016/09/09/configuration-manager-and-the-windows-adk-for-windows-10-version-1607/

Q: What was the package to add for Win 10 v1607 in MDT to fix WU issue?
A: Make sure to add the latest CU for November that is KB 3200970 http://support.microsoft.com/?kbid=3200970 together with servicing stack update KB3199986 https://support.microsoft.com/en-us/kb/3199986

Q: Adding the CU via a Package, but it still appears to download it from WU. Also, tried to add it the image via DISM, but same result. Any suggestions on how to prevent it from downloading?
A: This is a known issue that can be read from the KB article. To avoid it install them as applications before the first Windows Update step runs.

Q: KB3197954 is superseded so just add in the next Cumulative Update for Windows 10 Version 1607? do the next one have a working WU agent or do a first need to install this one?
A: No, all CUs contains all the previous month’s patches so the latest one will cover everything you need.

Q: What could we expect roadmap wise, with MDT and SCCM, compared to roadmap of Win 10? Will MDT / SCCM keep up?
A: Both ConfigMgr and MDT is dedicated to staying current with Windows 10. This means that MDT will be updates when needed for deployment and ConfigMgr will get continues releases to add features and fix bugs. Just this year we have seen 3 production releases of ConfigMgr (1602, 1606 and 1610)

Q: What’s the top benefits using MDT+ConfigMgr together?
A: MDT adds about 280 built-in features through scripts. You may of course build that yourself using native ConfigMgr but I have more fun things to do with my time. And if you build them yourself you will have to support them. MDT on the other hand is supported by Microsoft.

Q: Do you recommend custom Windows10 images and what is your go to image creation tool?
A: Always use MDT for reference image creation. I recommend using custom images for bare metal deployment so you can add in things your end users will need, like Visual C++ runtimes and .Net Framework. For upgrades, custom images are not supported so you will need both.

Q: When creating a W10 ref image, would you recommend applying the latest CU offline or online?
A: Both work but if you want to save time do them online otherwise it will redownload the patch to apply certain things again.

Q: Deploying with 1607 ADK working with win 7 deployment?
A: There is one big issue using the ADK 1607. Driver injection on Windows 7 with ADK1607 will fail when running on SSD drives. Using a ADK1511 boot image will solve that issue.


Hope this has helped you out with your deployments

/Peter

Windows Server 2016 Ref Image

Update 2016-10-20: VL media has been release and should be used for production environments. I have also added the servicing update for 2016 that is needed to get a more complete image.

During Ignite Windows Server 2016 was released as an Eval product. This means you can now download and start testing the RTM version of 2016 and prepare for when the volume license bits arrive sometime later this fall.

As with previous version of Windows Server it makes sense to create a reference image to include needed zero day patches and Visual C++ runtimes for any applications you might need to run.

To create a reference image we use Microsoft Deployment Toolkit and guidance on how to set that up can be found on TechNet here: https://technet.microsoft.com/en-us/itpro/windows/deploy/create-a-windows-10-reference-image The same principals for Windows 10 applies to Windows Server 2016 with a few differences.

So lets start with importing the operating system this is the same as on the client side, just keep in mind to keep the folder name short to avoid issues with filenames in subfolder getting to long.

ImportOS

Next we create the a Package folder and import the zero day patch with fixes for Storage Spaces Direct (S2D). The patch is at current writing missing a knowledge article but can be found in the update catalog. Search for KB3192366 or use this link http://catalog.update.microsoft.com/v7/site/Search.aspx?q=3192366

As KB3192366 is an update rollup you will also need the matching service stack update. For 2016 and Windows 10 that is KB3176936 found here http://support.microsoft.com/?kbid=3176936

When the folder has been created and the patch imported it should look something like this

Package

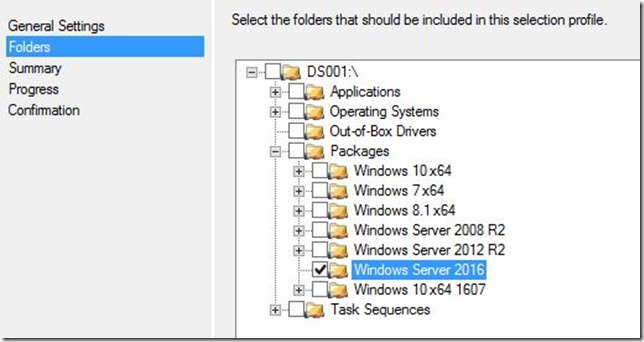
Continue with creating a Selection Profile to make sure that when the image is deployed only the relevant patches for WS2016 is imported. Expand the Advanced Configuration in MDT, select the node called Selection Profiles. Create a new profile and select the folder created in the step above.

SelectionProfile

We also need an application to install the Visual C++ runtimes to make it as easy as possible use the following from the friendly bunny https://deploymentbunny.com/2014/09/25/nice-to-havevb-script-wrapper-for-all-vc-installers-to-be-used-in-mdt/

VisualC

Next you need to create the task sequence by following the short wizard. When the sequence is created there are a couple of things to sort out.

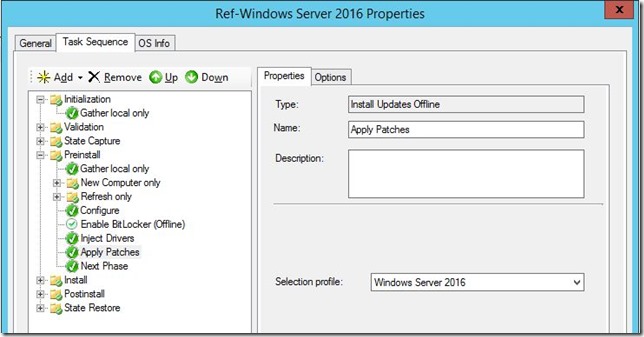
First off we need to use the selection profile we created earlier. To do that open up the sequence and in the Preinstall section find the step called Apply Patches. To the right you will find a dropdown that is preset to All Packages, this needs to be changed to the Selection Profile created.

TSSelectionProfile

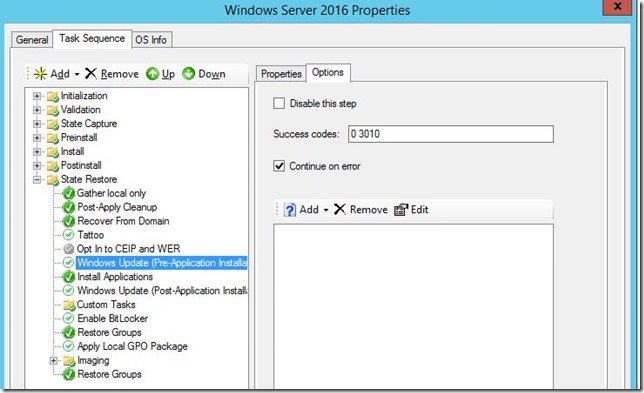
The second item to change is to turn on Windows Update in the sequence which is disabled by default. The two Windows Update steps can be found in the State Restore phase. Make sure to untick the Disable this step check box for each of them.

WindowsUpdate

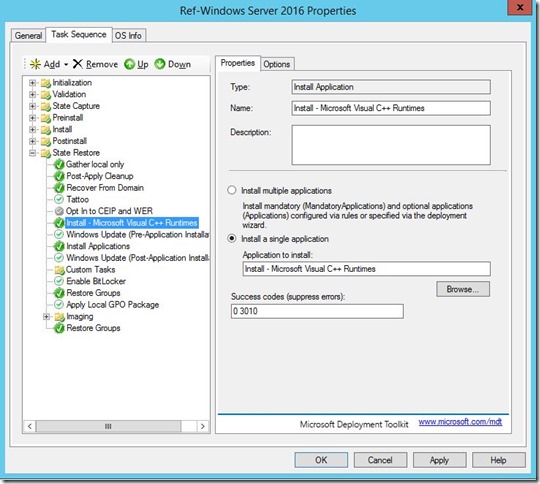
Add the C++ runtimes application to your sequence just above the first Windows Update step to make sure that any patches available for them will be applied as well.

VisualCTaskSequence

The last thing is to change the default behavior of Windows Update. To to that we need to change a value in the unattend.xml file used by this sequence. Browse to your deployment share and to the Control folder. In here there will be a folder with the same name as the ID of your newly created sequence. Inside of that folder you will find the unattend.xml file, edit the file with Notepad or any other xml compatible editor.

Find the OOBE Section and the value called ProtectYourPC. Change the value from 1 to 3. This will disable Windows Update until MDT is ready to use it and MDT will the turn the feature back on.

unattend

That’s it your all set. This can now be run as part of your image factory setup, as a stand alone sequence with either VmWare or Hyper-V as the virtual machine platform.

If you want more information on the Image Factory check Mikes blog here https://deploymentbunny.com/2014/01/06/powershell-is-king-building-a-reference-image-factory/

And if you want more detailed information on the setup and how to skip wizard panes during your reference image creation check Johan’s blog here http://deploymentresearch.com/Research/Post/521/Back-to-Basics-Building-a-Windows-7-SP1-Reference-Image-using-MDT-2013-Update-2

Happy deploying!

/Peter

Windows 10 – anniversary update

The new version of Windows 10 has been released. Since the build was completed during the month of July it has been named 1607 and has a build version number of 14393. The new version can be deployed using the current version of MDT but needs an upgraded ADK to fully work. The new ADK can be downloaded from here http://download.microsoft.com/download/9/A/E/9AE69DD5-BA93-44E0-864E-180F5E700AB4/adk/adksetup.exe

Don’t forget to rebuild your reference images to include C++ runtimes and other needed application frameworks for your organization.

If you want to know more about what’s new in ADK check you Johan Arwidmarks blog about that here http://deploymentresearch.com/Research/Post/539/Inside-Windows-ADK-10-v1607

I have not found any new releases of the ADMX templates but the current ones can be used from and installed OS with 1607. You will find them under C:\Windows\PolicyDefinitions.

Happy deploying!

/Peter

Enable credential guard in configmgr

While working with at customer last we it was decided they wanted Credential Guard. Which in it self is a good thing. The problem was that they wanted this enabled as part of the Configuration Manager OSD.

Now normally automating things during ConfigMgr OSD isn’t to difficult however ConfigMgr has a problem with things that require double reboots. Since Hyper-V is a prerequisite for Credential Guard and Hyper-V requires a double reboot this poses a problem.

This might be solved by Microsoft in the future but for now you will have to employ a bit of a workaround. This consists of a couple of things, one is setting it up so you have a reboot not monitored by the task sequence and the other is installing the required roles and lastly you will also need to input the relevant registry values to enable the features.

Step 1 – Adding a reboot outside of the task sequence

This is something you should probably do anyway and it is documented in several blogpost before this one.

You will need to set a custom task sequence variable called SMSTSPostAction and set that to “Shutdown /r /t 30” this will cause a reboot 30 seconds after sequence thinks its done.

SMSTSPostAction

Step 2 – Creating the package

Download the script from here http://bit.do/bYZsr and put it in a folder on your CMSources share. Create a new package and a program and define the following as command line for running it: “PowerShell.exe –ExecutionPolicy ByPass –file “Enabled-CredentialGuard.ps1”

Don’t forget to enabled “Allow this program to be installed from the Install Package task sequence without being deployed”

Step 3 – Customize the task sequence

Lastly we customize the sequence to run this specific package at specific point in the sequence. The rule here is that it needs to be run after any other steps that can cause a reboot as the script will install and configure everything but the reboot should happen outside of the sequence as we configured it during step 1.

So for this customer that happens just before status is set to 5 as you can se in the picture below.

Sequence

The last customization is to set an option on this to check for a task sequence variable. You should check for isUEFI equals true. This is to make this only applied to UEFI based machines as it will not work on legacy bios. If you want to you can add steps to check for Secureboot or other pre reqs.

UEFI

The script – raw

<#
Created:     2016-04-02
Version:     1.0
Author :     Peter Lofgren
Twitter:     @LofgrenPeter
Blog   :     https://syscenramblings.wordpress.com

Disclaimer:
This script is provided "AS IS" with no warranties, confers no rights and
is not supported by the author
#>

Function Import-SMSTSENV{
    try
    {
        $tsenv = New-Object -COMObject Microsoft.SMS.TSEnvironment
        Write-Output "$ScriptName - tsenv is $tsenv "
        $MDTIntegration = "YES"
       
        #$tsenv.GetVariables() | % { Write-Output "$ScriptName - $_ = $($tsenv.Value($_))" }
    }
    catch
    {
        Write-Output "$ScriptName - Unable to load Microsoft.SMS.TSEnvironment"
        Write-Output "$ScriptName - Running in standalonemode"
        $MDTIntegration = "NO"
    }
    Finally
    {
    if ($MDTIntegration -eq "YES"){
        if ($tsenv.Value("LogPath") -ne "") {
          $Logpath = $tsenv.Value("LogPath")
          $LogFile = $Logpath + "\" + "$LogName.log"
        }
        Elseif ($tsenv.Value("_SMSTSLogPath") -ne "") {
          $Logpath = $tsenv.Value("_SMSTSLogPath")
          $LogFile = $Logpath + "\" + "$LogName.log"
        }
    }
    Else{
        $Logpath = $env:TEMP
        $LogFile = $Logpath + "\" + "$LogName.log"
    }
    }
}
Function Start-Logging{
    start-transcript -path $LogFile -Force
}
Function Stop-Logging{
    Stop-Transcript
}


# Set Vars

$SCRIPTDIR = split-path -parent $MyInvocation.MyCommand.Path
$SCRIPTNAME = split-path -leaf $MyInvocation.MyCommand.Path
$SOURCEROOT = "$SCRIPTDIR\Source"
$SettingsFile = $SCRIPTDIR + "\" + $SettingsName
$LANG = (Get-Culture).Name
$OSV = $Null
$ARCHITECTURE = $env:PROCESSOR_ARCHITECTURE
$LogName = $SCRIPTNAME


#Try to Import SMSTSEnv
. Import-SMSTSENV


#Start Transcript Logging
. Start-Logging


#Output base info
Write-Output ""
Write-Output "$ScriptName - ScriptDir: $ScriptDir"
Write-Output "$ScriptName - SourceRoot: $SOURCEROOT"
Write-Output "$ScriptName - ScriptName: $ScriptName"
Write-Output "$ScriptName - SettingsFile: $SettingsFile"
Write-Output "$ScriptName - Current Culture: $LANG"
Write-Output "$ScriptName - Integration with MDT(LTI/ZTI): $MDTIntegration"
Write-Output "$ScriptName - Log: $LogFile"


#Enable Hyper-V
If ([environment]::Is64BitOperatingSystem -eq $True) {
  $InstallerName = "C:\Windows\sysnative\dism.exe"
}
Else {
  $InstallerName = "C:\Windows\system32\dism.exe"
}
$Arg = "/online /enable-feature /featurename:Microsoft-Hyper-V-Hypervisor /all /LimitAccess /Norestart"
Write-Output "About to run $InstallerName with arguments $Arg"
$Result = Start-Process -FilePath $InstallerName -ArgumentList $Arg -NoNewWindow -Wait -PassThru
Write-Output "Finsihed installing Hyper-V-Hypervisor with exitcode $($Result.ExitCode)"

$Arg = "/online /enable-feature /featurename:IsolatedUserMode /LimitAccess /Norestart"
Write-Output "About to run $InstallerName with arguments $Arg"
$Result = Start-Process -FilePath $InstallerName -ArgumentList $Arg -NoNewWindow -Wait -PassThru
Write-Output "Finsihed installing IsolatedUserMode with exitcode $($Result.ExitCode)"

$Arg = "/online /disable-feature /featurename:Microsoft-Hyper-V-Tools-All /Norestart"
Write-Output "About to run $InstallerName with arguments $Arg"
$Result = Start-Process -FilePath $InstallerName -ArgumentList $Arg -NoNewWindow -Wait -PassThru
Write-Output "Finsihed removing Hyper-V Tools with exitcode $($Result.ExitCode)"

#Enable Credential Guard
$Path = "HKLM:\SYSTEM\CurrentControlSet\Control\DeviceGuard"
New-Item -Path $Path -ItemType Directory -Force -ErrorAction SilentlyContinue
New-ItemProperty -Path $Path -Name EnableVirtualizationBasedSecurity -PropertyType 4 -Value 1 -ErrorAction SilentlyContinue
New-ItemProperty -Path $Path -Name RequirePlatformSecurityFeatures -PropertyType 4 -Value 1 -ErrorAction SilentlyContinue
New-ItemProperty -Path $Path -Name HypervisorEnforcedCodeIntegrity -PropertyType 4 -Value 0 -ErrorAction SilentlyContinue

New-ItemProperty -Path HKLM:\SYSTEM\CurrentControlSet\Control\Lsa -Name LsaCfgFlags -PropertyType 4 -Value 1 -ErrorAction SilentlyContinue


#Stop Transcript Logging
. Stop-Logging

ConfigMgr–Extending Hardware Inventory

So if you are using ConfigMgr you probably know that you can extend hardware inventory to inventory pretty much anything. The cool thing is that by almost default there are two classes that are really nice to have.

The first being Win32_QuickFixEngineering which is a WMI class listing all installed patches. Having that inventoried means you can build collections based on missing or certain patches installed which when it comes to critical patches or hotfixes are really nice.

The second is a kind of custom class and its called Microsoft_BDD_Info and it is created by ZTITatoo.wsf when you deploy a computer with either MDT or ConfigMgr with MDT integration. This includes a bunch of information from the deployment. For instance it lists which sequence ID was run and the timestamp. So if you inventory this you can keep collections based on what sequences was used and if you have a nice version control in your sequence you now find all your computer that where deployed with a certain version of sequence.

So how do you enable this awesomeness? Well its pretty simple. Fire off your ConfigMgr console and check under Administration and Client settings. You will have a setting called Default Client Settings. Open it up and on the left hand click Hardware inventory. Next click the button to the right where it says Classes. You will be presented with a long list of WMI classes that can be enabled and disabled. At the top just do a search for “Quick” and select the class Win32_QuickFixEngineering.

QuickFix

To enabled the second class a bit more work is required but don’t worry it is not hard. Go back to the client settings (if you left it) and click the Add button seen at the bottom (look at the image above for guidance). You now need to connect to a computer that has been deployed using MDT/ConfigMgr+MDT so click the connect button and type in the computer name and credentials if needed.

HardwareClass

When connected you will see all the WMI classes available on that computer. Just find the one called Microsoft_BDD_Info and select it and click OK when done.

BDD_info

So now they have both been selected and you have saved the Clients Settings by clicking OK all the way out. Now all that remains is waiting for the next hardware inventory to complete and you can start using the values collected.

Happy deploying!

/Peter

PowerShell Wrapper – Windows Management Framework 4.0

I got a question (you know who you are) if I had a WMF 4 PowerShell wrapper and while I didn’t at the time I thought I would create one as you still need WMF4 to be installed before WMF 5 can be installed.

Create a simple folder structure looking like this

Folders

In the source folder place the files for WMF4 that can be downloaded from Microsoft Download here https://www.microsoft.com/en-us/download/details.aspx?id=40855

Download the script here http://bit.ly/1TAck2I

Import as an application into MDT and either dynamically assign the application or add it into your Task Sequence the same way I do in my Windows Management Framework 5 here https://syscenramblings.wordpress.com/2016/02/26/wmf-5-in-the-reference-image/

Happy deploying!

/Peter

MDT handoff to SCCM

I will start by saying this is not in any of the best practices books but it works well and is used for certain scenarios.

Sometimes when I get to a customer they have MDT setup and working for OSD but someone higher up have decided that they need ConfigMgr to manage clients going forward. Don’t get me wrong I’m all for using ConfigMgr to manage clients but that being said not everyone finds ConfigMgr the easiest or most understandable platform to use. So the question then arises “Could we still use MDT to deploy the machines and then ConfigMgr to manage them?” and of course the answer is YES!

So how do we accomplish this? There are two ways and I will describe both but only show one.

The first way of doing it by using the excellent startup script created by Jason Sandys (found here http://blog.configmgrftw.com/configmgr-client-startup-script/) it is easy to setup and only requires a small startup GPO and a file share. The upside to using this is that if someone for some reason didn’t get the agent during initial setup or someone uninstalled it from a client that is targeted by the GPO the client will get reinstalled. Jason has also managed to add some repair functions to it. So the downside then is that when using a GPO the client has to actually read the GPO and for that work the client has to be a member of the domain so workgroup computers are out.

The second way is what we are going to focus on for the rest of this post. That way is to install it during OSD in MDT as an application. The upside to doing it this way is, as soon as the deployment is done the client is also installed regardless of if the client joins a domain or not. Another upside to doing it this way instead of with a GPO is that if the client restarts at any point during deployment and the GPO is enabled the client will be installed during OSD possibly messing around while you are doing other installations or configuration steps.

So how do I do this? Well first off we need to create an application in MDT then we link that application into our sequence.

Step 1 – Creating the application

Create a folder named “CMAgent” so we have something to work with. Inside that create another folder called “Source”. Next to the Source folder place the script file and the xml which you download a bit further down in the post. In the Source folder you copy the client installation files from your site server in \\<your site server>\sms_<sitecode>\Client.

You should then have a folder that looks like this

Folder

Now we import that into MDT. So you give the application a name, point to your source folder and set a command line. For name I prefer Install – CCM Agent so I can easily see what the application does by just looking at the name. For command line you should use the following

PowerShell.exe –ExecutionPolicy ByPass –File Install-Application.ps1

If you open the application when its done it should look like this

Application

Step 2 – Adding it to the Task Sequence

The next bit is to add it to the sequence in the correct spot to avoid it being installed and then messing with your deployment. So open your sequence go down all the way to the end and mark the step called Apply Local GPO Package, Click Add at the top and Create a group. Now name the group so you know what it does, either Custom Steps or as in this case I named it Custom Handoff. In that group we add a step for Install application. Change the step to install a single application and point to your newly imported application.

The sequence should then look something like this

Sequence

Step 3 – Customizing the agent installation

The last thing you need to do is change some settings to point the agent to your specific environment. So open up your deploymentshare folder and browse to Applications\Install – CCM Agent. Use notepad to edit the settings.xml file and change the Installswitch section of the file. Below is a sample of how it can look, make sure to change it to suit your server name and infrastructure.

settings

Your all set! Next time you image a computer it will then have the CCM agent installed.

Link to download the script is here http://bit.ly/1TAczuB

Happy deploying!

/Peter