Month: September 2016

WS2016 Beyond Unsupported

Update 2016-10-01: Currently MAK keys won’t work with activation. Expect Microsoft to release a new Eval media to correct this.

Update 2016-10-09: I previously had mentioned you can upgrade index 1 and 3 using the methods described below but Core editions cannot be modified this way and I have update the post to reflect that.

Windows Server 2016 Eval media has been released and while we wait for VL media there is a small cheat you can use if you want to play around with the licensing modes. Please do note that this is not in any way a supported way to do it and far from recommended.

Method 1 – An already running server with WS 2016 installed

This is the easier way and can be done on any running Windows Server 2016 except for domain controllers.

First you need to get the KMS keys from Microsoft TechNet KMS key appendix A found here https://technet.microsoft.com/en-us/library/jj612867(v=ws.11).aspx. There are different keys for both Standard and Datacenter so make sure pick the correct one.

Next start an elevated command prompt and run one of the following commands depending on if you upgrading to Standard or Datacenter

For Standard:
Dism /online /Set-Edition:ServerStandard /Productkey:<key for Standard from appendix A> /AcceptEULA /Norestart

SrvStd

For Datacenter:
Dism /online /Set-Edition:ServerDatacenter /Productkey:<key for Datacenter from appendix A> /AcceptEULA /Norestart

SrvDC

Wait while it completes and then reboot the server and your done. When the server is done rebooting you will have either a Standard edition or Datacenter Edition server.

Method 2 – Changing the media and enable in-place upgrade

This is a bit more complex and requires some installation steps before it works. The first thing needed is the newest Dism tools 10.0.14939 found in the ADK for Windows 10 1607. That can be found here https://developer.microsoft.com/sv-se/windows/hardware/windows-assessment-deployment-kit

Download the setup for ADK and run the installation. The only component needed for this is the Deployment Tools. Wait for the installation to finish and then reboot the machine to make sure all dlls are registered.

adk

Download the Eval media from the TechNet Evaluation Center https://www.microsoft.com/en-us/evalcenter/evaluate-windows-server-2016

Copy the contents of the ISO to a folder on your management machine in this example I will use C:\ISO but you can use any folder, just make sure to correct all paths in each command.

Iso

Create a folder for mounting the wim file (C:\Mount) and start an elevated command prompt.

Change the directory to your newly installed dism tools usually here C:\Program Files (x86)\Windows Kits\10\Assessment and Deployment Kit\Deployment Tools\amd64\DISM then run the following commands and press enter after each (there will be some wait in between each)

dism.exe /Mount-Wim /WimFile:C:\ISO\Sources\Install.wim /index:2 /MountDir:C:\Mount

dism.exe /Image:C:\Mount /Set-Edition:ServerStandard /ProductKey:WC2BQ-8NRM3-FDDYY-2BFGV-KHKQY /AcceptEula /Norestart

dism.exe /UnMount-image /MountDir:C:\Mount /Commit

dism.exe /Mount-Wim /WimFile:C:\ISO\Sources\Install.wim /index:4 /MountDir:C:\Mount

dism.exe /Image:C:\Mount /Set-Edition:ServerDatacenter /ProductKey:CB7KF-BWN84-R7R2Y-793K2-8XDDG /AcceptEula /Norestart

dism.exe /UnMount-image /MountDir:C:\Mount /Commit

If you look closely you will notice I change the index number and the product key to update all 4 scenarios, Server Standard Core, Server Standard GUI, Datacenter Core and Datacenter GUI

Now the last step is the one you have to solve yourself and that is to create a bootable ISO from these files.


As a last note: DO NOT under any circumstances use this in production. I highly doubt this is a supported or even recommended way from Microsoft but can help you in your testing with licenses.

Happy deploying!

/Peter

Windows Server 2016 Ref Image

Update 2016-10-20: VL media has been release and should be used for production environments. I have also added the servicing update for 2016 that is needed to get a more complete image.

During Ignite Windows Server 2016 was released as an Eval product. This means you can now download and start testing the RTM version of 2016 and prepare for when the volume license bits arrive sometime later this fall.

As with previous version of Windows Server it makes sense to create a reference image to include needed zero day patches and Visual C++ runtimes for any applications you might need to run.

To create a reference image we use Microsoft Deployment Toolkit and guidance on how to set that up can be found on TechNet here: https://technet.microsoft.com/en-us/itpro/windows/deploy/create-a-windows-10-reference-image The same principals for Windows 10 applies to Windows Server 2016 with a few differences.

So lets start with importing the operating system this is the same as on the client side, just keep in mind to keep the folder name short to avoid issues with filenames in subfolder getting to long.

ImportOS

Next we create the a Package folder and import the zero day patch with fixes for Storage Spaces Direct (S2D). The patch is at current writing missing a knowledge article but can be found in the update catalog. Search for KB3192366 or use this link http://catalog.update.microsoft.com/v7/site/Search.aspx?q=3192366

As KB3192366 is an update rollup you will also need the matching service stack update. For 2016 and Windows 10 that is KB3176936 found here http://support.microsoft.com/?kbid=3176936

When the folder has been created and the patch imported it should look something like this

Package

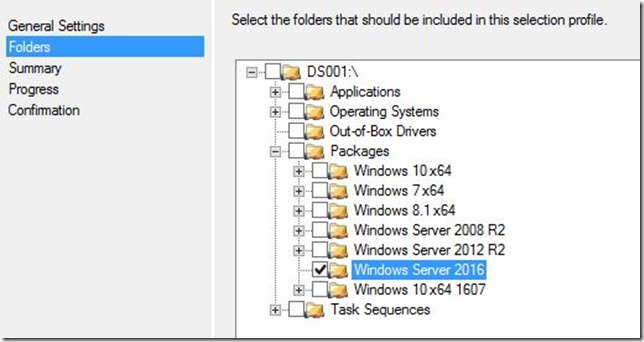
Continue with creating a Selection Profile to make sure that when the image is deployed only the relevant patches for WS2016 is imported. Expand the Advanced Configuration in MDT, select the node called Selection Profiles. Create a new profile and select the folder created in the step above.

SelectionProfile

We also need an application to install the Visual C++ runtimes to make it as easy as possible use the following from the friendly bunny https://deploymentbunny.com/2014/09/25/nice-to-havevb-script-wrapper-for-all-vc-installers-to-be-used-in-mdt/

VisualC

Next you need to create the task sequence by following the short wizard. When the sequence is created there are a couple of things to sort out.

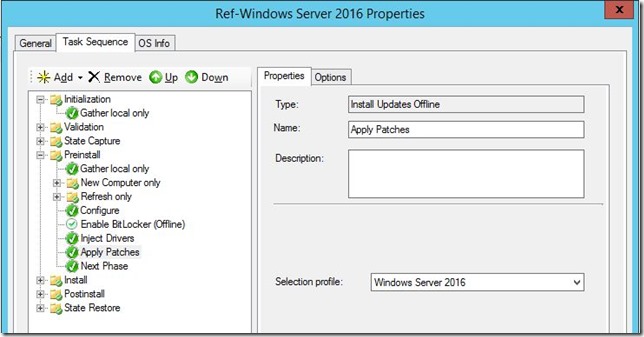
First off we need to use the selection profile we created earlier. To do that open up the sequence and in the Preinstall section find the step called Apply Patches. To the right you will find a dropdown that is preset to All Packages, this needs to be changed to the Selection Profile created.

TSSelectionProfile

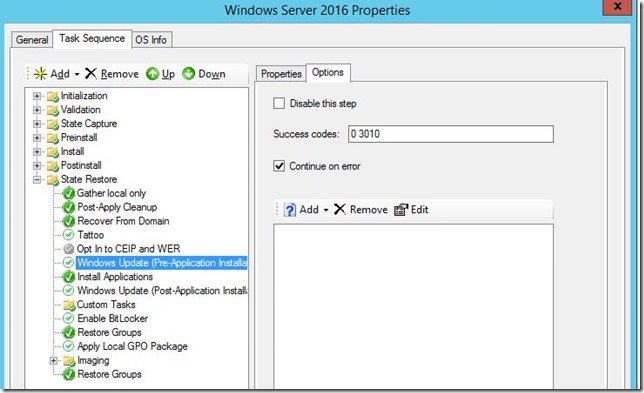
The second item to change is to turn on Windows Update in the sequence which is disabled by default. The two Windows Update steps can be found in the State Restore phase. Make sure to untick the Disable this step check box for each of them.

WindowsUpdate

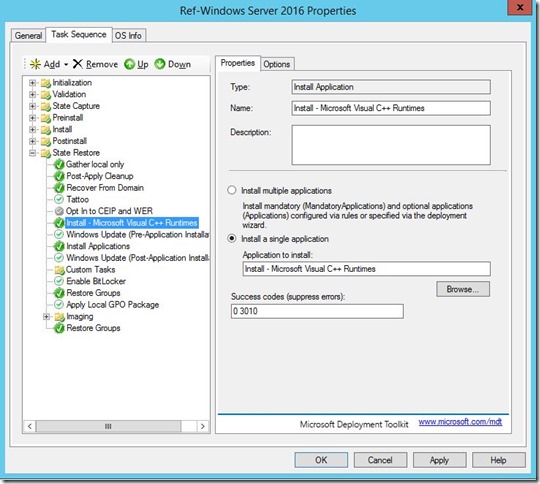
Add the C++ runtimes application to your sequence just above the first Windows Update step to make sure that any patches available for them will be applied as well.

VisualCTaskSequence

The last thing is to change the default behavior of Windows Update. To to that we need to change a value in the unattend.xml file used by this sequence. Browse to your deployment share and to the Control folder. In here there will be a folder with the same name as the ID of your newly created sequence. Inside of that folder you will find the unattend.xml file, edit the file with Notepad or any other xml compatible editor.

Find the OOBE Section and the value called ProtectYourPC. Change the value from 1 to 3. This will disable Windows Update until MDT is ready to use it and MDT will the turn the feature back on.

unattend

That’s it your all set. This can now be run as part of your image factory setup, as a stand alone sequence with either VmWare or Hyper-V as the virtual machine platform.

If you want more information on the Image Factory check Mikes blog here https://deploymentbunny.com/2014/01/06/powershell-is-king-building-a-reference-image-factory/

And if you want more detailed information on the setup and how to skip wizard panes during your reference image creation check Johan’s blog here http://deploymentresearch.com/Research/Post/521/Back-to-Basics-Building-a-Windows-7-SP1-Reference-Image-using-MDT-2013-Update-2

Happy deploying!

/Peter

Credential Guard without tools

When you deploy new machines with Windows 10 1607 and want to enable Credential Guards one of the things will want to do is prepare Hyper-V and Isolated User Mode so it is preinstalled so the end users do not get affected during enablement.

First off lets talk about Isolated User Mode, this was previously a stand alone feature that was required but starting with v1607 this has been included into the Hyper-V role. This means that there is one less feature for you to enable and keep track of.

Next we need to enable Hyper-V and the only features you need are the Hyper-V services and Hyper-V platform. This can be achieved using the Install Roles and Features step in MDT. In your sequence before the Windows Update step add a group and add the steps as show below.

Start with a Install Roles and Features step and then add a Restart Computer step and finish with Run Command Line step. Configure the Install Roles and Feature step as follow, check Hyper-V Platform, Hyper-V Hypervisor and Hyper-V Services.

AddHyperV

For the Run Command Line step add the following information:
Dism /online /disable-feature /featurename:Microsoft-Hyper-V-Tools-All /Norestart

RemoveTools

This will ensure that when the computer is finished deploying it will have the necessary roles and features for credential guard but end users won’t see the management tools.


Happy Deploying

/Peter

PowerShell – Convert To Weblink

During a recent project I was presented with a long text that was supposed to be emailed to administrative staff. The problem with the text is that it contained links to webpages. And since it was delivered as a text those links didn’t not get converted to HTML formattedformated links in the email.

The Input

The input can be any text that is delivered as a string.
For example:

$InputText = @"
This is meaningful text that someone important has written

A bit down there is a link in the text to http://wwww.viamonstra.com

Regards,
Viamonstra team
http://www.viamonstra.com
"@

The Script

<#
Created:     2016-09-22
Version:     1.0
Author :     Peter Lofgren
Twitter:     @LofgrenPeter
Blog   :     https://syscenramblings.wordpress.com

Disclaimer:
This script is provided "AS IS" with no warranties, confers no rights and
is not supported by the author
#>
<#
.SYNOPSIS
  Change DNS Client address on a computer
.DESCRIPTION
  Sets new DNS client ip address on one or more computers
.EXAMPLE
  Invoke-DnsServersChange.ps1 -ComputerName Server01.corp.viamonstra.com -PrimaryDns 8.8.8.8 -SecondaryDNS 8.8.4.4
.EXAMPLE
  Invoke-DnsServersChange.ps1 -ComputerName Server01.corp.viamonstra.com,Server02.corp.viamonstra.com -PrimaryDns 8.8.8.8 -SecondaryDNS 8.8.4.4
.EXAMPLE
  Invoke-DnsServersChange.ps1 -ComputerName C:\Servers.txt -PrimaryDns 8.8.8.8 -SecondaryDNS 8.8.4.4
#>

Function Convert-Weblink($InputText) {
  $regex = "(ht|f)tp(s?)\:\/\/(([a-zA-Z0-9\-\._]+(\.[a-zA-Z0-9\-\._]+)+)|localhost)(\/?)([a-zA-Z0-9\-\.\?\,\'\/\\\+&amp;%\$#_]*)?([\d\w\.\/\%\+\-\=\&amp;\?\:\\\&quot;\'\,\|\~\;]*)"
  $Matches = (Select-String -InputObject $InputText -Pattern $regex -AllMatches).Matches | select -Unique
  foreach ($Match in $Matches) {
    $InputText = $InputText -replace [regex]::Escape($Match.Value),"<a href=$($Match.value)>$($Match.value)</a>"
  }
  Return $InputText
}

The Output

Using the example input text above the output would look something like this and you can the use that to build a webpage, send a HTML formatted email or any other HTML scenario you can think of.

This is meaningful text that someone important has written

A bit down there is a link in the text to <a href=http://wwww.viamonstra.com>http://wwww.viamonstra.com</a>

Regards,
Viamonstra team
<a href=http://www.viamonstra.com>http://www.viamonstra.com</a>


Hopefully this helps you out and let me know if you find any issues!

/Peter