Configuration Manager

Enable TPM inventory

So a couple of weeks ago I wrote a post on how to verify that your computers are running UEFI and SecureBoot (read here). After that there was a post on the importance of staying supported with up to date hardware (read that here). As a follow up to both of them there is another part that should be monitored as we move deeper into to Windows as a Service. This becomes especially true when we look at todays security landscape and the need to enable all of the new security features.

Some of these new features requires TPM and furthermore some require TPM 2.0. Now this can be inventoried using tools like Microsoft Endpoint Manager. The issue here is that by default ConfigMgr only inventory information about if TPM is present, enabled and owned. It does not keep track of TPM spec version.

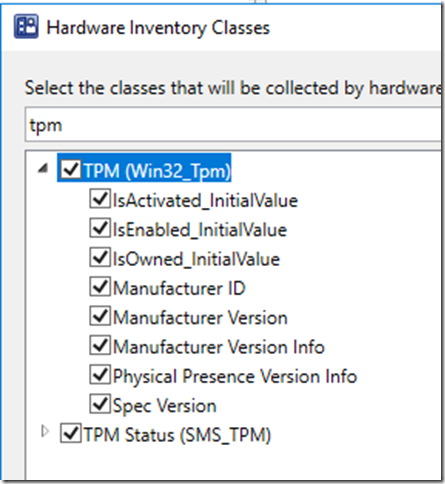
So this will be a quick fix! Open up your client settings that targets your workstations and laptops and make sure to enable the TPM spec version. Check out the hardware inventory page and the classes part. If you do a quick search for TPM you will find that spec version is not check. So go ahead and check that. Watch the inventory data flow in and make decisions based on it!

TPM

Happy deployments!

/Peter

#MEMCM and the stuck hotfix

While doing a new install at a customer the last couple of weeks we ran into a strange issue. To make matters worse this is an offline site so all the normal posts and tricks don’t apply.

Now the issue here is that when we run the serviceconnectiontool it will create a telemetry file and download needed hotfixes and upgrades. Now this all works as intended, the challenges is that once the dowloaded files have been imported over and the tool run on the primary again the hotfix is stuck as “available to download”. Now in most scenarios a simple restart of SMS_EXECUTIVE or kick the download process a bit. However, in a offline scenario re-downloading the patch doesn’t really help.

After a bit of looking and trouble shooting it turns out that I’m not the first (and probably not the last) to encounter this. Now Prajwal Desai has made a post on how to fix that on an online system, read the full post here https://www.prajwaldesai.com/sccm-1906-hotfix-download-issues/. What he either doesn’t know or have encountered yet is that the same principles apply to offline systems as well, meaning you should run the serviceconnectiontool as described in the official documentation. When done you still execute the storeprocedure spAddPackageToDownload with the guid as described. Restart the SMS_EXECUTIVE service and wait for extraction of the cab file to happen. The the hotfix will be available to install as expected.

MEMCM1906HF

A shoutout to Parjwal for documenting the fix!

Happy deployments!

/Peter

Staying secure with UEFI and SecureBoot

One of the bigger issues I still see with a lot of customers is devices that has still not been converted to run UEFI and SecureBoot. This will prevent you from enabling a bunch of security features in Windows 10. This includes but is not limited to new features such as Credential Guard (to protect your identities).

If you already have ConfigMgr CB today the new SMS_Firmware class is enabled by default in hardware inventory. By using this information we can get insight into the environment and see how many machines should be converted. Now you can either create collections for this or if you just need to know and want to use the data for a presentation or something like that a simple SQL query can be used.

Running the following SQL query would give you status for SecureBoot and UEFI.

select Secureboot00, UEFI00 from Firmware_DATA

The downside here is that you won’t see what devices. The next issue would be that certain bios versions won’t have full support for UEFI and SecureBoot. Furthermore there are certain vendors and models that requires specific BIOS versions to support new features like Credential Guard. This can however be fix by running a slightly more complex SQL query

select
Case
When SecureBoot00 = 0 Then ‘FALSE’
When SecureBoot00 = 1 Then ‘TRUE’
End AS SecureBootEnabled,
Case
When UEFI00 = 0 then ‘FALSE’
When UEFI00 = 1 Then ‘TRUE’
End AS UEFIEnabled,
dbo.vSMS_R_System.Name0 as PCName, v_GS_WORKSTATION_STATUS.LastHWScan as LastScan
,PC_BIOS_DATA.ReleaseDate00 as BIOSReleaseDate, PC_BIOS_DATA.BIOSVersion00 as BiosVersion
from dbo.Firmware_DATA
Inner Join dbo.vSMS_R_System on dbo.Firmware_DATA.MachineID = dbo.vSMS_R_System.ItemKey
Left join v_GS_WORKSTATION_STATUS on dbo.vSMS_R_System.ItemKey = v_GS_WORKSTATION_STATUS.ResourceID
Left join PC_BIOS_DATA on dbo.vSMS_R_System.ItemKey = PC_BIOS_DATA.MachineID
order by PCName

The output from this gives you a nice list with the status of SecureBoot, UEFI, PCName, bios release date and bios version. Something like below which can then be exported to excel or PowerBI.

SecureBootUefi

Happy deployments!

/Peter

Nice to Know – Defender Sandbox

So another step in the right direction for Windows Defender, it can now run in sandboxed mode. For now you have to turn it on but in the future that will be default.

If you want to read more about the release of this check out the cloudblog from MS here https://cloudblogs.microsoft.com/microsoftsecure/2018/10/26/windows-defender-antivirus-can-now-run-in-a-sandbox/?fbclid=IwAR1BX92wvaqmse7bgucQtPbi_Si6XY1cMfIec9JW1XttX-4wqttIU39mokM

So lets assume you also run ConfigMgr, now this is where its gets intreseting. We can then use a CI to track if it has been turned on!

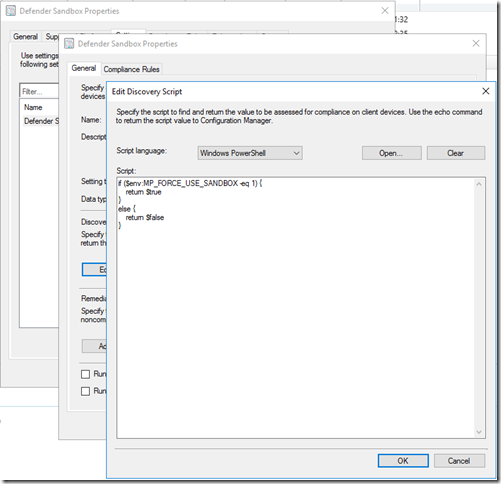
This is done using a very simple detection script.

image

Here is the small code snippet used to track compliance.

if ($env:MP_FORCE_USE_SANDBOX -eq 1) {
  return $true
}
else {
  return $false
}

Now two things remain, set the data type to boolean and as compliance set to “True”.

All set to measure this. Of course a simple script or package can now be used to force the setting of this, just remeber that its only supported on Windows 10 1703 and later and will require a reboot before taking effect.

Happy deploymnet!

/Peter

Improving the Windows 10 Upgrade Sequence

When you upgrade to Windows 10 or between diffrent Windows 10 versions there are genearlly several things you wish to do. This can include removing “bad” applications or install drivers. Among some common things that needs to be taken care of is diffrent pre-requisites and language packs. This posts covers some things you can improve in your Windows 10 upgrade sequence.

The small things first. As more and more users are working from a laptop a common problem is that someone intiates the sequence when the users has 10% battery left. Now the predicatable outcome is broken upgrade and rollback. To prevent this we can enable a small check to verify if the machine is running on battery power and if so exit the sequence quickly all while we leave a log trace for admins to track.

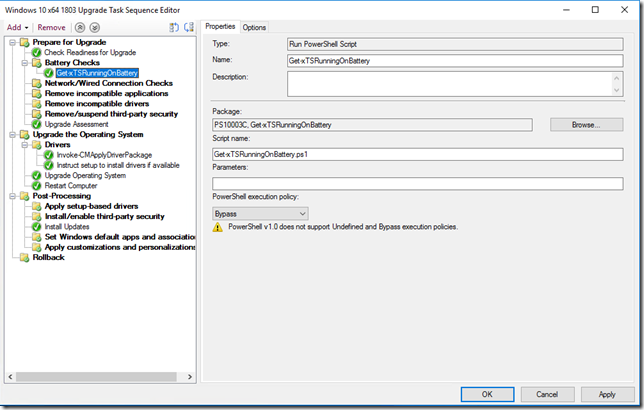
First we require a small powershell script, download that from here https://github.com/LofgrenP/Scripts/blob/master/Get-xTSRunningOnBattery/Get-xTSRunningOnBattery.ps1

Create a package with source files but no program. Then add a Run PowerShell Step in the begning of your sequence. Use the new package that has been created and set the script name to Get-xTSRunningOnBattery.ps1. Set the execution policy to ByPass.
image

That will take care of machines running on battery. Next common issue is that machines not connected to the wired network won’t reconnect to the network after a restart. To assist with this we can make sure that the upgrade does not run if its not a wired connection.

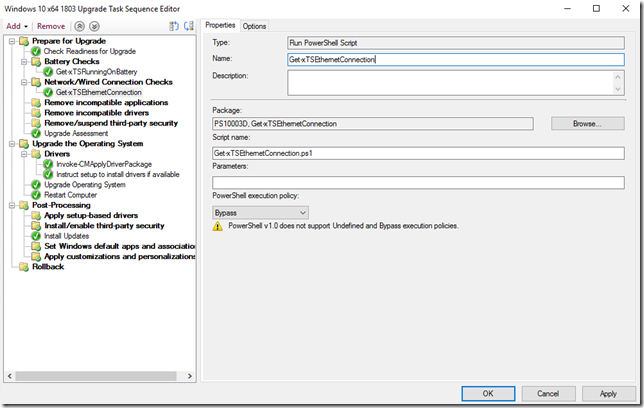
Download the script needed from here https://github.com/LofgrenP/Scripts/blob/master/Get-xTSEthernetConnection/Get-xTSEthernetConnection.ps1

Create a package with source files and no program then add another Run PowerShell Step in the beginning of your sequence. Use the new package that has been created and set the script name to Get-xTSEthernetConnection.ps1. Set the execution policy to ByPass.
image

With that taken care of lets move on to sorting the language packs. To sort this there are two things we need to sort out. First up is making sure to reinstall all language packs that are already installed. Now Nickolaj Andersen over at SCConfigMgr has an awesome post on how to do that, read that here http://www.scconfigmgr.com/2017/11/06/automatically-retain-installed-language-packs-during-windows-10-servicing/

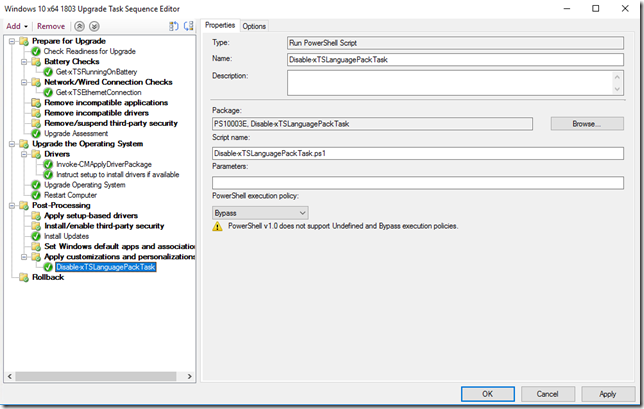
The final piece to the pussel is making sure that the Language Pack scheduled task does not run. This can be achived in many ways but I prefer to just disable the task after the upgrade is done. For that reasone you can download a small script here https://github.com/LofgrenP/Scripts/blob/master/Disable-xTSLanguagePackTask/Disable-xTSLanguagePackTask.ps1

Now we create another package with source files but without any program and add a final Run PowerShell Step to our upgrade sequence. This time at the very end of the sequence. Make sure to use your new package, set the script name to Disable-xTSLanguagePackTask.ps1 and set the execution policy to ByPass.
image

Now you should be all set to upgrace your machines.

Happy deployments!

/Peter

Refresh scenario and LAPS

When doing reinstall of machines a common issue is that the LAPS password does not get updated due to the fact that the machine thinks the password is current. So to prevent the nice folks from Microsoft wrote a small script to reset the timer and force and update. The original blog post and script can be found here https://blogs.msdn.microsoft.com/laps/2015/05/06/laps-and-machine-reinstalls/

Now my issue with this is there is no log file created and no way for helpdesk to verify it actually happend (besides logging on which I don’t like).

So to solve this I have made an updated version of the script that centralizes logging basone if the script is run as part of MDT, Configuration Manager or Standalone.

image

Script can found on github here https://github.com/LofgrenP/Scripts/tree/master/Clear-xTSPasswordTimeStamp

Redistributing failed content

When working with ConfigMgr you always end up distributing content to several DPs. This normaly goes off without a hitch but from time to time this fails. If you then have several DPs spread across a large geographical area, WAN links may be questionable. So when a package then fails most are not happy to redistribute the content to all DPs again.

image

So to help sort that out the following script can be used. The script will find all failed packages on a specified DP and then redistributed them to that single DP only. All that is needed is to run in on the Primary site server / server with SMS provider and specifiy your SiteCode and DP FQDN.

The script is available on Github over here: Update-ContentForSingleDP

Happy deploying!

/Peter

SQL Server Inventory using ConfigMgr

The hardware inventor feature of ConfigMgr helps us discover and track several items. One recurring item is SQL Server and by default there is no nice way of tracking this. Basically the only option out of the box is using the application inventory to find where SQL server is installed. However this usualy results in a large list with mixed servers and clients and you still have no idea if its running SQLExpress, Standard or Enterprise edtion.

So what can we do to fix this besides buy a third party solution. Well the good thing is that SQL stores all the information into WMI, this means we can track editions, installations and versions with a bit of trickery with the hardware inventory engine.

There are number of steps included here at it is important to follow all of them for a successful result.

Step 1 – Update Configuration.mof

The first part of this is updateing configuration.mof. This file will control classes that inventoried and then index into the database.

The file can be a bit tricky to find if you have never done this before. You need to go to this location <Your ConfigMgr Install folder>\Inboxes\clifiles.src\hinv

In here is the configuration.mof file, now first make a backup copy of the file in case you want to revert the changes later and don’t want edit the file again.

At the very end of the file there is a section for adding custom extensions.

//========================

// Added extensions start

//========================

//========================

// Added extensions end

//========================

In between these block we need to add the following

//———————————————

// SQL 2017 Properties

//———————————————

[Union, ViewSources{“select IsReadOnly,PropertyIndex,PropertyName,PropertyNumValue,PropertyStrValue,PropertyValueType,

ServiceName,SqlServiceType from sqlServiceAdvancedProperty”},ViewSpaces{“\\\\.\\root\\microsoft\\sqlserver\\computermanagement14”}, dynamic,

Provider(“MS_VIEW_INSTANCE_PROVIDER”)]

class cm_sql17

{

[PropertySources{“IsReadOnly”}        ] boolean IsReadOnly;

[PropertySources{“PropertyIndex”},key ] uint32 PropertyIndex;

[PropertySources{“PropertyName”},key  ] string PropertyName;

[PropertySources{“PropertyNumValue”}  ] uint32 PropertyNumValue;

[PropertySources{“PropertyStrValue”}  ] string PropertyStrValue;

[PropertySources{“PropertyValueType”} ] uint32 PropertyValueType;

[PropertySources{“ServiceName”},key   ] string ServiceName;

[PropertySources{“SqlServiceType”},key] uint32 SqlServiceType;

};

//———————————————

// SQL 2016 Properties

//———————————————

[Union, ViewSources{“select IsReadOnly,PropertyIndex,PropertyName,PropertyNumValue,PropertyStrValue,PropertyValueType,

ServiceName,SqlServiceType from sqlServiceAdvancedProperty”},ViewSpaces{“\\\\.\\root\\microsoft\\sqlserver\\computermanagement13”}, dynamic,

Provider(“MS_VIEW_INSTANCE_PROVIDER”)]

class cm_sql16

{

[PropertySources{“IsReadOnly”}        ] boolean IsReadOnly;

[PropertySources{“PropertyIndex”},key ] uint32 PropertyIndex;

[PropertySources{“PropertyName”},key  ] string PropertyName;

[PropertySources{“PropertyNumValue”}  ] uint32 PropertyNumValue;

[PropertySources{“PropertyStrValue”}  ] string PropertyStrValue;

[PropertySources{“PropertyValueType”} ] uint32 PropertyValueType;

[PropertySources{“ServiceName”},key   ] string ServiceName;

[PropertySources{“SqlServiceType”},key] uint32 SqlServiceType;

};

//———————————————

// SQL 2014 Properties

//———————————————

[Union, ViewSources{“select IsReadOnly,PropertyIndex,PropertyName,PropertyNumValue,PropertyStrValue,PropertyValueType,

ServiceName,SqlServiceType from sqlServiceAdvancedProperty”},ViewSpaces{“\\\\.\\root\\microsoft\\sqlserver\\computermanagement12”}, dynamic,

Provider(“MS_VIEW_INSTANCE_PROVIDER”)]

class cm_sql14

{

[PropertySources{“IsReadOnly”}        ] boolean IsReadOnly;

[PropertySources{“PropertyIndex”},key ] uint32 PropertyIndex;

[PropertySources{“PropertyName”},key  ] string PropertyName;

[PropertySources{“PropertyNumValue”}  ] uint32 PropertyNumValue;

[PropertySources{“PropertyStrValue”}  ] string PropertyStrValue;

[PropertySources{“PropertyValueType”} ] uint32 PropertyValueType;

[PropertySources{“ServiceName”},key   ] string ServiceName;

[PropertySources{“SqlServiceType”},key] uint32 SqlServiceType;

};

//———————————————

// SQL 2012 Properties

//———————————————

[Union, ViewSources{“select IsReadOnly,PropertyIndex,PropertyName,PropertyNumValue,PropertyStrValue,PropertyValueType,

ServiceName,SqlServiceType from sqlServiceAdvancedProperty”},ViewSpaces{“\\\\.\\root\\microsoft\\sqlserver\\computermanagement11”}, dynamic,

Provider(“MS_VIEW_INSTANCE_PROVIDER”)]

class cm_sql12

{

[PropertySources{“IsReadOnly”}        ] boolean IsReadOnly;

[PropertySources{“PropertyIndex”},key ] uint32 PropertyIndex;

[PropertySources{“PropertyName”},key  ] string PropertyName;

[PropertySources{“PropertyNumValue”}  ] uint32 PropertyNumValue;

[PropertySources{“PropertyStrValue”}  ] string PropertyStrValue;

[PropertySources{“PropertyValueType”} ] uint32 PropertyValueType;

[PropertySources{“ServiceName”},key   ] string ServiceName;

[PropertySources{“SqlServiceType”},key] uint32 SqlServiceType;

};

//———————————————

// SQL 2008 Properties

//———————————————

[Union, ViewSources{“select IsReadOnly,PropertyIndex,PropertyName,PropertyNumValue,PropertyStrValue,PropertyValueType,

ServiceName,SqlServiceType from sqlServiceAdvancedProperty”},ViewSpaces{“\\\\.\\root\\microsoft\\sqlserver\\computermanagement10”}, dynamic,

Provider(“MS_VIEW_INSTANCE_PROVIDER”)]

class cm_sql08

{

[PropertySources{“IsReadOnly”}        ] boolean IsReadOnly;

[PropertySources{“PropertyIndex”},key ] uint32 PropertyIndex;

[PropertySources{“PropertyName”},key  ] string PropertyName;

[PropertySources{“PropertyNumValue”}  ] uint32 PropertyNumValue;

[PropertySources{“PropertyStrValue”}  ] string PropertyStrValue;

[PropertySources{“PropertyValueType”} ] uint32 PropertyValueType;

[PropertySources{“ServiceName”},key   ] string ServiceName;

[PropertySources{“SqlServiceType”},key] uint32 SqlServiceType;

};

//———————————————

// SQL 2000/2005 Properties

//———————————————

[Union, ViewSources{“select IsReadOnly,PropertyIndex,PropertyName,PropertyNumValue,PropertyStrValue,PropertyValueType,

ServiceName,SqlServiceType from sqlServiceAdvancedProperty”},ViewSpaces{“\\\\.\\root\\microsoft\\sqlserver\\computermanagement”}, dynamic,Provider(“MS_VIEW_INSTANCE_PROVIDER”)]

class cm_sql2kand05

{

[PropertySources{“IsReadOnly”}        ] boolean IsReadOnly;

[PropertySources{“PropertyIndex”},key ] uint32 PropertyIndex;

[PropertySources{“PropertyName”},key  ] string PropertyName;

[PropertySources{“PropertyNumValue”}  ] uint32 PropertyNumValue;

[PropertySources{“PropertyStrValue”}  ] string PropertyStrValue;

[PropertySources{“PropertyValueType”} ] uint32 PropertyValueType;

[PropertySources{“ServiceName”},key   ] string ServiceName;

[PropertySources{“SqlServiceType”},key] uint32 SqlServiceType;

};

Save the configuration.mof file

Done! On to step two.

Step 2 – Import hardware inventory information

The next step is done in the console and you need some nice permissions to do this. You will need to edit the default client settings object.

First thing is first. So we need to create a custom mof file to import. To do this, copy the following and save it as SQLProperties.mof (pick a nice location, like the desktop).

//=================SQL 2017 Information

[dynamic, provider(“MS_VIEW_INSTANCE_PROVIDER”),

SMS_Report(TRUE),

SMS_Group_Name(“SQL17 Property”),

SMS_Class_ID(“CUSTOM|SQL17_Property|1.0”)]

class cm_sql17 : SMS_Class_Template

{

[SMS_Report(TRUE)    ]  boolean IsReadOnly;

[SMS_Report(TRUE),key]  uint32 PropertyIndex;

[SMS_Report(TRUE),key]  string PropertyName;

[SMS_Report(TRUE)    ]  uint32 PropertyNumValue;

[SMS_Report(TRUE)    ]  string PropertyStrValue;

[SMS_Report(TRUE)    ]  uint32 PropertyValueType;

[SMS_Report(TRUE),key]  string ServiceName;

[SMS_Report(TRUE),key]  uint32 SqlServiceType;

};

//=================SQL 2016 Information

[dynamic, provider(“MS_VIEW_INSTANCE_PROVIDER”),

SMS_Report(TRUE),

SMS_Group_Name(“SQL16 Property”),

SMS_Class_ID(“CUSTOM|SQL16_Property|1.0”)]

class cm_sql16 : SMS_Class_Template

{

[SMS_Report(TRUE)    ]  boolean IsReadOnly;

[SMS_Report(TRUE),key]  uint32 PropertyIndex;

[SMS_Report(TRUE),key]  string PropertyName;

[SMS_Report(TRUE)    ]  uint32 PropertyNumValue;

[SMS_Report(TRUE)    ]  string PropertyStrValue;

[SMS_Report(TRUE)    ]  uint32 PropertyValueType;

[SMS_Report(TRUE),key]  string ServiceName;

[SMS_Report(TRUE),key]  uint32 SqlServiceType;

};

//=================SQL 2014 Information

[dynamic, provider(“MS_VIEW_INSTANCE_PROVIDER”),

SMS_Report(TRUE),

SMS_Group_Name(“SQL14 Property”),

SMS_Class_ID(“CUSTOM|SQL14_Property|1.0”)]

class cm_sql14 : SMS_Class_Template

{

[SMS_Report(TRUE)    ]  boolean IsReadOnly;

[SMS_Report(TRUE),key]  uint32 PropertyIndex;

[SMS_Report(TRUE),key]  string PropertyName;

[SMS_Report(TRUE)    ]  uint32 PropertyNumValue;

[SMS_Report(TRUE)    ]  string PropertyStrValue;

[SMS_Report(TRUE)    ]  uint32 PropertyValueType;

[SMS_Report(TRUE),key]  string ServiceName;

[SMS_Report(TRUE),key]  uint32 SqlServiceType;

};

//=================SQL 2012 Information

[dynamic, provider(“MS_VIEW_INSTANCE_PROVIDER”),

SMS_Report(TRUE),

SMS_Group_Name(“SQL12 Property”),

SMS_Class_ID(“CUSTOM|SQL12_Property|1.0”)]

class cm_sql12 : SMS_Class_Template

{

[SMS_Report(TRUE)    ]  boolean IsReadOnly;

[SMS_Report(TRUE),key]  uint32 PropertyIndex;

[SMS_Report(TRUE),key]  string PropertyName;

[SMS_Report(TRUE)    ]  uint32 PropertyNumValue;

[SMS_Report(TRUE)    ]  string PropertyStrValue;

[SMS_Report(TRUE)    ]  uint32 PropertyValueType;

[SMS_Report(TRUE),key]  string ServiceName;

[SMS_Report(TRUE),key]  uint32 SqlServiceType;

};

//=================SQL 2008 Information

[dynamic, provider(“MS_VIEW_INSTANCE_PROVIDER”),

SMS_Report(TRUE),

SMS_Group_Name(“SQL Property”),

SMS_Class_ID(“CUSTOM|SQL_Property|2.0”)]

class cm_sql08 : SMS_Class_Template

{

[SMS_Report(TRUE)    ]  boolean IsReadOnly;

[SMS_Report(TRUE),key]  uint32 PropertyIndex;

[SMS_Report(TRUE),key]  string PropertyName;

[SMS_Report(TRUE)    ]  uint32 PropertyNumValue;

[SMS_Report(TRUE)    ]  string PropertyStrValue;

[SMS_Report(TRUE)    ]  uint32 PropertyValueType;

[SMS_Report(TRUE),key]  string ServiceName;

[SMS_Report(TRUE),key]  uint32 SqlServiceType;

};

//==================SQL Information 2000 and 2005

[dynamic, provider(“MS_VIEW_INSTANCE_PROVIDER”),

SMS_Report(TRUE),

SMS_Group_Name(“SQL Property Legacy”),

SMS_Class_ID(“CUSTOM|SQL_Property_Legacy|2.0”)]

class cm_sql2kand05 : SMS_Class_Template

{

[SMS_Report(TRUE)    ]  boolean IsReadOnly;

[SMS_Report(TRUE),key]  uint32 PropertyIndex;

[SMS_Report(TRUE),key]  string PropertyName;

[SMS_Report(TRUE)    ]  uint32 PropertyNumValue;

[SMS_Report(TRUE)    ]  string PropertyStrValue;

[SMS_Report(TRUE)    ]  uint32 PropertyValueType;

[SMS_Report(TRUE),key]  string ServiceName;

[SMS_Report(TRUE),key]  uint32 SqlServiceType;

};

Next, head on over to the Administration workspace in the ConfigMgr console and find the Client Settings in the menu to the left. Open up the Default Client Settings and check the Hardware Inventory tab.

There is a nice little button named Set Classes, hit that and then hit import. Browse to the SQLProperties.mof file and hit Open.

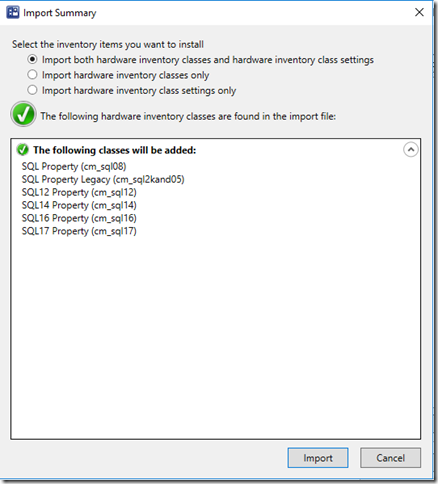
You will be greated by this screen where you need to make sure the Import both hardware inventory classes and hardware inventory class settings is selected

sqlinv02

If you are like me and don’t want this inventory to hit each and every device you have deselect the following classes in your default settings. If you are only using the default client settings object, please skip to the next step.

sqlinv01

If you are using custom client settings, please add the above classes to be included in hardware inventory under the same tabe as we did the import.

This means SQL information will now be imorted into the database! We can now create collections based on this, please do leave enough time for hardware inventory to run on each client before you find data in the database.

Step 3 – The Report

For me the last piece of the pussel is to create a custom report to easily show me the information needed. I will not cover the details of how to create a custom reports as the options are plenty. However I will share the query used to get a nice detailed view with the server and edition info.

Note that this is a simple report and can be extended in a lot of ways and if you are already using PowerBI you can extract the same data that way.

Query used:

— SQL 2017
select
sys1.Netbios_name0 as [Computer Name]
,max(Case sql6.PropertyName0 when ‘VERSION’ then
(case
when sql6.PropertySTRValue0 like ‘9.0%’ then ‘SQL 2005’
when sql6.PropertySTRValue0 like ‘10.5%’ then ‘SQL 2008 R2′
when sql6.PropertySTRValue0 like ’10.%’ then ‘SQL 2008′
when sql6.PropertySTRValue0 like ’11.%’ then ‘SQL 2012′
when sql6.PropertySTRValue0 like ’12.%’ then ‘SQL 2014′
when sql6.PropertySTRValue0 like ’13.%’ then ‘SQL 2016′
when sql6.PropertySTRValue0 like ’14.%’ then ‘SQL 2017’
else ‘SQL Other’ End)
end) as [SQL]
,max(Case sql6.PropertyName0 when ‘SKUName’ then
sql6.PropertySTRValue0 end) as [SQL Type]
,max(Case sql6.PropertyName0 when ‘SPLEVEL’ then
sql6.PropertyNUMValue0 end) as [SQL Service Pack]
,max(Case sql6.PropertyName0 when ‘VERSION’ then
sql6.PropertySTRValue0 end) as [SQL Version]
,max(Case sql6.PropertyName0 when ‘FILEVERSION’ then
sql6.PropertySTRValue0 end) as [SQL CU Version]
from v_r_system sys1
left join v_gs_custom_SQL17_Property0 sql6 on sys1.ResourceID=sql6.ResourceID
where
sql6.PropertyName0 in (‘SKUNAME’,’SPLevel’,’version’,’fileversion’)
group by sys1.Netbios_name0
union

— SQL 2016
select
sys1.Netbios_name0 as [Computer Name]
,max(Case sql5.PropertyName0 when ‘VERSION’ then
(case
when sql5.PropertySTRValue0 like ‘9.0%’ then ‘SQL 2005’
when sql5.PropertySTRValue0 like ‘10.5%’ then ‘SQL 2008 R2′
when sql5.PropertySTRValue0 like ’10.%’ then ‘SQL 2008′
when sql5.PropertySTRValue0 like ’11.%’ then ‘SQL 2012′
when sql5.PropertySTRValue0 like ’12.%’ then ‘SQL 2014′
when sql5.PropertySTRValue0 like ’13.%’ then ‘SQL 2016′
when sql5.PropertySTRValue0 like ’14.%’ then ‘SQL 2017’
else ‘SQL Other’ End)
end) as [SQL]
,max(Case sql5.PropertyName0 when ‘SKUName’ then
sql5.PropertySTRValue0 end) as [SQL Type]
,max(Case sql5.PropertyName0 when ‘SPLEVEL’ then
sql5.PropertyNUMValue0 end) as [SQL Service Pack]
,max(Case sql5.PropertyName0 when ‘VERSION’ then
sql5.PropertySTRValue0 end) as [SQL Version]
,max(Case sql5.PropertyName0 when ‘FILEVERSION’ then
sql5.PropertySTRValue0 end) as [SQL CU Version]
from v_r_system sys1
left join v_gs_custom_SQL16_Property0 sql5 on sys1.ResourceID=sql5.ResourceID
where
sql5.PropertyName0 in (‘SKUNAME’,’SPLevel’,’version’,’fileversion’)
group by sys1.Netbios_name0
union

— SQL 2014
select
sys1.Netbios_name0 as [Computer Name]
,max(Case sql4.PropertyName0 when ‘VERSION’ then
(case
when sql4.PropertySTRValue0 like ‘9.0%’ then ‘SQL 2005’
when sql4.PropertySTRValue0 like ‘10.5%’ then ‘SQL 2008 R2′
when sql4.PropertySTRValue0 like ’10.%’ then ‘SQL 2008′
when sql4.PropertySTRValue0 like ’11.%’ then ‘SQL 2012′
when sql4.PropertySTRValue0 like ’12.%’ then ‘SQL 2014′
when sql4.PropertySTRValue0 like ’13.%’ then ‘SQL 2016′
when sql4.PropertySTRValue0 like ’14.%’ then ‘SQL 2017’
else ‘SQL Other’ End)
end) as [SQL]
,max(Case sql4.PropertyName0 when ‘SKUName’ then
sql4.PropertySTRValue0 end) as [SQL Type]
,max(Case sql4.PropertyName0 when ‘SPLEVEL’ then
sql4.PropertyNUMValue0 end) as [SQL Service Pack]
,max(Case sql4.PropertyName0 when ‘VERSION’ then
sql4.PropertySTRValue0 end) as [SQL Version]
,max(Case sql4.PropertyName0 when ‘FILEVERSION’ then
sql4.PropertySTRValue0 end) as [SQL CU Version]
from v_r_system sys1
left join v_gs_custom_SQL14_Property0 sql4 on sys1.ResourceID=sql4.ResourceID
where
sql4.PropertyName0 in (‘SKUNAME’,’SPLevel’,’version’,’fileversion’)
group by sys1.Netbios_name0
union

— SQL 2012
select
sys1.Netbios_name0 as [Computer Name]
,max(Case sql3.PropertyName0 when ‘VERSION’ then
(case
when sql3.PropertySTRValue0 like ‘9.0%’ then ‘SQL 2005’
when sql3.PropertySTRValue0 like ‘10.5%’ then ‘SQL 2008 R2′
when sql3.PropertySTRValue0 like ’10.%’ then ‘SQL 2008′
when sql3.PropertySTRValue0 like ’11.%’ then ‘SQL 2012′
when sql3.PropertySTRValue0 like ’12.%’ then ‘SQL 2014′
when sql3.PropertySTRValue0 like ’13.%’ then ‘SQL 2016′
when sql3.PropertySTRValue0 like ’14.%’ then ‘SQL 2017’
else ‘SQL Other’ End)
end) as [SQL]
,max(Case sql3.PropertyName0 when ‘SKUName’ then
sql3.PropertySTRValue0 end) as [SQL Type]
,max(Case sql3.PropertyName0 when ‘SPLEVEL’ then
sql3.PropertyNUMValue0 end) as [SQL Service Pack]
,max(Case sql3.PropertyName0 when ‘VERSION’ then
sql3.PropertySTRValue0 end) as [SQL Version]
,max(Case sql3.PropertyName0 when ‘FILEVERSION’ then
sql3.PropertySTRValue0 end) as [SQL CU Version]
from v_r_system sys1
left join v_gs_custom_SQL14_Property0 sql3 on sys1.ResourceID=sql3.ResourceID
where
sql3.PropertyName0 in (‘SKUNAME’,’SPLevel’,’version’,’fileversion’)
group by sys1.Netbios_name0
union

— SQL 2008
Select
sys1.Netbios_name0 as [Computer Name]
,max(Case sql2.PropertyName0 when ‘VERSION’ then
(case
when sql2.PropertySTRValue0 like ‘9.0%’ then ‘SQL 2005’
when sql2.PropertySTRValue0 like ‘10.5%’ then ‘SQL 2008 R2′
when sql2.PropertySTRValue0 like ’10.%’ then ‘SQL 2008′
when sql2.PropertySTRValue0 like ’11.%’ then ‘SQL 2012′
when sql2.PropertySTRValue0 like ’12.%’ then ‘SQL 2014′
when sql2.PropertySTRValue0 like ’13.%’ then ‘SQL 2016′
when sql2.PropertySTRValue0 like ’14.%’ then ‘SQL 2017’
else ‘SQL Other’ End)
end) as [SQL]
,max(Case sql2.PropertyName0 when ‘SKUName’ then
sql2.PropertySTRValue0 end) as [SQL Type]
,max(Case sql2.PropertyName0 when ‘SPLEVEL’ then
sql2.PropertyNUMValue0 end) as [SQL Service Pack]
,max(Case sql2.PropertyName0 when ‘VERSION’ then
sql2.PropertySTRValue0 end) as [SQL Version]
,max(Case sql2.PropertyName0 when ‘FILEVERSION’ then
sql2.PropertySTRValue0 end) as [SQL CU Version]
from v_r_system sys1
left join v_gs_custom_sql_property_2_00 sql2 on sys1.resourceid=sql2.ResourceID
where
sql2.PropertyName0 in (‘SKUNAME’,’SPLevel’,’version’,’fileversion’)
group by sys1.Netbios_name0
union

— SQL 2005
Select
sys1.Netbios_name0 as [Computer Name]
,max(Case sql1.PropertyName0 when ‘VERSION’ then
(case
when sql1.PropertySTRValue0 like ‘9.%’ then ‘SQL 2005’
when sql1.PropertySTRValue0 like ‘10.5%’ then ‘SQL 2008 R2′
when sql1.PropertySTRValue0 like ’10.%’ then ‘SQL 2008′
when sql1.PropertySTRValue0 like ’11.%’ then ‘SQL 2012′
when sql1.PropertySTRValue0 like ’12.%’ then ‘SQL 2014′
when sql1.PropertySTRValue0 like ’13.%’ then ‘SQL 2016′
when sql1.PropertySTRValue0 like ’14.%’ then ‘SQL 2017’
else ‘SQL Other’ End)
end) as [SQL]
,max(Case sql1.PropertyName0 when ‘SKUName’ then
sql1.PropertySTRValue0 end) as [SQL Type]
,max(Case sql1.PropertyName0 when ‘SPLEVEL’ then
sql1.PropertyNUMValue0 end) as [SQL Service Pack]
,max(Case sql1.PropertyName0 when ‘VERSION’ then
sql1.PropertySTRValue0 end) as [SQL Version]
,max(Case sql1.PropertyName0 when ‘FILEVERSION’ then
sql1.PropertySTRValue0 end) as [SQL CU Version]
from v_r_system sys1
left join v_gs_custom_sql_property_legacy_2_00 sql1 on sys1.ResourceID=sql1.ResourceID
where sql1.PropertyName0 in (‘SKUNAME’,’SPLevel’,’version’,’fileversion’)
group by sys1.Netbios_name0

This might not be the prettiest query every created or the smartest way (there are alot smarter people out there) so don’t go flaming it’s not optimized. It does the job : )

/Peter

Techdays 2017 Pre-Conf Slides

Me and Jörgen Nilsson (@ccmexec) did a pre-conf together at Techdays in sweden. And after much slacking here are now the slide deck from that pre-conf.

Here is the link to download the slidedeck!
https://1drv.ms/b/s!ArAh2CEqOjRkk-8ZDAVJ1vRqi8Glxg

Techday2017

/Peter

Techdays 2017

I have the great honor of presenting at TechDays sweden this year. I will be doing a pre conf together with Jörgen Nilsson about Client management. We will show of tips and trix, give some insight on how to surive the Windows As A Service change and talk about the future of client management.

Make sure to reserve your seat now and we will see you there. For more information check out the preconf site for TechDays here http://tdswe.se/events/windows-10-client-management-now-and-in-the-future-level-300/

Hope to see you there!

/Peter