Windows

Edge Chromium Default Search Provider

With more and more organizations and users adopting the Microsoft new Edge Chromium based browser. One of the most common requests are setting the default search provider. The most common request I get is setting it to Google but there are other providers out there and even specific ones for some systems and sites.

Finding the search provider string

First we need to find the search provider string that is supposed to be entered. The easiest way I’ve found, is actually using the browser to first visit the site and using the built in auto discover let Edge find the correct search terms and extracting them.

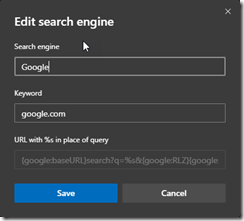
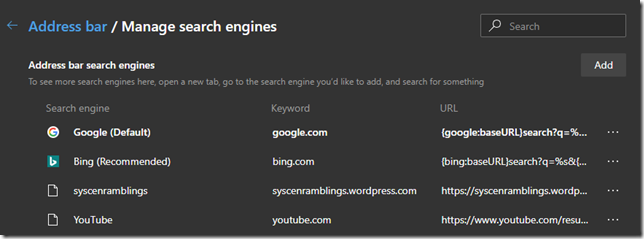
Let’s start by putting in “edge://settings/searchEngines” in the address field and you will end up on the correct page. In here all the search providers are already listed for you.

image

Hittig the … and then Edit, at the end will give you some options for that specific provider. You can set the name and the keyword. You will also have a locked field for URL. The URL part is what you need to use in a GPO or MDM later.

image

Setting the policies needed

Now all that remains is setting the policies needed. For this to work you will need to have the admx templates for Microsoft Edge. The templates can be found here Edge MSI and ADMX download

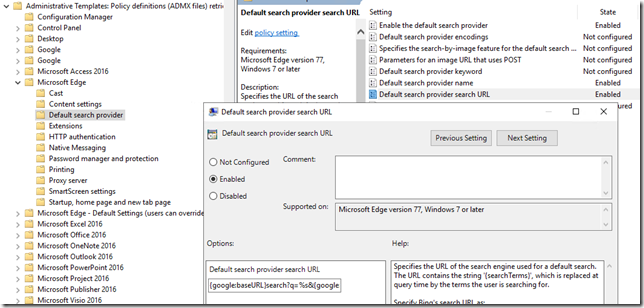
Next you need to edit the settings found under either User Configuration / Policies / Administrative Templates / Microsoft Edge / Default search provider or Computer Configuration / Policies / Administrative Templates / Microsoft Edge / Default search provider. Note that one location is enough as long as it linked to the correct type.

Configure the Default search provider URL and past the URL copied from the previous section.

image

Make sure to also configure Enable the default search provider. As an optional you can specify how the search provider name will be displayed by setting the Default search provider name. All settings are visible in the screenshot above.

Summary

This way you can configure any search provider you want, and even take it a step further and configure a predefined list using other GPO/MDM options. The new Edge policies really make this a enterprise class browser.

/Peter
Supported Hardware

For some reason the last couple of engagements there has been discussions on what its means to run supported hardware for your devices and why that is imported. For me this has always been a no brainer, I refuse to be last person to solve everything. This applied to everything I do, if there is an issue I don’t want to be that last stop, the one everyone expects to magically fix everything. This is especially true for devices so I always make sure the devices that we run are supported.

Now in the old days of Windows 7 this was not a big issue. The same device that was supported 5 years ago was usually still supported later on as well and since the same OS was run all was the same. With Windows 10 its a different story. And before you start screaming about “<insert brand name> should fix this” or “I will switch to <insert other brand name>” you need to consider why this is happening and what the consequences of a change actually are.

So if we look at why, well its pretty simple and as a lot of other things it basically boils down to money. Intel/AMD wants to make more money, they way they do that is to sell more CPUs. To sell more CPUs to enterprise customers (who don’t just change CPUs) they need to speed up how often they release new versions of the CPUs. This together with the fact that newer CPUs are more secure and faster by design means the Microsoft also have to step up and release new versions of the OS more often (exactly how often is a different discussion). But this all means that the vendors have to supply new models with the new CPUs more often and since they don’t want to support a million different models (cost money to support) they move the support cycles.

intelCPU

The other side of this is that even if you where to change to different vendor, odds are they are doing the same thing and you would still have all of your old models laying around and you would still have to deal with them. With all of what that entails both regarding support and firmware updates.

So if we establish that we cannot solve the issue by moving to another vendor the solution is then to have a lifecycle process to make sure old hardware is replace in a timely fashion. This will beside the point of making sure you are supported also make it easier to stay compliant with patching, firmware updates and so as you will get better control on the actual devices running in the your organization.

So there are three links that you should keep track of (since I am assuming you are running one of the big vendors). The list is without any preference and available to help you find the information.

For Lenovo
https://support.lenovo.com/se/en/solutions/ht509394

For HP
https://support.hp.com/bg-en/document/c05195282

For Dell
https://www.dell.com/support/article/us/en/04/sln297954/dell-computers-tested-for-windows-10-november-2019-update-and-previous-versions-of-windows-10?lang=en


Happy deployments!

/Peter

Windows Server 2019 Server Manager

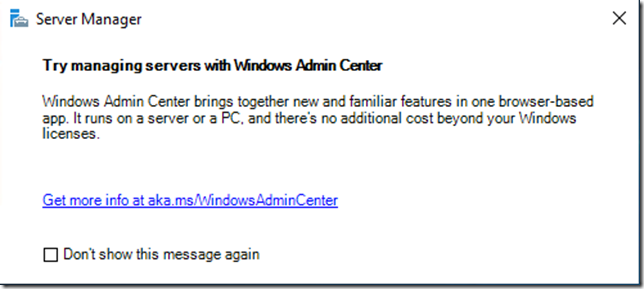
We all like the new admin center, right? But logging on to a new shiny Windows Server 2019 and getting a popup saying “hey you know about Windows Admin Center” thats not my idea of nice server management. Pops ups should be killed with fire! So when I first saw the box below well that got me thinking, how do we get rid of it before I even log on?

image

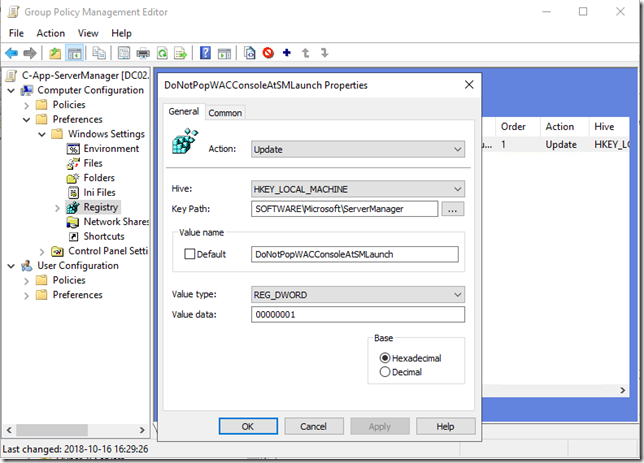
Answer to this is simple, this is controlled by a registry value and as such subject to the power of group policy preferences. Create a new GPO and create a new registry item following these settings

Hive: HKEY_LOCAL_MACHINE
Key Path: SOFTWARE\Microsoft\ServerManager
Value name: DoNotPopWACConsoleAtSMLaunch
Value type: REG_DWORD
Value data: 00000001

image

Now hit ok and then link the policy to you server OU/OUs. Done, no more annoying popup!

/Peter

Windows 10 – Lifecycle change AGAIN!

Update 2018-09-07: Michael Niehaus was kind enough to supply some additional information on this subject. So to clarify this post and the information from MS. The currently available versions of Windows 10 Enterprise and Education will have 30 months of support and future releases starting with 1809 and 1903 will have 30 and 18 months of support.

Niehaus has also stated that Microsoft is still commited to deliver innovation and new features for every single Windows 10 release.

Orignial Post:

So its happend again, the lifecycle supportstatment surrounding Windows 10 has been changed. Some say for the better, but it remains to be seen. The change only applies to Enterprise and Education SKUs and only to the september relase of every year. So if you are on 1703 nothing has changed but if you are on 1607 or 1709 there has been some changes.

The new change is that Enterprise and Education now get 30months of support. There is also a small note to be made about a statment of the lifecycle facts page stating

“…you’ll need to install the latest feature update to help keep your device secure and have it remain supported by Microsoft.”

Which would mean that unless you apply the latest CU every month you are not really supported. How this will be “enforced” remains to be seen.

For more detailed information and source of the change review the lifecycle fact page from Microsoft here https://support.microsoft.com/en-us/help/13853/windows-lifecycle-fact-sheet

One last thing to note, up until now Microsoft have only been testing upgrading the previous version to the lastest version of Windows 10, example when 1709 was released the only path that was tested was 1703->1709. With the new support statement you might have an urge to skip versions. However unless Microsoft changes their test protcoll and actually tests jumps like 1607->1709 it might still be worth going with every version, altho not as quickly as before.

Support dates as of 2018-09-06

image

/Peter

The Death Of MBAM

Update: 2018-10-06
Microsoft has given out information that MBAM is not been removed but instead put into sustained engieering. Meaning it will continue to work and continue to recive bug fixes but no new features will be added. This also means that support for future Windows 10 release as well as new SQL release should be added.

This should hold true until Microsoft has a feature by feature compareable service elsewhere (Azure most likley).


Microsoft Bitlocker Administration and Monitoring (MBAM) has now recieved its finaly date. This means that if you have already implemented MBAM you have a couple of years to migrate away from it, but if you haven’t implemented it and was about to do so. Please refrain from it.

Mainstream support will end July 7th 2019, meaning up until that date new “features” will be brought out to support newer SQL versions and the like.

Extended support will end on July 7th 2024, meaning after this date there will be no security patches and no support at all available.

image

Hopefully Microsoft gives a solution to rotating keys and self-service through Active Directory or Azure Active directory soon to fill the gap between MBAM and a standarnd Bitlocker implementation.

/Peter

NIC 2018 – Future Edition

So NIC has come to and end and I was fortunate enought to be selected as a presenter for not one but two session. My first session was about whats changed in Windows 10 in the 2 years since its first release and how to keep up with the changes. The second session was a co-presented session with @nickolajA from SCconfigMgr.com about using community tools during OSD in ConfigMgr and MDT.

I had a blast presenting this and you can now find the presentations from those session (and others) over on github github.com/nordicinfrastructureconference/2018

If you want a some more details about what me and my coworkers did at NIC check out this post http://www.scconfigmgr.com/2018/02/07/nic-2018-future-edition/ from @modaly_it

image

PowerShell remoting – source vs destination

Powershell remoting, the ability to remotley manage and influence devices is a key part of PowerShell. By default PowerShell remoting is enabled on servers and one of the lazy “security” features you can use is to only allow connections from specified networks.

In a domain network this is very easy to do, all you need is a small group policy that sets the networks. There is one thing you need to note, that is not really documented.

The Group Policy

The group policy is a regular computer policy setting found under “Computer\Policies\Administrative Templates\Windows Components\Windows Remote Management (WinRM)\WinRM Service” and the actual poliy item is named “Allow remote server management through WinRM”

When you enable this policy you can enter networks the server will consider trusted.  So lets say you have your server on the network 192.168.1.0, that would mean you set the filder to 192.168.1.1-.192.168.1.254.

The issue

What you need to consider is the following. Say you have servers on two seperate networks and one is considered management network, lets say it uses 172.16.1.0/24. This means you now specify the management network as approved. But the servers you are accessing is on your primary server network 192.168.1.0/24. You have to specifiy both source and destination networks for this to work as this also controls the actual listners and if you only specify the 172.16.1.0/24 network the listners on the servers on network 192.168.1.0/24 will not be enabled.

The solution

For the scenario above make sure to specify both networks in your GPO. So the filter will be set to 192.168.1.1-192.168.1.254,172.16.1.1-172.16.1.254

winrm

/Peter

Strange Case of the failed Remote Desktop Gateway

I have been having a kind of a strange issue for a longe while and finally got around to troubleshooting and figuring out why so here is a breakdown of the strange case of the failed remote desktop gateway connection.

The setup is as follow, using diffrent machines Windows 10, 8.1 and 7 to connect to diffrent remote desktop gateway solutions and for some reason the connection failed with wrong username and password to a couple of the RDGWs.

So after som digging and alot of help from my good friend over at isloation.se we found the issue and how to check if you are also running into this issue.

The check

On the RDGW check under incomming connections/monitoring and if the connections display as RPC-HTTP. This is the clue that something is not all right.

rdgw1

The cause

So over the years the has been alot of fixes and version of the RDP client for each version of Windows. In the later release support was introduced for RDP over HTTP with UDP as a performance booster. However due to bugs and other things happening there have been posts and information about setting a registry value to make RDP work again. The value is called RDGClientTransport. It is a DWORD and you set it to 1 to get everyting working again.

However what this does is force the RDP client to fall back to RPC-HTTP connections instead of HTTP/UDP. This in turn can cause connection issues if you have modern solutions.

The solution

Depsite several blogs and forum posts saying this the value should be 1 you really should change the default value of 0.

So here is the full path to set the value.

HKEY_CURRENT_USER\Software\Microsoft\Terminal Server Client\RDPClientTransport

As you probably noted it is a current user setting and since I am very lazy. Most of my configuration is done through either Configuration Manager or GPO so in this case it was a GPO setting the value to 1 for all my users. Hence the problem was only on my devices and not my coworkers devices.

rdgw2

/Peter

Techdays 2017 Pre-Conf Slides

Me and Jörgen Nilsson (@ccmexec) did a pre-conf together at Techdays in sweden. And after much slacking here are now the slide deck from that pre-conf.

Here is the link to download the slidedeck!
https://1drv.ms/b/s!ArAh2CEqOjRkk-8ZDAVJ1vRqi8Glxg

Techday2017

/Peter

Windows 10 1709 Reference Image

Update – 2018-03-06 – Read at the bottom

When creating a Windows 10 reference image a common issue is that the store updates will autoupdate while you are busy installing software updates and applications. This then causes sysprep to fail in giant ball of fire.

To solve this there are basically two options and for some option one doesn’t seem to work which is why I always opt for option two.

Option 1, follow the guidance for disabling auto store updates. This consists of adding a DWORD registry item to HKEY_LOCAL_MACHINE\SOFTWARE\Policies\Microsoft\WindowsStore named AutoDownload with a value of 2. More info on how to do this check out the blog over at deploymentresearch.com

Option 2, is to use a WSUS and then disable internet access for the duration of the build. This can easily be achieved using PowerShell and a sprinkle of magic.

Here is how! Lets start with creating a small PowerShell Script.

param (
[Parameter(Mandatory=$False,Position=0)]
[Switch]$Disable
)

If (!$Disable) {
Write-Output “Adding internet block”
New-NetFirewallRule -DisplayName “Block Outgoing 80, 443” -Enabled True -Direction Outbound -Profile Any -Action Block -Protocol TCP -RemotePort 80,443
}

if ($Disable) {
Write-Output “Removing internet block”
Get-NetFirewallRule -DisplayName “Block Outgoing 80, 443” | Remove-NetFirewallRule

}

Save that into as Invoke-InternetAccess.ps1 and place the file into the MDT deployment share script folder.

Now time to set the sequence.
Add two “Run PowerShell script” steps as shown below.

Ref1709

For the first one just set the script name to Invoke-InternetAccess.ps1
For the second one set the script name to Invoke-InternetAccess.ps1 and parameters to –Disable

All done! Now you can run your sequence and not worry about any store updates during your build.

Update – 2018-03-06
There has been some discussion around this and there is an alternative to the way below which will work if you use MDT. The solution is a simple as it is elegant and requires very little configuration.

All you would need is to set HideShell=YES in your customsettings.ini. This will not load a full explorer and hence store will not start and there will be no store updates downloaded.


Happy deploying

/Peter