configuration manager

Enable TPM inventory

So a couple of weeks ago I wrote a post on how to verify that your computers are running UEFI and SecureBoot (read here). After that there was a post on the importance of staying supported with up to date hardware (read that here). As a follow up to both of them there is another part that should be monitored as we move deeper into to Windows as a Service. This becomes especially true when we look at todays security landscape and the need to enable all of the new security features.

Some of these new features requires TPM and furthermore some require TPM 2.0. Now this can be inventoried using tools like Microsoft Endpoint Manager. The issue here is that by default ConfigMgr only inventory information about if TPM is present, enabled and owned. It does not keep track of TPM spec version.

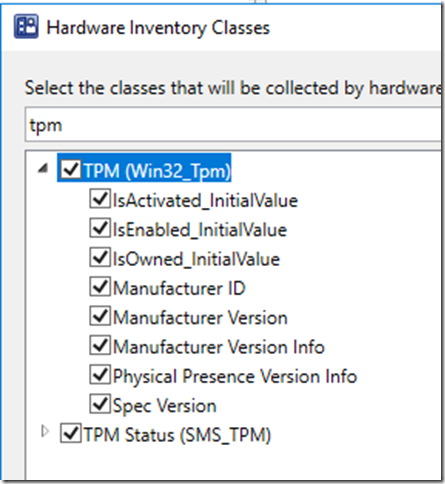
So this will be a quick fix! Open up your client settings that targets your workstations and laptops and make sure to enable the TPM spec version. Check out the hardware inventory page and the classes part. If you do a quick search for TPM you will find that spec version is not check. So go ahead and check that. Watch the inventory data flow in and make decisions based on it!

TPM

Happy deployments!

/Peter

Nice to Know – Defender Sandbox

So another step in the right direction for Windows Defender, it can now run in sandboxed mode. For now you have to turn it on but in the future that will be default.

If you want to read more about the release of this check out the cloudblog from MS here https://cloudblogs.microsoft.com/microsoftsecure/2018/10/26/windows-defender-antivirus-can-now-run-in-a-sandbox/?fbclid=IwAR1BX92wvaqmse7bgucQtPbi_Si6XY1cMfIec9JW1XttX-4wqttIU39mokM

So lets assume you also run ConfigMgr, now this is where its gets intreseting. We can then use a CI to track if it has been turned on!

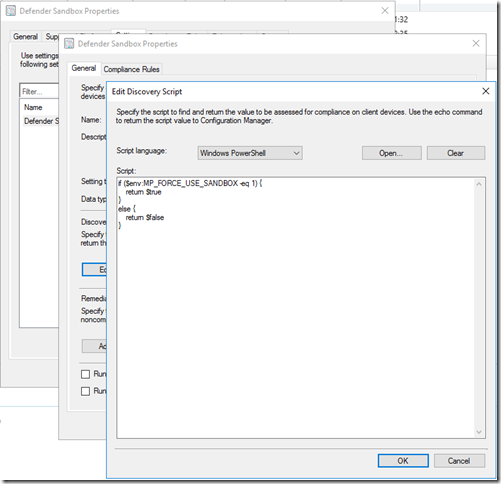
This is done using a very simple detection script.

image

Here is the small code snippet used to track compliance.

if ($env:MP_FORCE_USE_SANDBOX -eq 1) {
  return $true
}
else {
  return $false
}

Now two things remain, set the data type to boolean and as compliance set to “True”.

All set to measure this. Of course a simple script or package can now be used to force the setting of this, just remeber that its only supported on Windows 10 1703 and later and will require a reboot before taking effect.

Happy deploymnet!

/Peter

Improving the Windows 10 Upgrade Sequence

When you upgrade to Windows 10 or between diffrent Windows 10 versions there are genearlly several things you wish to do. This can include removing “bad” applications or install drivers. Among some common things that needs to be taken care of is diffrent pre-requisites and language packs. This posts covers some things you can improve in your Windows 10 upgrade sequence.

The small things first. As more and more users are working from a laptop a common problem is that someone intiates the sequence when the users has 10% battery left. Now the predicatable outcome is broken upgrade and rollback. To prevent this we can enable a small check to verify if the machine is running on battery power and if so exit the sequence quickly all while we leave a log trace for admins to track.

First we require a small powershell script, download that from here https://github.com/LofgrenP/Scripts/blob/master/Get-xTSRunningOnBattery/Get-xTSRunningOnBattery.ps1

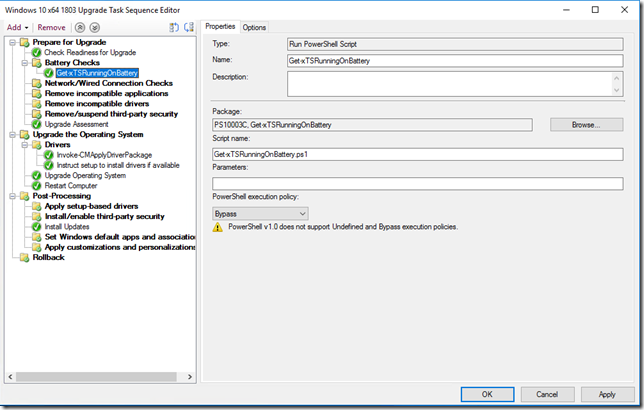
Create a package with source files but no program. Then add a Run PowerShell Step in the begning of your sequence. Use the new package that has been created and set the script name to Get-xTSRunningOnBattery.ps1. Set the execution policy to ByPass.
image

That will take care of machines running on battery. Next common issue is that machines not connected to the wired network won’t reconnect to the network after a restart. To assist with this we can make sure that the upgrade does not run if its not a wired connection.

Download the script needed from here https://github.com/LofgrenP/Scripts/blob/master/Get-xTSEthernetConnection/Get-xTSEthernetConnection.ps1

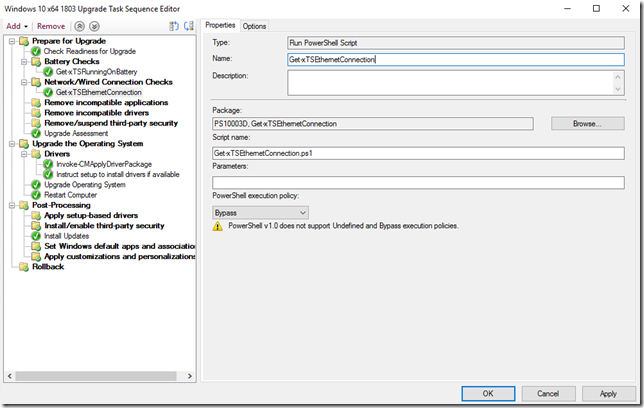
Create a package with source files and no program then add another Run PowerShell Step in the beginning of your sequence. Use the new package that has been created and set the script name to Get-xTSEthernetConnection.ps1. Set the execution policy to ByPass.
image

With that taken care of lets move on to sorting the language packs. To sort this there are two things we need to sort out. First up is making sure to reinstall all language packs that are already installed. Now Nickolaj Andersen over at SCConfigMgr has an awesome post on how to do that, read that here http://www.scconfigmgr.com/2017/11/06/automatically-retain-installed-language-packs-during-windows-10-servicing/

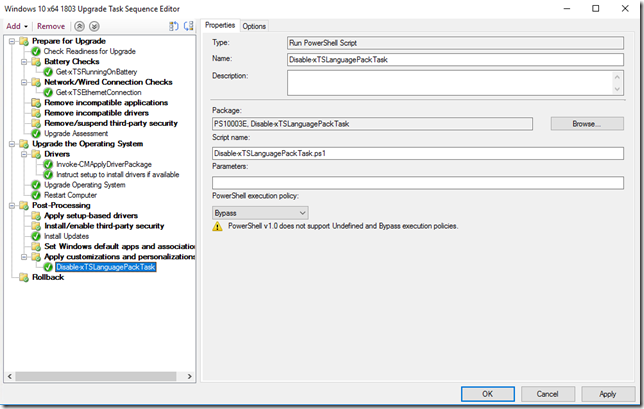
The final piece to the pussel is making sure that the Language Pack scheduled task does not run. This can be achived in many ways but I prefer to just disable the task after the upgrade is done. For that reasone you can download a small script here https://github.com/LofgrenP/Scripts/blob/master/Disable-xTSLanguagePackTask/Disable-xTSLanguagePackTask.ps1

Now we create another package with source files but without any program and add a final Run PowerShell Step to our upgrade sequence. This time at the very end of the sequence. Make sure to use your new package, set the script name to Disable-xTSLanguagePackTask.ps1 and set the execution policy to ByPass.
image

Now you should be all set to upgrace your machines.

Happy deployments!

/Peter

SQL Server Inventory using ConfigMgr

The hardware inventor feature of ConfigMgr helps us discover and track several items. One recurring item is SQL Server and by default there is no nice way of tracking this. Basically the only option out of the box is using the application inventory to find where SQL server is installed. However this usualy results in a large list with mixed servers and clients and you still have no idea if its running SQLExpress, Standard or Enterprise edtion.

So what can we do to fix this besides buy a third party solution. Well the good thing is that SQL stores all the information into WMI, this means we can track editions, installations and versions with a bit of trickery with the hardware inventory engine.

There are number of steps included here at it is important to follow all of them for a successful result.

Step 1 – Update Configuration.mof

The first part of this is updateing configuration.mof. This file will control classes that inventoried and then index into the database.

The file can be a bit tricky to find if you have never done this before. You need to go to this location <Your ConfigMgr Install folder>\Inboxes\clifiles.src\hinv

In here is the configuration.mof file, now first make a backup copy of the file in case you want to revert the changes later and don’t want edit the file again.

At the very end of the file there is a section for adding custom extensions.

//========================

// Added extensions start

//========================

//========================

// Added extensions end

//========================

In between these block we need to add the following

//———————————————

// SQL 2017 Properties

//———————————————

[Union, ViewSources{“select IsReadOnly,PropertyIndex,PropertyName,PropertyNumValue,PropertyStrValue,PropertyValueType,

ServiceName,SqlServiceType from sqlServiceAdvancedProperty”},ViewSpaces{“\\\\.\\root\\microsoft\\sqlserver\\computermanagement14”}, dynamic,

Provider(“MS_VIEW_INSTANCE_PROVIDER”)]

class cm_sql17

{

[PropertySources{“IsReadOnly”}        ] boolean IsReadOnly;

[PropertySources{“PropertyIndex”},key ] uint32 PropertyIndex;

[PropertySources{“PropertyName”},key  ] string PropertyName;

[PropertySources{“PropertyNumValue”}  ] uint32 PropertyNumValue;

[PropertySources{“PropertyStrValue”}  ] string PropertyStrValue;

[PropertySources{“PropertyValueType”} ] uint32 PropertyValueType;

[PropertySources{“ServiceName”},key   ] string ServiceName;

[PropertySources{“SqlServiceType”},key] uint32 SqlServiceType;

};

//———————————————

// SQL 2016 Properties

//———————————————

[Union, ViewSources{“select IsReadOnly,PropertyIndex,PropertyName,PropertyNumValue,PropertyStrValue,PropertyValueType,

ServiceName,SqlServiceType from sqlServiceAdvancedProperty”},ViewSpaces{“\\\\.\\root\\microsoft\\sqlserver\\computermanagement13”}, dynamic,

Provider(“MS_VIEW_INSTANCE_PROVIDER”)]

class cm_sql16

{

[PropertySources{“IsReadOnly”}        ] boolean IsReadOnly;

[PropertySources{“PropertyIndex”},key ] uint32 PropertyIndex;

[PropertySources{“PropertyName”},key  ] string PropertyName;

[PropertySources{“PropertyNumValue”}  ] uint32 PropertyNumValue;

[PropertySources{“PropertyStrValue”}  ] string PropertyStrValue;

[PropertySources{“PropertyValueType”} ] uint32 PropertyValueType;

[PropertySources{“ServiceName”},key   ] string ServiceName;

[PropertySources{“SqlServiceType”},key] uint32 SqlServiceType;

};

//———————————————

// SQL 2014 Properties

//———————————————

[Union, ViewSources{“select IsReadOnly,PropertyIndex,PropertyName,PropertyNumValue,PropertyStrValue,PropertyValueType,

ServiceName,SqlServiceType from sqlServiceAdvancedProperty”},ViewSpaces{“\\\\.\\root\\microsoft\\sqlserver\\computermanagement12”}, dynamic,

Provider(“MS_VIEW_INSTANCE_PROVIDER”)]

class cm_sql14

{

[PropertySources{“IsReadOnly”}        ] boolean IsReadOnly;

[PropertySources{“PropertyIndex”},key ] uint32 PropertyIndex;

[PropertySources{“PropertyName”},key  ] string PropertyName;

[PropertySources{“PropertyNumValue”}  ] uint32 PropertyNumValue;

[PropertySources{“PropertyStrValue”}  ] string PropertyStrValue;

[PropertySources{“PropertyValueType”} ] uint32 PropertyValueType;

[PropertySources{“ServiceName”},key   ] string ServiceName;

[PropertySources{“SqlServiceType”},key] uint32 SqlServiceType;

};

//———————————————

// SQL 2012 Properties

//———————————————

[Union, ViewSources{“select IsReadOnly,PropertyIndex,PropertyName,PropertyNumValue,PropertyStrValue,PropertyValueType,

ServiceName,SqlServiceType from sqlServiceAdvancedProperty”},ViewSpaces{“\\\\.\\root\\microsoft\\sqlserver\\computermanagement11”}, dynamic,

Provider(“MS_VIEW_INSTANCE_PROVIDER”)]

class cm_sql12

{

[PropertySources{“IsReadOnly”}        ] boolean IsReadOnly;

[PropertySources{“PropertyIndex”},key ] uint32 PropertyIndex;

[PropertySources{“PropertyName”},key  ] string PropertyName;

[PropertySources{“PropertyNumValue”}  ] uint32 PropertyNumValue;

[PropertySources{“PropertyStrValue”}  ] string PropertyStrValue;

[PropertySources{“PropertyValueType”} ] uint32 PropertyValueType;

[PropertySources{“ServiceName”},key   ] string ServiceName;

[PropertySources{“SqlServiceType”},key] uint32 SqlServiceType;

};

//———————————————

// SQL 2008 Properties

//———————————————

[Union, ViewSources{“select IsReadOnly,PropertyIndex,PropertyName,PropertyNumValue,PropertyStrValue,PropertyValueType,

ServiceName,SqlServiceType from sqlServiceAdvancedProperty”},ViewSpaces{“\\\\.\\root\\microsoft\\sqlserver\\computermanagement10”}, dynamic,

Provider(“MS_VIEW_INSTANCE_PROVIDER”)]

class cm_sql08

{

[PropertySources{“IsReadOnly”}        ] boolean IsReadOnly;

[PropertySources{“PropertyIndex”},key ] uint32 PropertyIndex;

[PropertySources{“PropertyName”},key  ] string PropertyName;

[PropertySources{“PropertyNumValue”}  ] uint32 PropertyNumValue;

[PropertySources{“PropertyStrValue”}  ] string PropertyStrValue;

[PropertySources{“PropertyValueType”} ] uint32 PropertyValueType;

[PropertySources{“ServiceName”},key   ] string ServiceName;

[PropertySources{“SqlServiceType”},key] uint32 SqlServiceType;

};

//———————————————

// SQL 2000/2005 Properties

//———————————————

[Union, ViewSources{“select IsReadOnly,PropertyIndex,PropertyName,PropertyNumValue,PropertyStrValue,PropertyValueType,

ServiceName,SqlServiceType from sqlServiceAdvancedProperty”},ViewSpaces{“\\\\.\\root\\microsoft\\sqlserver\\computermanagement”}, dynamic,Provider(“MS_VIEW_INSTANCE_PROVIDER”)]

class cm_sql2kand05

{

[PropertySources{“IsReadOnly”}        ] boolean IsReadOnly;

[PropertySources{“PropertyIndex”},key ] uint32 PropertyIndex;

[PropertySources{“PropertyName”},key  ] string PropertyName;

[PropertySources{“PropertyNumValue”}  ] uint32 PropertyNumValue;

[PropertySources{“PropertyStrValue”}  ] string PropertyStrValue;

[PropertySources{“PropertyValueType”} ] uint32 PropertyValueType;

[PropertySources{“ServiceName”},key   ] string ServiceName;

[PropertySources{“SqlServiceType”},key] uint32 SqlServiceType;

};

Save the configuration.mof file

Done! On to step two.

Step 2 – Import hardware inventory information

The next step is done in the console and you need some nice permissions to do this. You will need to edit the default client settings object.

First thing is first. So we need to create a custom mof file to import. To do this, copy the following and save it as SQLProperties.mof (pick a nice location, like the desktop).

//=================SQL 2017 Information

[dynamic, provider(“MS_VIEW_INSTANCE_PROVIDER”),

SMS_Report(TRUE),

SMS_Group_Name(“SQL17 Property”),

SMS_Class_ID(“CUSTOM|SQL17_Property|1.0”)]

class cm_sql17 : SMS_Class_Template

{

[SMS_Report(TRUE)    ]  boolean IsReadOnly;

[SMS_Report(TRUE),key]  uint32 PropertyIndex;

[SMS_Report(TRUE),key]  string PropertyName;

[SMS_Report(TRUE)    ]  uint32 PropertyNumValue;

[SMS_Report(TRUE)    ]  string PropertyStrValue;

[SMS_Report(TRUE)    ]  uint32 PropertyValueType;

[SMS_Report(TRUE),key]  string ServiceName;

[SMS_Report(TRUE),key]  uint32 SqlServiceType;

};

//=================SQL 2016 Information

[dynamic, provider(“MS_VIEW_INSTANCE_PROVIDER”),

SMS_Report(TRUE),

SMS_Group_Name(“SQL16 Property”),

SMS_Class_ID(“CUSTOM|SQL16_Property|1.0”)]

class cm_sql16 : SMS_Class_Template

{

[SMS_Report(TRUE)    ]  boolean IsReadOnly;

[SMS_Report(TRUE),key]  uint32 PropertyIndex;

[SMS_Report(TRUE),key]  string PropertyName;

[SMS_Report(TRUE)    ]  uint32 PropertyNumValue;

[SMS_Report(TRUE)    ]  string PropertyStrValue;

[SMS_Report(TRUE)    ]  uint32 PropertyValueType;

[SMS_Report(TRUE),key]  string ServiceName;

[SMS_Report(TRUE),key]  uint32 SqlServiceType;

};

//=================SQL 2014 Information

[dynamic, provider(“MS_VIEW_INSTANCE_PROVIDER”),

SMS_Report(TRUE),

SMS_Group_Name(“SQL14 Property”),

SMS_Class_ID(“CUSTOM|SQL14_Property|1.0”)]

class cm_sql14 : SMS_Class_Template

{

[SMS_Report(TRUE)    ]  boolean IsReadOnly;

[SMS_Report(TRUE),key]  uint32 PropertyIndex;

[SMS_Report(TRUE),key]  string PropertyName;

[SMS_Report(TRUE)    ]  uint32 PropertyNumValue;

[SMS_Report(TRUE)    ]  string PropertyStrValue;

[SMS_Report(TRUE)    ]  uint32 PropertyValueType;

[SMS_Report(TRUE),key]  string ServiceName;

[SMS_Report(TRUE),key]  uint32 SqlServiceType;

};

//=================SQL 2012 Information

[dynamic, provider(“MS_VIEW_INSTANCE_PROVIDER”),

SMS_Report(TRUE),

SMS_Group_Name(“SQL12 Property”),

SMS_Class_ID(“CUSTOM|SQL12_Property|1.0”)]

class cm_sql12 : SMS_Class_Template

{

[SMS_Report(TRUE)    ]  boolean IsReadOnly;

[SMS_Report(TRUE),key]  uint32 PropertyIndex;

[SMS_Report(TRUE),key]  string PropertyName;

[SMS_Report(TRUE)    ]  uint32 PropertyNumValue;

[SMS_Report(TRUE)    ]  string PropertyStrValue;

[SMS_Report(TRUE)    ]  uint32 PropertyValueType;

[SMS_Report(TRUE),key]  string ServiceName;

[SMS_Report(TRUE),key]  uint32 SqlServiceType;

};

//=================SQL 2008 Information

[dynamic, provider(“MS_VIEW_INSTANCE_PROVIDER”),

SMS_Report(TRUE),

SMS_Group_Name(“SQL Property”),

SMS_Class_ID(“CUSTOM|SQL_Property|2.0”)]

class cm_sql08 : SMS_Class_Template

{

[SMS_Report(TRUE)    ]  boolean IsReadOnly;

[SMS_Report(TRUE),key]  uint32 PropertyIndex;

[SMS_Report(TRUE),key]  string PropertyName;

[SMS_Report(TRUE)    ]  uint32 PropertyNumValue;

[SMS_Report(TRUE)    ]  string PropertyStrValue;

[SMS_Report(TRUE)    ]  uint32 PropertyValueType;

[SMS_Report(TRUE),key]  string ServiceName;

[SMS_Report(TRUE),key]  uint32 SqlServiceType;

};

//==================SQL Information 2000 and 2005

[dynamic, provider(“MS_VIEW_INSTANCE_PROVIDER”),

SMS_Report(TRUE),

SMS_Group_Name(“SQL Property Legacy”),

SMS_Class_ID(“CUSTOM|SQL_Property_Legacy|2.0”)]

class cm_sql2kand05 : SMS_Class_Template

{

[SMS_Report(TRUE)    ]  boolean IsReadOnly;

[SMS_Report(TRUE),key]  uint32 PropertyIndex;

[SMS_Report(TRUE),key]  string PropertyName;

[SMS_Report(TRUE)    ]  uint32 PropertyNumValue;

[SMS_Report(TRUE)    ]  string PropertyStrValue;

[SMS_Report(TRUE)    ]  uint32 PropertyValueType;

[SMS_Report(TRUE),key]  string ServiceName;

[SMS_Report(TRUE),key]  uint32 SqlServiceType;

};

Next, head on over to the Administration workspace in the ConfigMgr console and find the Client Settings in the menu to the left. Open up the Default Client Settings and check the Hardware Inventory tab.

There is a nice little button named Set Classes, hit that and then hit import. Browse to the SQLProperties.mof file and hit Open.

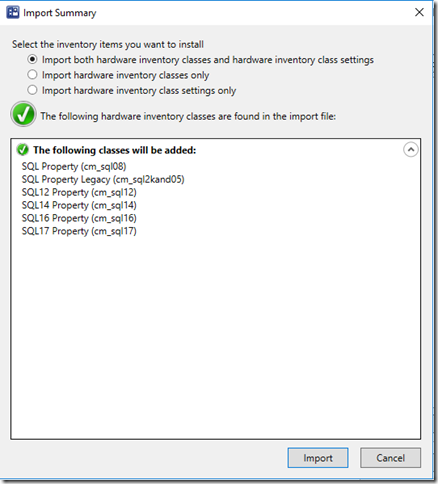
You will be greated by this screen where you need to make sure the Import both hardware inventory classes and hardware inventory class settings is selected

sqlinv02

If you are like me and don’t want this inventory to hit each and every device you have deselect the following classes in your default settings. If you are only using the default client settings object, please skip to the next step.

sqlinv01

If you are using custom client settings, please add the above classes to be included in hardware inventory under the same tabe as we did the import.

This means SQL information will now be imorted into the database! We can now create collections based on this, please do leave enough time for hardware inventory to run on each client before you find data in the database.

Step 3 – The Report

For me the last piece of the pussel is to create a custom report to easily show me the information needed. I will not cover the details of how to create a custom reports as the options are plenty. However I will share the query used to get a nice detailed view with the server and edition info.

Note that this is a simple report and can be extended in a lot of ways and if you are already using PowerBI you can extract the same data that way.

Query used:

— SQL 2017
select
sys1.Netbios_name0 as [Computer Name]
,max(Case sql6.PropertyName0 when ‘VERSION’ then
(case
when sql6.PropertySTRValue0 like ‘9.0%’ then ‘SQL 2005’
when sql6.PropertySTRValue0 like ‘10.5%’ then ‘SQL 2008 R2′
when sql6.PropertySTRValue0 like ’10.%’ then ‘SQL 2008′
when sql6.PropertySTRValue0 like ’11.%’ then ‘SQL 2012′
when sql6.PropertySTRValue0 like ’12.%’ then ‘SQL 2014′
when sql6.PropertySTRValue0 like ’13.%’ then ‘SQL 2016′
when sql6.PropertySTRValue0 like ’14.%’ then ‘SQL 2017’
else ‘SQL Other’ End)
end) as [SQL]
,max(Case sql6.PropertyName0 when ‘SKUName’ then
sql6.PropertySTRValue0 end) as [SQL Type]
,max(Case sql6.PropertyName0 when ‘SPLEVEL’ then
sql6.PropertyNUMValue0 end) as [SQL Service Pack]
,max(Case sql6.PropertyName0 when ‘VERSION’ then
sql6.PropertySTRValue0 end) as [SQL Version]
,max(Case sql6.PropertyName0 when ‘FILEVERSION’ then
sql6.PropertySTRValue0 end) as [SQL CU Version]
from v_r_system sys1
left join v_gs_custom_SQL17_Property0 sql6 on sys1.ResourceID=sql6.ResourceID
where
sql6.PropertyName0 in (‘SKUNAME’,’SPLevel’,’version’,’fileversion’)
group by sys1.Netbios_name0
union

— SQL 2016
select
sys1.Netbios_name0 as [Computer Name]
,max(Case sql5.PropertyName0 when ‘VERSION’ then
(case
when sql5.PropertySTRValue0 like ‘9.0%’ then ‘SQL 2005’
when sql5.PropertySTRValue0 like ‘10.5%’ then ‘SQL 2008 R2′
when sql5.PropertySTRValue0 like ’10.%’ then ‘SQL 2008′
when sql5.PropertySTRValue0 like ’11.%’ then ‘SQL 2012′
when sql5.PropertySTRValue0 like ’12.%’ then ‘SQL 2014′
when sql5.PropertySTRValue0 like ’13.%’ then ‘SQL 2016′
when sql5.PropertySTRValue0 like ’14.%’ then ‘SQL 2017’
else ‘SQL Other’ End)
end) as [SQL]
,max(Case sql5.PropertyName0 when ‘SKUName’ then
sql5.PropertySTRValue0 end) as [SQL Type]
,max(Case sql5.PropertyName0 when ‘SPLEVEL’ then
sql5.PropertyNUMValue0 end) as [SQL Service Pack]
,max(Case sql5.PropertyName0 when ‘VERSION’ then
sql5.PropertySTRValue0 end) as [SQL Version]
,max(Case sql5.PropertyName0 when ‘FILEVERSION’ then
sql5.PropertySTRValue0 end) as [SQL CU Version]
from v_r_system sys1
left join v_gs_custom_SQL16_Property0 sql5 on sys1.ResourceID=sql5.ResourceID
where
sql5.PropertyName0 in (‘SKUNAME’,’SPLevel’,’version’,’fileversion’)
group by sys1.Netbios_name0
union

— SQL 2014
select
sys1.Netbios_name0 as [Computer Name]
,max(Case sql4.PropertyName0 when ‘VERSION’ then
(case
when sql4.PropertySTRValue0 like ‘9.0%’ then ‘SQL 2005’
when sql4.PropertySTRValue0 like ‘10.5%’ then ‘SQL 2008 R2′
when sql4.PropertySTRValue0 like ’10.%’ then ‘SQL 2008′
when sql4.PropertySTRValue0 like ’11.%’ then ‘SQL 2012′
when sql4.PropertySTRValue0 like ’12.%’ then ‘SQL 2014′
when sql4.PropertySTRValue0 like ’13.%’ then ‘SQL 2016′
when sql4.PropertySTRValue0 like ’14.%’ then ‘SQL 2017’
else ‘SQL Other’ End)
end) as [SQL]
,max(Case sql4.PropertyName0 when ‘SKUName’ then
sql4.PropertySTRValue0 end) as [SQL Type]
,max(Case sql4.PropertyName0 when ‘SPLEVEL’ then
sql4.PropertyNUMValue0 end) as [SQL Service Pack]
,max(Case sql4.PropertyName0 when ‘VERSION’ then
sql4.PropertySTRValue0 end) as [SQL Version]
,max(Case sql4.PropertyName0 when ‘FILEVERSION’ then
sql4.PropertySTRValue0 end) as [SQL CU Version]
from v_r_system sys1
left join v_gs_custom_SQL14_Property0 sql4 on sys1.ResourceID=sql4.ResourceID
where
sql4.PropertyName0 in (‘SKUNAME’,’SPLevel’,’version’,’fileversion’)
group by sys1.Netbios_name0
union

— SQL 2012
select
sys1.Netbios_name0 as [Computer Name]
,max(Case sql3.PropertyName0 when ‘VERSION’ then
(case
when sql3.PropertySTRValue0 like ‘9.0%’ then ‘SQL 2005’
when sql3.PropertySTRValue0 like ‘10.5%’ then ‘SQL 2008 R2′
when sql3.PropertySTRValue0 like ’10.%’ then ‘SQL 2008′
when sql3.PropertySTRValue0 like ’11.%’ then ‘SQL 2012′
when sql3.PropertySTRValue0 like ’12.%’ then ‘SQL 2014′
when sql3.PropertySTRValue0 like ’13.%’ then ‘SQL 2016′
when sql3.PropertySTRValue0 like ’14.%’ then ‘SQL 2017’
else ‘SQL Other’ End)
end) as [SQL]
,max(Case sql3.PropertyName0 when ‘SKUName’ then
sql3.PropertySTRValue0 end) as [SQL Type]
,max(Case sql3.PropertyName0 when ‘SPLEVEL’ then
sql3.PropertyNUMValue0 end) as [SQL Service Pack]
,max(Case sql3.PropertyName0 when ‘VERSION’ then
sql3.PropertySTRValue0 end) as [SQL Version]
,max(Case sql3.PropertyName0 when ‘FILEVERSION’ then
sql3.PropertySTRValue0 end) as [SQL CU Version]
from v_r_system sys1
left join v_gs_custom_SQL14_Property0 sql3 on sys1.ResourceID=sql3.ResourceID
where
sql3.PropertyName0 in (‘SKUNAME’,’SPLevel’,’version’,’fileversion’)
group by sys1.Netbios_name0
union

— SQL 2008
Select
sys1.Netbios_name0 as [Computer Name]
,max(Case sql2.PropertyName0 when ‘VERSION’ then
(case
when sql2.PropertySTRValue0 like ‘9.0%’ then ‘SQL 2005’
when sql2.PropertySTRValue0 like ‘10.5%’ then ‘SQL 2008 R2′
when sql2.PropertySTRValue0 like ’10.%’ then ‘SQL 2008′
when sql2.PropertySTRValue0 like ’11.%’ then ‘SQL 2012′
when sql2.PropertySTRValue0 like ’12.%’ then ‘SQL 2014′
when sql2.PropertySTRValue0 like ’13.%’ then ‘SQL 2016′
when sql2.PropertySTRValue0 like ’14.%’ then ‘SQL 2017’
else ‘SQL Other’ End)
end) as [SQL]
,max(Case sql2.PropertyName0 when ‘SKUName’ then
sql2.PropertySTRValue0 end) as [SQL Type]
,max(Case sql2.PropertyName0 when ‘SPLEVEL’ then
sql2.PropertyNUMValue0 end) as [SQL Service Pack]
,max(Case sql2.PropertyName0 when ‘VERSION’ then
sql2.PropertySTRValue0 end) as [SQL Version]
,max(Case sql2.PropertyName0 when ‘FILEVERSION’ then
sql2.PropertySTRValue0 end) as [SQL CU Version]
from v_r_system sys1
left join v_gs_custom_sql_property_2_00 sql2 on sys1.resourceid=sql2.ResourceID
where
sql2.PropertyName0 in (‘SKUNAME’,’SPLevel’,’version’,’fileversion’)
group by sys1.Netbios_name0
union

— SQL 2005
Select
sys1.Netbios_name0 as [Computer Name]
,max(Case sql1.PropertyName0 when ‘VERSION’ then
(case
when sql1.PropertySTRValue0 like ‘9.%’ then ‘SQL 2005’
when sql1.PropertySTRValue0 like ‘10.5%’ then ‘SQL 2008 R2′
when sql1.PropertySTRValue0 like ’10.%’ then ‘SQL 2008′
when sql1.PropertySTRValue0 like ’11.%’ then ‘SQL 2012′
when sql1.PropertySTRValue0 like ’12.%’ then ‘SQL 2014′
when sql1.PropertySTRValue0 like ’13.%’ then ‘SQL 2016′
when sql1.PropertySTRValue0 like ’14.%’ then ‘SQL 2017’
else ‘SQL Other’ End)
end) as [SQL]
,max(Case sql1.PropertyName0 when ‘SKUName’ then
sql1.PropertySTRValue0 end) as [SQL Type]
,max(Case sql1.PropertyName0 when ‘SPLEVEL’ then
sql1.PropertyNUMValue0 end) as [SQL Service Pack]
,max(Case sql1.PropertyName0 when ‘VERSION’ then
sql1.PropertySTRValue0 end) as [SQL Version]
,max(Case sql1.PropertyName0 when ‘FILEVERSION’ then
sql1.PropertySTRValue0 end) as [SQL CU Version]
from v_r_system sys1
left join v_gs_custom_sql_property_legacy_2_00 sql1 on sys1.ResourceID=sql1.ResourceID
where sql1.PropertyName0 in (‘SKUNAME’,’SPLevel’,’version’,’fileversion’)
group by sys1.Netbios_name0

This might not be the prettiest query every created or the smartest way (there are alot smarter people out there) so don’t go flaming it’s not optimized. It does the job : )

/Peter

Techdays 2017 Pre-Conf Slides

Me and Jörgen Nilsson (@ccmexec) did a pre-conf together at Techdays in sweden. And after much slacking here are now the slide deck from that pre-conf.

Here is the link to download the slidedeck!
https://1drv.ms/b/s!ArAh2CEqOjRkk-8ZDAVJ1vRqi8Glxg

Techday2017

/Peter

Techdays 2017

I have the great honor of presenting at TechDays sweden this year. I will be doing a pre conf together with Jörgen Nilsson about Client management. We will show of tips and trix, give some insight on how to surive the Windows As A Service change and talk about the future of client management.

Make sure to reserve your seat now and we will see you there. For more information check out the preconf site for TechDays here http://tdswe.se/events/windows-10-client-management-now-and-in-the-future-level-300/

Hope to see you there!

/Peter

ConfigMgr 1703 Technical Preview

ConfigMgr 1703 TP has just been released and I am really exited by all the new features! Three of the ones you should check out are the Collapsible task sequence groups, the ability to control Windows Analytics and the direct links to applications in software center

Collapsible Task Sequence Groups

MDT has had this for a long while but now ConfigMgr gets it as well. This will help out while editing a task sequence. And it looks a bit like this

Collapse

Windows Analytics

There is now a new settings group in the client settings that’s called Windows Analytics and there you can enter your Commercial ID (found in the settings of OMS) and select the type of telemetry data sent to Windows Analytics.

It looks a bit like this

CommericialID

When you get data back you can connect Windows Analytics with ConfigMgr and then get collections based on the data in Windows Analytics. For instance a collection with all machines that are ready for the next version of Windows without known upgrade issues.

Shiny!

Create direct links to applications in Software Center

So one request that has been around for a while is the ability for admins to give end users a direct link to the install section of an app in software center. This has previously been done with a workaround and calling the WMI methods involved. Starting with 1703 you can now easily deploy your own link as URL links.

Its pretty straight forward, create a URL link specify the link to be Softwarecenter:SoftwareID=<ApplicationID>

To find the ID either use powershell and the Get-CMApplication command or use the gui end show the column named “CI Unique ID”

You will then end up with a URL looking something like this

Softwarecenter:SoftwareID=ScopeId_96EF26AC-1571-4633-9CE4-1A51DCC38B84/Application_3e312927-bcd9-4fea-8066-0e407d051037

Note that this new feature requires the new agent version available with 1703 and does not work with previous agent versions.

Below is a short script that can help you easily create these shortcuts. Just run it on your CM Server or a machine with the console installed. Select the applications you want and it will create the shortcuts on your desktop ready for distribution to other machines.

<#
Created:     2017-03-31
Version:     1.0
Author :     Peter Lofgren
Twitter:     @LofgrenPeter
Blog   :     https://syscenramblings.wordpress.com

Disclaimer:
This script is provided "AS IS" with no warranties, confers no rights and
is not supported by the author

Updates
1.0 - Initial release
#>

# Import the ConfigurationManager.psd1 module
Import-Module "$($ENV:SMS_ADMIN_UI_PATH)\..\ConfigurationManager.psd1"
# Set the current location to be the site code.
Set-Location "$((Get-PSDrive -PSProvider CMSite).Name):"

#Get Application Name
$AppName = Get-CMApplication | Select LocalizedDisplayName | Out-GridView -PassThru
foreach ($App in $AppName) {
  $Application = Get-CMApplication -Name $App.LocalizedDisplayName

  #Get Application ID
  $ID = ($Application.CI_UniqueID -split "/")[0] + "/" + ($Application.CI_UniqueID -split "/")[1]

  #Create URL Link on desktop
  $Shell = New-Object -ComObject ("WScript.Shell")
  $Favorite = $Shell.CreateShortcut($env:USERPROFILE + "\Desktop\$($App.LocalizedDisplayName).lnk")
  $Favorite.TargetPath = "SoftwareCenter:SoftwareID=$ID";
  $Favorite.IconLocation = "C:\Windows\ccm\SCClient.exe, 0";
  $Favorite.Save()
}

$Favorite.Save()

If you want to read more about the other new features check out the post by the team here https://blogs.technet.microsoft.com/enterprisemobility/2017/03/30/update-1703-for-configuration-manager-technical-preview-branch-available-now/

/Peter

System Center ConfigMgr 1702

Here we go again. New version of ConfigMgr! This time around it brings a bunch of new cool features and improvements. It also brings along the end of the 2008 era for site servers and SQL servers.

This is all good news but it requires some planning and managinig before an upgrade can be done if you are still running Windows Server 2008 or SQL server 2008.

For a complete list of what’s new and removed check out the official documentation here.

https://docs.microsoft.com/en-us/sccm/core/plan-design/changes/whats-new-in-version-1702


Happy deploying!

/Peter

Keeping Track of PowerShell versions

In today enterprises many are faced with the challenge of managing both Windows 7, 8, 8.1 and 10. This means that most have a multitude of PowerShell versions out there which in turn does not ease the management tasks faced.

If you are running ConfigMgr 2012 or later you have access to one of my favorite features called Compliance Settings. Use this feature you can easily keep track of your environments different settings and measure compliance. One of the things I like to measure is the current running PowerShell version. I do this for two reasons. Number one, I want to now that my systems are running the version set out as a baseline. Number two is that if they are not running the correct version I get an easy way of finding them all and hence an easy way of correcting it.

So the tasks including creating a Configuration Item, linking it to a Configuration Baseline, deploying said baseline to a collection of workstations and creating a collection of devices that are not running the correct version.

Step 1 – Creating the Configuration Item

In your ConfigMgr console find the Assets and Compliance workspace and then under Compliance Settings you will find Configuration Items.

Create a new one and give it a name, I will be using “PowerShell Version”. Make sure that Settings for device managed with ConfigMgr Client is set to “Windows Desktops and Servers (custom)”.

In the next pane select the appropriate Operating Systems that this can be run on. Hint, Windows XP does not support PowerShell.

On the settings pane, hit New and in the configuration set a Name, again “PowerShell version” works just fine. Set the Setting type to “Script” and the datatype to Integer. Hit the “Add Script” button for Discovery script and paste in the following script and then hit OK.

[int]$Version = $PSVersionTable.PSVersion.Major
return $Version

On the Compliance Rules pane hit New and give the Rule a name. I’m calling it BaselineVersion. Hit the browse button and select your Current CI and the Version setting we just created. The rule type should be set to Value and in the comply part set the value returned must “Equal” and then set your desired baseline version. 4 will give you an OK on Windows 8.1 and Windows 10 and 5 will only give you an OK on Windows 10 (this assumes you have not previously upgraded your WMF versions). Hit OK and then Next.

Review your setting on the summary pane and hit next when ready to create the Configuration Item

Step 2 – Creating a Configuration Baseline

Head over to the Configuration Baselines workspace and create a new baseline. Please note this can both be included in previously created baselines but I prefer a separate for this so I can later use the non compliance feature. Give the Baseline a name, “PowerShell”. Hit Add, Select Configuration Item and select your previously created CI.

Step 3 – Deploying the Baseline

This should feel very normal to most of you since it’s the same procedure as deploying any application or client setting. Right click your baseline and select deploy. The wizard will not look like the usual deployment wizards but all you have to do is select a collection to deploy to. I recommend avoiding deploying it to the built-in collections and instead do two deployments if you want to monitor both servers and clients. Before you hit OK change the Schedule to suite your response times. Default is 7 days which in a small environment can be forever but in a large environment it just around the corner.

Step 4 – Creating the non compliant collection

The last step is to create that all needed collection which you can deploy the new Windows Management Framework too. select your newly created baseline, look for a tab named Deployments a the bottom of the console. In this view you can see the collection the baseline has been deployed to.

Now right click the collection, select “Create New Collection” and then select “Non-Compliant”. Follow the new Collection wizard and not that the rule for membership is premade.

noncompliance

Last notes

Now all that remains is waiting for the devices to report back status and then end up in the Non-Compliant collection so you can remedy them.

For your Windows 7 machines please note that if you have not previously upgraded Windows Management Framework you will need to install both WMF4 and WMF5. WMF4 is a prerequisite for WMF5 and both require a reboot to complete. This might be a good time for a small custom task sequence.


/Peter

Windows 10 Notes From The Field – Q&A

Last week @jarwidmark and myself held a live session about windows 10 deployment notes from the field and we had ALOT of good questions.

Here are the questions and answers from the session

Q: How well does the performance of an NVMe drive compare to an M2 SSD?
A: There are both M2 NVMe and M2 SSD drives available at the current time. However, the NVMe drives are a different type of drives even if they are connected using the slot type. NVMe will always be faster but depending on what you need to do it might not be economical.

Q: Can Secure Boot be disabled and enabled after Windows 10 installation?
A: Yes, Secure Boot can be disabled/enabled after Windows installation. Note that turning UEFI on/off is not the same thing!

Q: Is peercache similar to a product such as 1E Nomad?
A: Yes, peerchache is very similar to those types of products. What you need to remember is that peercache has now been around for all of 2 months while products similar third party products have been out for a couple of years. There is a good write up about this topic made by 2Pint Software found here https://2pintsoftware.com/peer-cache-in-configmgr-current-branch-first-impressions/

Q: What’s the best way to upgrade from Windows 7 to Windows 10 1607 in place?
A: As of right now the best way is using the Replace scenario so backup the current computer and redeploy it as a new computer while restoring the settings and documents. This will enable you to turn on UEFI+SecureBoot and any other new features you desire.

If you do a normal in-place upgrade there is currently no way of switching from Legacy BIOS to UEFI and thus you will not be able to use all the new cool features of Windows 10.

Q: how do you prevent Windows 10 from automatically uninstalling software it deems “not compatible” when doing Windows update? Example: Cisco VPN client app, when updating versions (i.e. 1507->1511)
A: Don’t use Windows Update, use sequencing instead. Either with MDT or SCCM. That way you can control before, during and after. Giving you the tools you need to get the job done. In this case making sure the software is reinstalled or upgrade as part of the in-place upgrade.

A good starting point can be found here http://deploymentresearch.com/Research/Post/533/Improving-the-ConfigMgr-Inplace-Upgrade-Task-Sequence

Q: For the in-place upgrade Task Sequence, is it possible to add Cumulative Update to the image rather than adding the CU to the TS? Running a Cumulative Update during the TS adds a lot of time to the deployment.
A: Yes, you can add both CUs and Security fixes to a install.wim file. That is fully supported. However, as it will use offline servicing to do so the patches won’t be installed until the machine is booted up and during the initial boot they will install. This will take the same amount of time as adding them as applications during the TS.

Q: Which OSs are supported by MDT 8443?
A: Windows 7 and forward. Note that MDT 8443 requires ADK1607 and that ADK has issues with Windows 7 and driver injection when running on SSD drives.

Q: Is the best way to customize default pinned apps in the Win 10 task bar still via a run-once logon script?
A: No, use the start and taskbar layout xml file instead. More info on that can be found here https://technet.microsoft.com/en-us/itpro/windows/manage/windows-10-start-layout-options-and-policies

Note that taskbar pinning using xml requires Windows 10 1607.

Q: Have you seen any new hardware components with no Win7 drivers?
A: Yes, not all new models support Windows 7. This is due to instruction sets in some of the Skylake CPUs by Intel. Most vendors have a number of models/configurations that do support Windows 7 still. Expect this to diminish now that Kaby Lake is out and going forward with new CPUs.

Q: With Win 7/8.1 we would use Copyprofile, configure items in the captured image, and that worked great. Since Copyprofile is a no-go with Win10 it seems, what is the best approach going forward? WICD? Don’t configure in captured image, but apply during deployment TS?
A: Microsoft is moving towards less IT configuration and more personal configuration by end-users. This makes it less worthwhile doing customizations but when you need to do them you have a couple of options. Do the in the deployment TS or use GPOs. Since in-place upgrade is going to be the way between versions and you can’t customize the install.wim file moving them elsewhere will be needed.

Q: Is it better to remove Appx packages from win 10 via a powershell script during OS deployment, or via applocker (so that they never get installed for the users) anyone have experience/comparison to both
A: Removing Appx packages can only be done with PowerShell. Applocker will not remove them only block them from being used. If you want to scale down on the apps make sure to remove AppX packages and the AppX provisioned packages.

Q: Why don’t use ConfigMgr for reference images?
A: Until very recently that was not an option due to the fact that ConfigMgr will install the client as part of deployment and we want to avoid that. We still prefer MDT due to the fact its smaller, needs to infrastructure to work, its much faster and you also get a profile that can be customized to some extent.

Q: In your experience, has anyone needed hardware upgrades to go from win7 to win10? Or are real-world HW requirements the same?
A: This is a split question. If a model is supported no they won’t need an upgrade x64 requirements for Windows 7 and 10 are the same. Windows 10 will even be kinder to your hardware giving you more bang for your buck.

The thing to lock out for is of course that old models might not be vendor supported for Windows 10 and a lot of older models does not support full UEFI. Thus, for those models you won’t be able to turn on features like, Device guard and Credential guard.

Q: Would MDT Version: 6.2.5019.0 work with Win 1607, if I was to start testing deployment?
A: No, you will need a newer ADK and that is not supported with the old versions of MDT. The newer version of MDT also contains a massive amount of bugfixes so make sure to upgrade MDT instead.

Q: Does CM1610 with MDT 8443 support ADK 1511? I ask because we have to use 802.1x port authentication in our boot images and that is broken in ADK 1607.
A: Kind of, 1606 does support ADK1511 and I have not seen statements that 1610 requires ADK1607 to work. Its more a question on which OS you want to deploy. Check the link for support statement on ADK and ConfigMgr from the Microsoft Team.
https://blogs.technet.microsoft.com/enterprisemobility/2016/09/09/configuration-manager-and-the-windows-adk-for-windows-10-version-1607/

Q: What was the package to add for Win 10 v1607 in MDT to fix WU issue?
A: Make sure to add the latest CU for November that is KB 3200970 http://support.microsoft.com/?kbid=3200970 together with servicing stack update KB3199986 https://support.microsoft.com/en-us/kb/3199986

Q: Adding the CU via a Package, but it still appears to download it from WU. Also, tried to add it the image via DISM, but same result. Any suggestions on how to prevent it from downloading?
A: This is a known issue that can be read from the KB article. To avoid it install them as applications before the first Windows Update step runs.

Q: KB3197954 is superseded so just add in the next Cumulative Update for Windows 10 Version 1607? do the next one have a working WU agent or do a first need to install this one?
A: No, all CUs contains all the previous month’s patches so the latest one will cover everything you need.

Q: What could we expect roadmap wise, with MDT and SCCM, compared to roadmap of Win 10? Will MDT / SCCM keep up?
A: Both ConfigMgr and MDT is dedicated to staying current with Windows 10. This means that MDT will be updates when needed for deployment and ConfigMgr will get continues releases to add features and fix bugs. Just this year we have seen 3 production releases of ConfigMgr (1602, 1606 and 1610)

Q: What’s the top benefits using MDT+ConfigMgr together?
A: MDT adds about 280 built-in features through scripts. You may of course build that yourself using native ConfigMgr but I have more fun things to do with my time. And if you build them yourself you will have to support them. MDT on the other hand is supported by Microsoft.

Q: Do you recommend custom Windows10 images and what is your go to image creation tool?
A: Always use MDT for reference image creation. I recommend using custom images for bare metal deployment so you can add in things your end users will need, like Visual C++ runtimes and .Net Framework. For upgrades, custom images are not supported so you will need both.

Q: When creating a W10 ref image, would you recommend applying the latest CU offline or online?
A: Both work but if you want to save time do them online otherwise it will redownload the patch to apply certain things again.

Q: Deploying with 1607 ADK working with win 7 deployment?
A: There is one big issue using the ADK 1607. Driver injection on Windows 7 with ADK1607 will fail when running on SSD drives. Using a ADK1511 boot image will solve that issue.


Hope this has helped you out with your deployments

/Peter