Update 2016-10-20: VL media has been release and should be used for production environments. I have also added the servicing update for 2016 that is needed to get a more complete image.
During Ignite Windows Server 2016 was released as an Eval product. This means you can now download and start testing the RTM version of 2016 and prepare for when the volume license bits arrive sometime later this fall.
As with previous version of Windows Server it makes sense to create a reference image to include needed zero day patches and Visual C++ runtimes for any applications you might need to run.
To create a reference image we use Microsoft Deployment Toolkit and guidance on how to set that up can be found on TechNet here: https://technet.microsoft.com/en-us/itpro/windows/deploy/create-a-windows-10-reference-image The same principals for Windows 10 applies to Windows Server 2016 with a few differences.
So lets start with importing the operating system this is the same as on the client side, just keep in mind to keep the folder name short to avoid issues with filenames in subfolder getting to long.
Next we create the a Package folder and import the zero day patch with fixes for Storage Spaces Direct (S2D). The patch is at current writing missing a knowledge article but can be found in the update catalog. Search for KB3192366 or use this link http://catalog.update.microsoft.com/v7/site/Search.aspx?q=3192366
As KB3192366 is an update rollup you will also need the matching service stack update. For 2016 and Windows 10 that is KB3176936 found here http://support.microsoft.com/?kbid=3176936
When the folder has been created and the patch imported it should look something like this
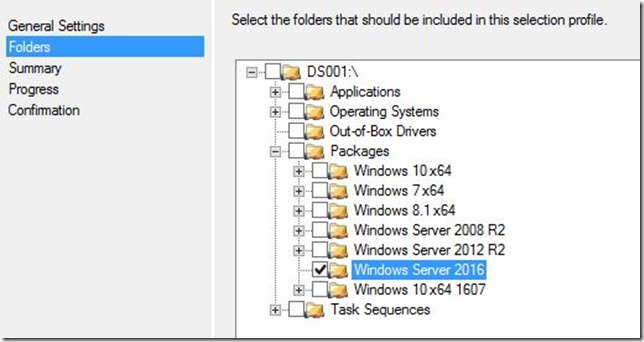
Continue with creating a Selection Profile to make sure that when the image is deployed only the relevant patches for WS2016 is imported. Expand the Advanced Configuration in MDT, select the node called Selection Profiles. Create a new profile and select the folder created in the step above.
We also need an application to install the Visual C++ runtimes to make it as easy as possible use the following from the friendly bunny https://deploymentbunny.com/2014/09/25/nice-to-havevb-script-wrapper-for-all-vc-installers-to-be-used-in-mdt/
Next you need to create the task sequence by following the short wizard. When the sequence is created there are a couple of things to sort out.
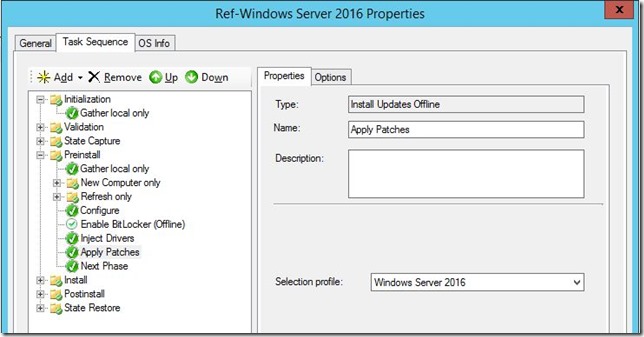
First off we need to use the selection profile we created earlier. To do that open up the sequence and in the Preinstall section find the step called Apply Patches. To the right you will find a dropdown that is preset to All Packages, this needs to be changed to the Selection Profile created.
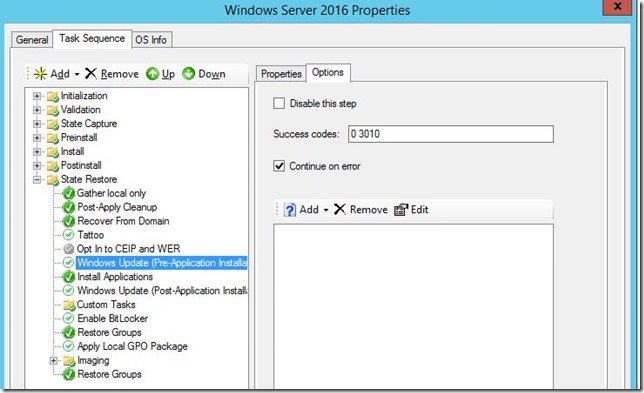
The second item to change is to turn on Windows Update in the sequence which is disabled by default. The two Windows Update steps can be found in the State Restore phase. Make sure to untick the Disable this step check box for each of them.
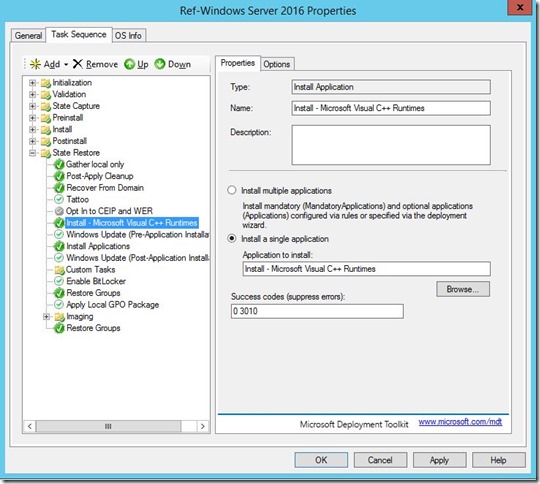
Add the C++ runtimes application to your sequence just above the first Windows Update step to make sure that any patches available for them will be applied as well.
The last thing is to change the default behavior of Windows Update. To to that we need to change a value in the unattend.xml file used by this sequence. Browse to your deployment share and to the Control folder. In here there will be a folder with the same name as the ID of your newly created sequence. Inside of that folder you will find the unattend.xml file, edit the file with Notepad or any other xml compatible editor.
Find the OOBE Section and the value called ProtectYourPC. Change the value from 1 to 3. This will disable Windows Update until MDT is ready to use it and MDT will the turn the feature back on.
That’s it your all set. This can now be run as part of your image factory setup, as a stand alone sequence with either VmWare or Hyper-V as the virtual machine platform.
If you want more information on the Image Factory check Mikes blog here https://deploymentbunny.com/2014/01/06/powershell-is-king-building-a-reference-image-factory/
And if you want more detailed information on the setup and how to skip wizard panes during your reference image creation check Johan’s blog here http://deploymentresearch.com/Research/Post/521/Back-to-Basics-Building-a-Windows-7-SP1-Reference-Image-using-MDT-2013-Update-2
Happy deploying!
/Peter


